Distortion
Distortion effects focus on the creation of a range of audio clipping artifacts that can add character and attitude to sounds—or destroy them completely. Studio One Pro includes the following distortion-oriented processors:
Ampire
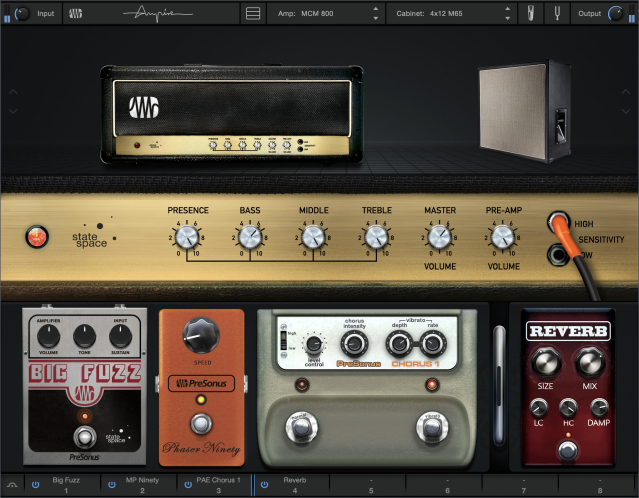
Ampire is a powerful and versatile collection of guitar- and bass-amplifier models based on our proprietary State Space Modeling technology, with precise emulation of every component in the signal path. Convolution-based speaker cabinets and microphones play a vital role, with variable mic positioning and phase. Signals can be processed pre- and/or post-amplifier by a bevy of effect stompboxes, some of which employ State Space Modeling of their components. Use Ampire with guitars, basses, or any audio signal to create spot-on emulation of guitar amps and cabinets and a rougher, harmonically-enriched sound.
The Ampire window is divided into four main sections:
- Toolbar: This runs along the top of the Ampire window, and provides the basic functions such as input / output levels, window configuration, amp / cabinet selectors, and access to the microphone settings and a tuner.
- Gallery: The first section under the toolbar allows visual selection and display of the amps and cabinets models. It can be hidden to reduce the overall size of the Ampire window.
- Edit section: The next section houses the controls for the selected amplifier model. It is always visible.
- Pedalboard: The bottom of the Ampire window is home to the Pedalboard, which allows you to add up to eight effects units to the signal path and configure them however you want. These effects units are also known as Stomps.
Note that the Pedalboard is also available as an independent effects plug-in, which can also contain up to eight Stomps. More about that later.
Each of these four sections is described in the following paragraphs.
Toolbar

The gateway to Ampire is the toolbar, where component selections are made and basic levels are set. Viewing options are available here too, along with access to a handy tuner and other features.
- Input Level: Trim the input level directly at Ampire’s input to pull up weak instrument signals or to attenuate loud, processed signals. With a good input level, the signal is in the optimal range for dynamic distortion within Ampire. Variable from -12 dB to 24 dB. This parameter is not saved with each preset. It stays at a static setting for each instance of Ampire until you change it.
- Show / Hide Views: This button (
 ) hides or reveals different sections of the Ampire window so you only see what you want. Click above the button to toggle the Stage view; click below the button to toggle the Stomps view.
 - Amplifier Model: Select an amplifier model by clicking on the Amp name in the toolbar and choosing an amplifier from the Gallery. Move the cursor over the Gallery images to read a brief description of each amp. You can also use the up / down arrows in the toolbar or on the left side of the Stage view to select an adjacent amplifier.
Changing the amp model changes the characteristics of the entire amplifier, including preamp and power amp distortion and amplification, the differences between channels 1, 2, and 3 (where applicable), and tone stack behavior. Select "None" if you want to bypass the amp head and run the signal directly through the cabinet. - Cabinet Model: Click the Cabinet Model selection box to choose a cabinet from the Gallery. Move the cursor over the Gallery images to read a brief description of each cabinet. You can also use the up / down arrows in the toolbar or on the left side of the Stage view to select an adjacent amplifier. If you want to take the direct output of the amp head, choose the Bypass icon (
 ).
).
You can also drag and drop Impulse Response files into the Mic A, B, and C slots for the User Cabinet (see IR Maker). WAV and AIFF files are supported. - Mic Edit Controls: Click the Mic Edit Controls button to access the settings for the microphones that were used to capture the sound of each cabinet.
- Mic Mix Link: Activate this button to link the microphone channel levels. When linked, moving one fader adjusts all three proportionately, for a combined level of 100%. If a mic level is at 0, moving the other faders adjusts only those channels. Disengage this button for independent control of each microphone level.
- Mic A/B/C Mix: Adjust these faders to achieve the desired level for each mic. When linked (as described above), adjusting one adjusts all three.
- Mic Mute: Each channel has a Mute button. Use the appropriate button to mute only that microphone. Note that this does not affect the Link status of that channel.
- Mic Polarity: Each channel has a Polarity switch. Use the appropriate button to invert the phase of that microphone.
- Mic B/C Delay: These controls simulate moving Mic B and Mic C further from the cabinet. Variable from 0 to 2.9ms.
- Show / Hide Tuner: This button reveals or hides the Tuner window.
- Frequency/Difference: When a pitched input signal is detected, several things happen:
- The name and octave number of the nearest fundamental pitch is shown below the tuning meter (i.e., D#2), with arrows on either side to indicate whether the note is flat, sharp, or in tune (both arrows lit)
- Frequency: The fundamental frequency of the input signal is displayed in Hertz (Hz)
- Difference: The amount of deviation from center is shown as a positive number (sharp) or a negative number (flat).
- Strobe: Click this switch to toggle the tuner between the standard and strobe tuner views.
- Calibration: Click and drag the knob to set the tuning reference frequency, or enter a value manually in the number field. [Ctrl]/[Cmd]-click to reset the value to A=440.00.
- Mute: Activate the Mute switch to defeat the input signal temporarily while the instrument is being tuned. The signal is restored when the Tuner window is hidden. However, if the Ampire Editor window is closed while the Mute switch is still engaged, the input signal is not restored.
- Output Level: Distortion and amplifier emulation may result in massive level changes. Use Output Level to adjust the signal to normal levels. Unlike the Input Level setting, the Output Level value is saved with each preset. Variable from -24 dB to 12 dB.
State Space Amplifier Models

PreSonus used our State Space Modeling technology to perform a component-level analysis of every circuit in these sought-after amplifiers. This enables Ampire to recreate the dynamic behavior and non-linearities that are critical to the distinctive tone and character of tube and semiconductor-based analog circuits.
After an amplifier is selected its controls appear in the middle of the Ampire window (the Edit section). Here's a description of each control.
MCM 800
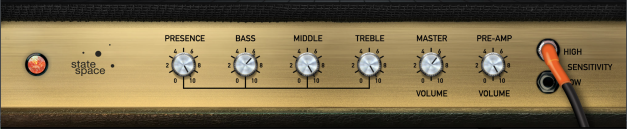
- Tone Controls:
- Presence controls the amount of negative feedback; increasing the value changes the high frequencies and harmonics.
- Bass, Middle, and Treble are basic tone controls for their respective frequency ranges.
- Gain Controls:
- Master Volume controls the final output volume.
- Pre-Amp Volume controls the level of the input signal before it enters the amplifier circuitry.
- Sensitivity: Click one of the connectors to route the signal into the High sensitivity input or the Low sensitivity input.
Dual Amplifier

The channels of the Dual Amplifier model are numbered from right to left. They have similar EQ and tone controls, but each has different gain and circuit characteristics.
- Channel selector: This knob selects channel 1, 2, or 3. You can also use the small selector buttons between the toggle switches to select a channel. The channel indicators have different colors (green, orange, and red) to help you see which is active. The green channel is "clean", while the orange and red channels are more distorted.
- Main Power: There are two options for the power supply characteristics: Spongy or Bold.
- Tone Controls: These are identical for channels 1-3. Bass, Mid, and Treble are basic tone controls for their respective frequency ranges.
- Gain Controls: These are identical for channels 1-3. Presence controls the amount of negative feedback; increasing the value changes the high frequencies and harmonics. Master controls the final output volume for the channel. Gain controls the pre-amp input level.
- Mode switch: Channel 1: Two positions: Clean and Pushed, each with different sound characteristics. Pushed has a boost, so the tone controls contribute less to the sound of Channel 1 in that position.
- Mode switch: Channels 2 and 3: Three positions: Raw, Vintage, and Modern. Each provides sound characteristics that were modeled after different amplifiers from the same manufacturer.
- Rectifier switch: All Channels: Two positions: Diode and Tube. These determine the basic character of the selected channel, which changes the output volume, the harmonic response, and the amount of headroom for that channel.
VC30
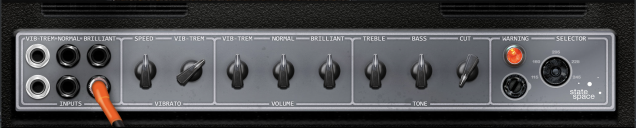
- Channel Inputs: The VC30 has three channels: Vib-Trem, Normal, and Brilliant. Each channel has two inputs on the front panel, arranged vertically. The low-sensitivity inputs are on the top row, and the high-sensitivity inputs are on the bottom row. Each channel corresponds to a section of controls on the right side. The active channel is determined by which input is used.
- Vibrato: The controls in this channel are used when one of the Vib-Trem inputs is connected. Use the Speed selector to choose one of the three speeds. The Vib-Trem selector also has three settings (Vibrato, Off, or Tremolo). Adjust the level with the Vib-Trem control in the Volume section.
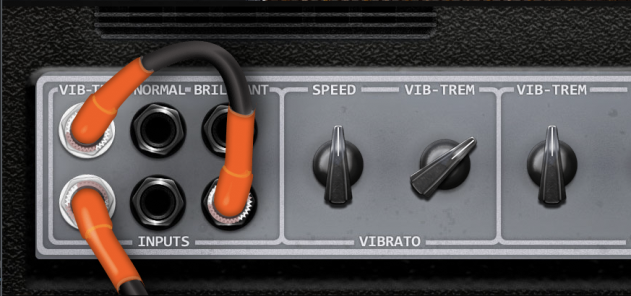
- Volume: Adjust the gain of each channel with the corresponding control in the Volume section. Usually only one channel is active, depending on which input is connected. But when the Vib-Trem and Brilliant channels are "jumpered" as shown below, the gain controls for both channels can be used to achieve the perfect blend.
- Tone: The Treble and Bass controls are dedicated to the Brilliant channel. The Cut control attenuates the high frequencies, and is active for all three channels. 0% = no cut, 100% clockwise = maximum cut.
-
Vib-Trem > Brilliant: The Vib-Trem and Brilliant channels can be patched together and used at the same time. To do this, click input 2 of the Vib-Trem channel, then click it again and a patch cable appears between Vib-Trem input 1 and Brilliant input 2. This shows that the connection has been made.
This "jumpered connection" sends the signal through both the Vib-Trem and Brilliant circuits, so you have the dirt and tone control from the Brilliant channel and the vibrato / tremolo effect from the Vib-Trem channel available. The relevant controls in each channel can be used to modify and blend the two outputs.
Blackface Twin

This well-known amp has two channels (normal and vibrato). Each channel has two input jacks that differ in input volume, as well as a Bright switch.
- Normal Channel: A simple channel with three EQ knobs and a Bright switch. The EQ knob range is from 1 (maximum cut) to 10 (maximum boost); 5 is neutral (no change). With Bright switched on, high frequencies can pass through the volume stage more easily. The effect depends on the Volume setting; when the volume is low, the Bright switch makes a bigger difference.
- Vibrato Channel: The features are identical to the Normal Channel, with the addition of Reverb and Vibrato controls. The Reverb knob controls the amount of spring reverb, with a setting of 1 shutting off the reverb. The Speed and Intensity knobs control the "Vibrato" effect (it's actually tremolo), with a minimum to maximum range of 1 to 10. An Intensity setting of 1 shuts off the Vibrato. The Reverb and the Vibrato Intensity can be toggled between their current value and "Off" by clicking below the appropriate knob.
Amp STV

This amplifier was designed for bass instruments. It has two independent channels, with two inputs per channel (Bright and Normal). The difference between the Normal and Bright inputs is that the Bright input attenuates the low and mid frequencies.
- Channel One: Standard volume and boost/cut EQ controls (treble, midrange, bass), with a set of selector switches that influence the results in each EQ range. Click the desired switch to change its setting.
- ultra hi is a two-position switch: flat (0) or boost (+). It has a significant impact on the high frequencies, especially in combination with the other tone controls.
- mid frequency is a three-position switch: 220 Hz, 800 Hz, or 3000 Hz. This sets the center frequency of the midrange EQ band.
- ultra lo is a three-position switch: cut (-), flat (0), or boost (+). It has a significant impact on the low frequencies, especially in combination with the other tone controls.
- Channel Two: Identical to Channel One, only without the midrange controls.
Pedalboard and Stomp Boxes
The Ampire Pedalboard features a wide variety of Stomp Box effects, including distortion and modulation of all sorts. Up to eight Stomps can be used at once and placed in any order you like (pre- or post-amplifier). Several have sync-to-tempo capabilities. You can even use the same Stomp in several slots if you want.
For added flexibility, the Pedalboard is available as an independent effects plug-in inside the Browser/Effects/PreSonus folder. That way, you can use it as an insert or send effect on any Channel without needing to bypass the amplifier and cabinet models. You can even drag a favorite Stomp between instances of Ampire and the Pedalboard, and vice versa, as long as there's an empty slot available.
Note that when used with Ampire, all Pedalboard effects are placed prior to the cabinets in the audio chain.
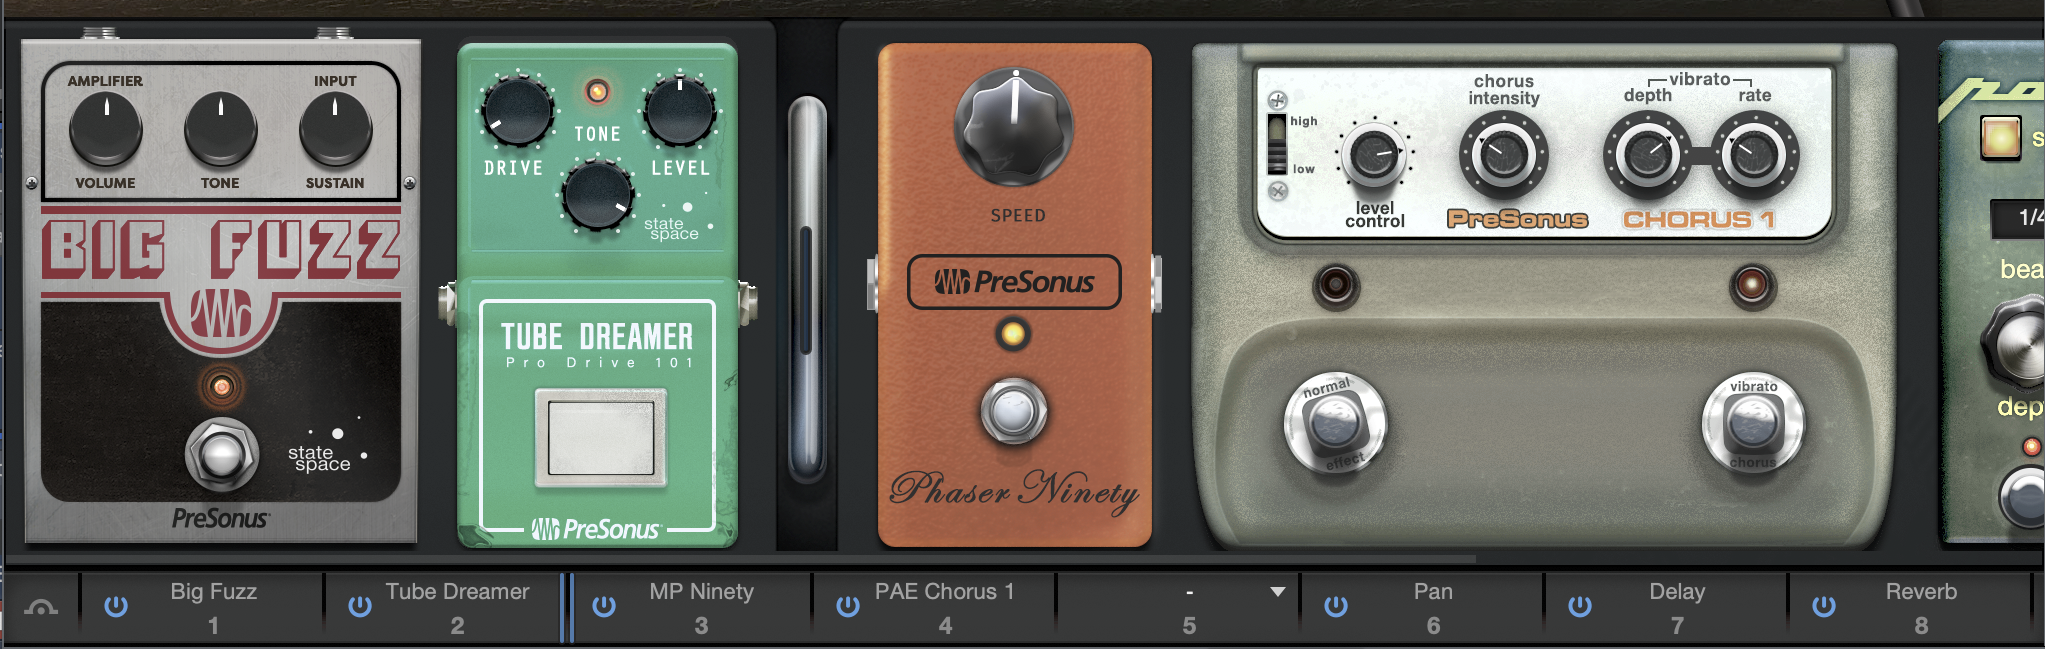
Now let's take a look at the row of buttons beneath the Stomps window. The numbered slots show the names of the selected Stomps in the order they appear in the window above them. An unused slot has no name. Each slot has an on/off switch, and on the far left is one switch to rule them all: it toggles the entire Pedalboard on and off.
Pre-/post amp placement
Notice the double blue line between two of the Stomp slots; that's the dividing line between pre- and post-amplifier effects. Click-drag the blue line to place it between any two Stomps, or even before or after the entire Pedalboard. As it moves you'll see a vertical, silver switch move to the same location in the Stomps window.
Mirrored actions
Many of the actions performed in the Stomps window are mirrored in the Stomps tray, and vice versa. For example:
- Click-drag the silver switch in the Stomps window and the blue line moves too.
- Click-drag a Stomp to a new location and its numbered slot does the same below. Remember that this works both ways.
- Toggle the foot switch of an effect in the Stomps window and the on/off switch in the Stomps tray does it too.
- Hover over a number in the Stomp tray to identify that effect in the Stomps window. Hover over the top of a Stomp to see its number.
This is useful if you're using more than one instance of the same Stomp, for example, and you want to know which is which. It also helps if the Stomps are not located directly above their position numbers in the Stomp tray. Some of them are fat in more ways than one.
Add or remove a Stomp box
To insert a Stomp, right-click in an empty space in the Stomps window or in the Stomps tray. To remove a Stomp, right-click on the Stomp itself or on its numbered slot below. Note that a right-click on a Stomp control opens the Macro/Automation menu instead.
Select a Stomp box
Click the name area of any slot in the Stomps tray to open the Gallery and select an effect for that slot. There are too many to fit in the Gallery window, so be sure to scroll up or down if you don't see the one you're looking for at first.
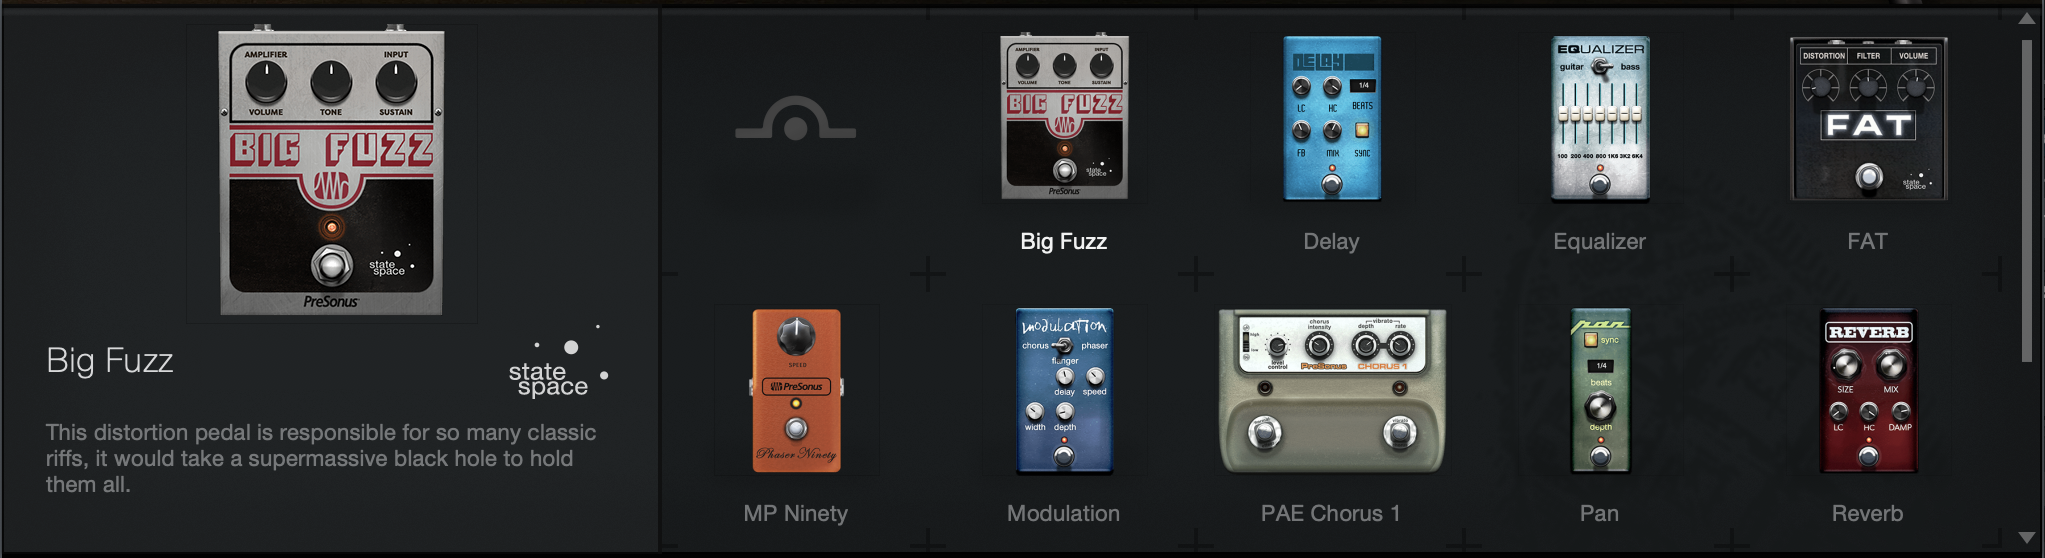
Now let's take a tour of the parameters, Stomp-by-Stomp.
- Bypass:
- This selection leaves the Stomp slot empty.
- Big Fuzz:
This is one of the PreSonus State-Space Modeling effects.- Volume: Controls the level into the Tone circuit.
- Tone: Turn to the left to attenuate high frequencies; turn to the right for more treble, less bass. Tone control is post the two clipping stages.
- Sustain: A pre-pre-amp stage into the Volume circuit. Adds sustain and fuzz.
- Compressor:
The compressor pedal reduces the dynamic range of your signal for additional shaping of your sound. With its two different modes you can dial in the exact amount of sustain that you want.- Gain: Sets the input gain to the compressor.
- Peak: Controls the amount of peak reduction. Higher peak settings result in more gain reduction and more compression.
- Mode: limit / compress: Toggles between two different dynamic ratios. When in limiter mode, peaks are limited more aggressively.
- Delay:
- Speed: Adjusts the delay speed from 0.01 to 10 Hz.
- Sync: Engage this if you want to sync the delay speed to tempo.
- Beats: Selects a beat value for the synced delay speed.
- LC: Sets the frequency of the low-cut filter from 20 Hz to 1 kHz.
- HC: Sets the frequency of the high-cut filter from 1 kHz to 20 kHz.
- Feed: Adjusts the amount of feedback from 0 to 100%.
- Mix: Adjusts the mix of the delayed signal with the original signal from 0 to 50%.
- Speed: Adjusts the delay speed from 0.01 to 10 Hz.
- Equalizer:
- Guitar/Bass: Selects the appropriate style, which adjusts the frequency values for each band of the graphic EQ.
- Band Sliders: Adjusts the level of each EQ band up or down to achieve the desired EQ setting. Click-drag across them to set a quick curve.
- Fat:
This is one of the PreSonus State-Space Modeling effects.- Distortion: Turn to the right to increase the amount of distortion.
- Filter: With this control fully to the left, the Filter is open and high frequencies can pass; fully to the right, the high frequencies are attenuated. Tone control is post-Distortion.
- Volume: Controls the final output level.
- Gate:
The gate pedal completely removes unwanted noise in your signal. No more buzzing and humming in your signal chain! This One-Knob model has the following control:- Threshold: Adjusts the lower limit at which the Gate starts to work. Variable from -96 dB to 0 dB. All signals above the threshold setting are passed through unaffected, whereas signals below the threshold are muted (e.g., pickup hum or noise).
- Modulation:
- Chorus/Flanger/Phaser: Selects the type of modulation.
- Chorus:
- Delay: Adjusts the delay of the chorus signal from 2 to 20 ms.
- Speed: Adjusts the chorus speed from 0.01 to 10 Hz.
- Width: Adjusts depth of delay line modulation, from 0 to 100%.
- Depth: Adjusts the chorus depth from 0 to 100%.
- Flanger:
- Delay: Adjusts the delay of the flanged signal from .2 to 4 ms.
- Speed: Adjust the flanger speed from 0.01 to 10 Hz.
- Sync: Engage this if you want to sync the flanger speed to tempo.
- Beats: Selects a beat value for the synced flanger speed.
- Feed: Adjusts the amount of feedback from 0 to 100%.
- Width: Adjusts the flanger LFO width from 0 to 100%.
- Depth: Adjusts the flanger depth from 0 to 100%.
- Phaser:
- Phase: Adjusts the frequency of the phaser from 240 Hz to 8 kHz.
- Speed: Adjusts the speed of the phaser from 0.01 to 10 Hz.
- Sync: Engage this if you want to sync the phaser speed to tempo.
- Beats: Selects a beat value for the synced phaser speed.
- Feed: Adjusts the amount of feedback from 0 to 100%.
- Width: Adjusts the phaser LFO width from 0 to 100%.
- Depth: Adjusts the phaser depth from 0 to 100%.
- MP Ninety:
- Speed: Controls the phaser speed.
- PAE Chorus 1:
- High/Low: Selects the input sensitivity.
- Level Control: Adjusts the input level.
- Chorus Intensity: Controls the rate and depth of the Chorus effect for Chorus mode.
- Vibrato Depth: Controls the depth of the Vibrato effect for Vibrato mode.
- Vibrato Rate: Controls the rate of the Vibrato effect for Vibrato mode.
- Normal/Effect: This foot switch toggles the effect on and off.
- Mode: Vibrato/Chorus: This foot switch toggles the effect between Vibrato and Chorus modes.
- Pan:
- Speed: Adjust the pan speed from 0.01 to 10 Hz.
- Sync: Engage this if you want to sync the pan speed to tempo.
- Beats: Selects a beat value for the synced pan speed.
- Depth: Adjusts the pan depth from 0 to 100%.
- Speed: Adjust the pan speed from 0.01 to 10 Hz.
- Reverb:
- Size: This control affects several parameters to approximate an overall room size. It adjusts the size of the reverberated signal from 0 to 100%, with lower percentages representing smaller rooms and therefore shorter reverb tails and higher percentages representing larger rooms and longer tails.
- Mix: Adjusts the mix of the reverberated signal with the original signal from 0 to 50%.
- LC: Sets the frequency of the low-cut filter from 20 Hz to 1 kHz.
- HC: Sets the frequency of the high-cut filter from 1 kHz to 20 kHz.
- Damp: Adjusts the dampening of the reverberated signal from 0 to 100%.
- Tremolo:
- Speed: Adjusts the tremolo speed from 0.01 to 10 Hz.
- Sync: Engage this if you want to sync the tremolo speed to tempo.
- Beats: Selects a beat value for the synced tremolo speed.
- Depth: Adjusts the tremolo depth from 0 to 100%.
- Speed: Adjusts the tremolo speed from 0.01 to 10 Hz.
- Tube Dreamer:
This is one of the PreSonus State-Space Modeling effects.- Drive: Turn to the right to increase the Drive amount.
- Tone: Turn to the left to attenuate high frequencies. The tone control is post-Drive.
- Level: Controls the final output stage.
- Tube Driver:
- Amount: Adjusts the amount of drive from 0 to 11.
- Wah-Wah:
- Type Selection Box: Selects the type of wah-wah desired.
- Amount: Adjusts the amount of the wah-wah effect from 0 to 100%, equivalent to rocking a traditional wah-wah pedal forward and backward.
Bitcrusher
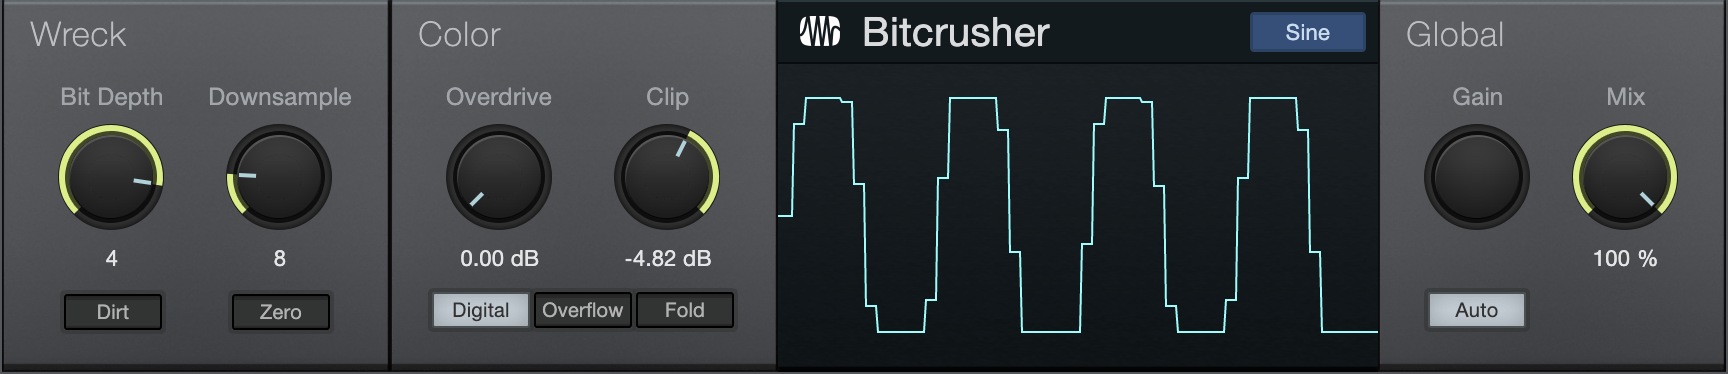
Perfect for audio abuse, Bitcrusher combines overdrive, bit-depth reduction, downsampling and clipping into a single plug-in. Bit depth reduction and down-sampling are both digital resolution-reduction techniques, but each has its own sonic effect. When used in combination, they create a wide variety of tonal options.
The following parameters are available in Bitcrusher:
- Bit Depth: Lets you specify the level of Bit Depth reduction to apply, from 24-bit to 1-bit.
-
- Dirt: Enable this to introduce a high-frequency instability in the Bit Depth reduction effect. Good for creating aggressive sounds.
- Downsample: Lets you specify the level of downsampling to apply.
-
- Zero: Enable this to emphasize the high-frequency ringing effects added by the downsampling process. When disabled, a smoothing interpolation process is applied to the signal, lessening audible artifacts.
- Overdrive: Lets you apply a warm distortion effect, ranging from clean to fuzzy.
- Clip: Lets you set the threshold for the signal clipping effect. At 0 the signal is unaffected, and at settings below 0 the signal is clipped in your choice of the following ways:
-
- Digital: Standard digital clipping. Squarely clips the peaks of the waveform at the chosen threshold.
- Overflow: Inverts and offsets peaks at a faster interval.
- Fold: Introduces harmonics by inverting waveform peaks at the chosen threshold (and at zero).
- Sine: Click this to switch to a real-time view of the Bitcrusher audio output.
- Gain: Adjusts Bitcrusher output gain. Variable from -24 dB to +24 dB.
- Auto: Enable this to set Gain automatically, to match the gain changes created by other Bitcrusher processors.
- Mix: Lets you blend between the dry (0%) and effected (100%) signals.
Red Light Distortion
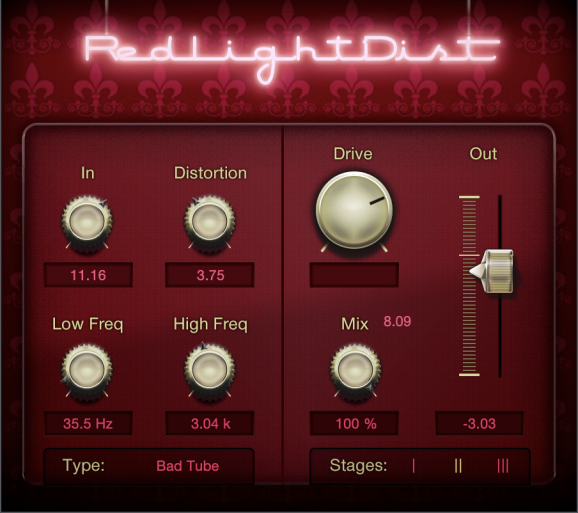
Red Light Distortion is an analog-distortion emulator with several selectable distortion models.
The following parameters are available in Red Light Distortion:
- In: Input gain to the distortion. Variable from -12 dB to 24 dB.
- Distortion: Only for Hard and Bad Tube types, this is the tube working-point adjustment (bias). Variable from 0 to 10.00.
- Low Freq: Filters frequencies below this value from the distorted signal. Variable from 20 Hz to 5 kHz, depending on the High Freq setting.
- High Freq: Filters frequencies above this value from the distorted signal. Variable from 800 Hz to 16 kHz.
- Drive: Amplification during overdrive. Variable from 0 to 11; drive increases a lot between 10 and 11 for really distorted sounds.
- Out: Adjust the output gain of Red Light Distortion. Variable from -12 dB to 24 dB.
- Stages: Number of overdrive stages used serially in the signal path (including filters). Select from 1, 2, or 3 with the horizontal fader.
- Type: Select the type of distortion emulation by clicking on the display and selecting Soft Tube, Hard Tube, Bad Tube, Transistor, Fuzz, or OpAmp from the list.
- Mix: Lets you set a mix between the wet (effected) and dry (unaffected) signals running through the plug-in, allowing for parallel processing effects.