Impact
Impact features a grid of pads into which samples are loaded and played back independently, as with many popular hardware drum-sample players. Each pad has its own pitch, amplifier, and filter controls with accompanying envelopes. There are multiple stereo and mono outputs for each pad, making sophisticated output busing simple.
Make sure to download the sound sets that came bundled with your edition of Studio One Pro. Impact requires the sound set download for sounds and presets to work as intended within the virtual instrument.
Interface Overview
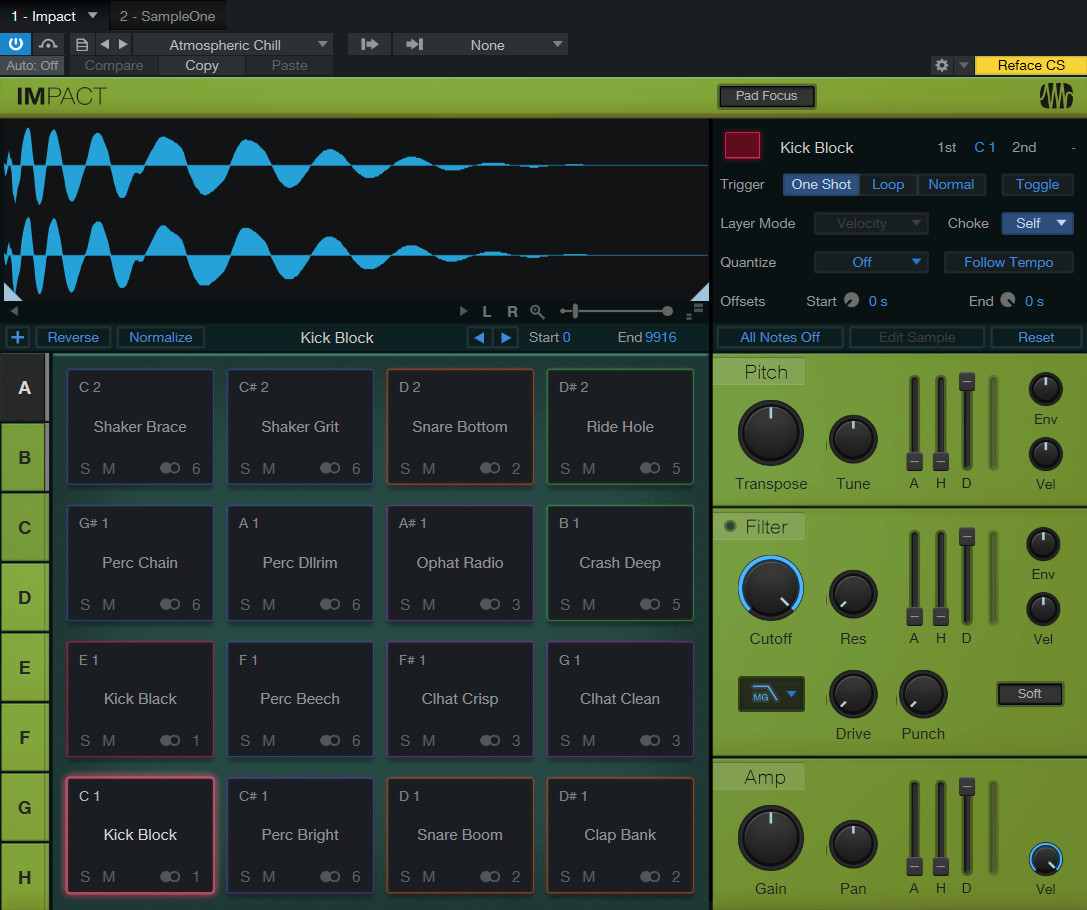
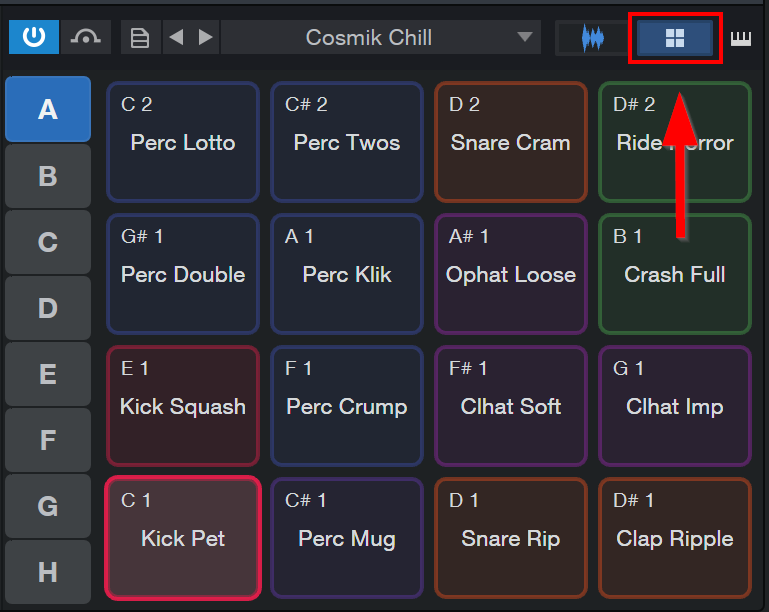
Impact is arranged as a 4x4 grid of pads, with controls for each pad. There are eight selectable banks of 16 pads, labeled A through H. Below each pad are Solo and Mute controls, as well as an Output Channel assignment. Click on any pad to select it and view its parameters, located on the right side of the interface. At the top of the window is the waveform display, which shows the currently selected sample along with controls for setting start and end points. To the right of the waveform display are the sample controls, which let you set playback behavior for the samples on each pad.
Add and Play Samples
To add a sample to a pad, drag any audio clip from the Browser, or any Audio Event or selected range from the Arrange view, directly onto the desired pad. If you drag in a selected range from the Arrange view, the range is bounced to a separate audio file and then added to Impact. Dragging a sample to a pad that already contains a sample replaces the old sample with the new one, by default.
To mute a pad, click the Mute button beneath the pad. To solo a pad, click the Solo button beneath the pad. Note that each pad has its own Pitch, Filter, and Amplifier controls.
To import a drum loop and automatically split its hits across multiple pads, hold [Shift] while dragging the loop onto Impact.
To copy a pad to another pad, hold [Cmd/Ctrl] and drag from one pad to another. Hold [Shift]+[Cmd/Ctrl] to swap two pads. If you would like to copy a pad from one bank to another, use the copy and paste options from the right-click menu described below. Filter, Amp, and other control settings are retained on a pad copy or swap.
A variety of useful actions can be taken by right-clicking a pad and choosing from the drop-down menu:
- Replace Sample: Replace the currently loaded sample with a new one.
- Add Sample: Add a sample to the pad.
- Rename Pad: Assign a new name to the pad.
- Copy Pad: Copy a pad to the clipboard.
- Paste Pad: Paste a copied pad from the clipboard.
-
Paste Parameters: Paste copied pad parameters from the clipboard.
- Clear Pad: Clear all samples from the pad.
- Clear Bank: Clear all samples from all pads in the current bank.
- Play One Shot: Change the Trigger mode for the pad to One Shot.
- Play Loop: Change the Trigger mode for the pad to Loop.
- Play Normal: Change the Trigger mode for the pad to Normal.
-
Insert Matched Instrument Part: Choosing this option will insert a matched instrument part of the selected pad sound to the nearest bar position (relative to the cursor position).
Copying Pad Parameters
Copying parameters between pads is also possible. To copy a pad’s parameters, hold [Alt/Option] and drag from one pad to another. Alternatively, after copying a pad, you can use the “Paste Parameters” option from the right-click menu. Note that Reverse and Normalize are not copied, as they are tied to the sample(s) rather than the pad(s).
Send to New Impact Instrument
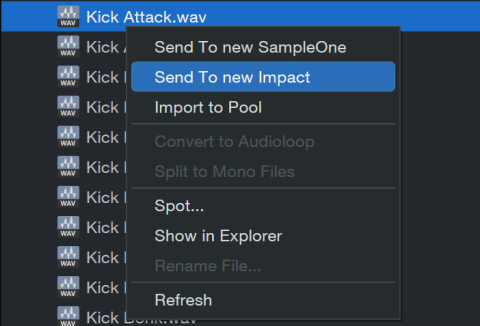
To quickly create a new instrument track with Impact preloaded with a sample or loop, [Right]/[Ctrl] - click onto the loop/sample you would like and select the “Send to new Impact” option from the context menu.
Create Matched Instrument Part from Loop
In order to create a matched Instrument Part from a loop in the browser, drag any audio file/Event to Impact while holding shift key (“slice and spread across multiple pads”):
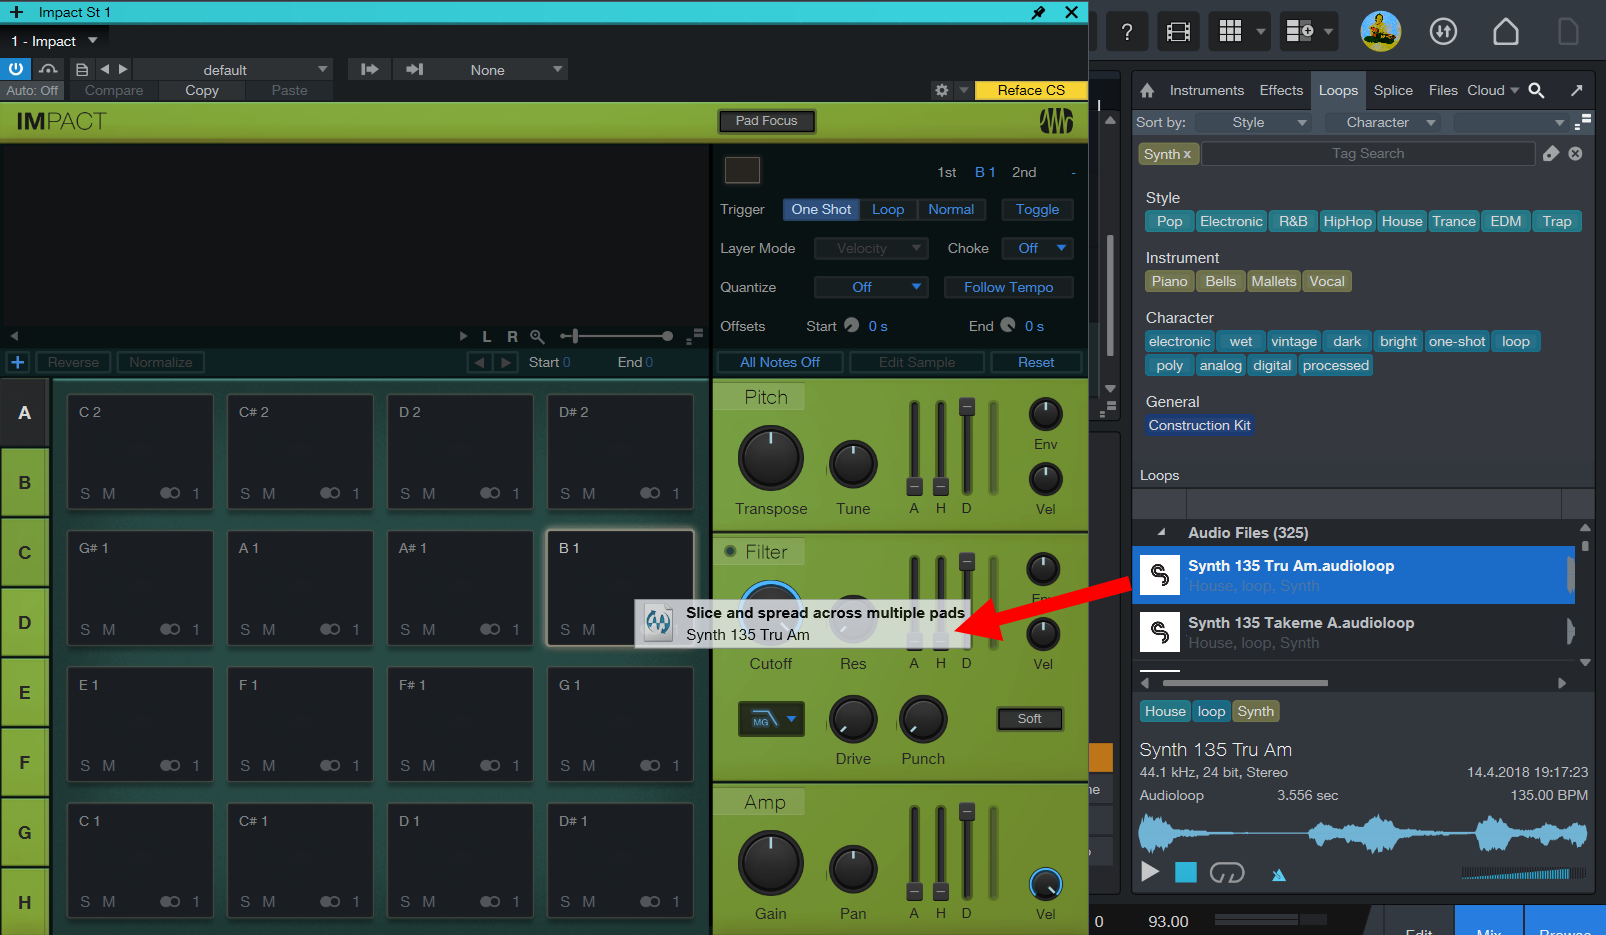
Once you drop the file into Impact, it is spread across multiple pads, and an Instrument Part is also created. The Instrument part will trigger the Instrument’s virtual keyboard as if it was consecutive audio.
After dropping, the new Instrument Part will be placed at the nearest bar position to the time cursor. The notes will be stretched according to the current song tempo if the track's timebase is beats, and the part length will always be 1, 2, 4, 8, etc. bars.
You can edit the new instrument part just as you would with any drum pattern you make in the note editor. This feature may be especially useful if you would like to split audio drum loops in order to modify them. The same option to create a matched instrument part from a loop is available when you use SampleOne.
Multiple Velocity Layers
It is possible to add more than one sample to a pad, enabling you to trigger different samples based on velocity. For instance, you may want to have three different samples for a single snare drum pad: one soft, one medium, and one loud. This way, when you play Impact, the snare drum sounds much more realistic than if you use a single sample.
To do this, select multiple samples in the browser or in your computer's file system, and drag them to a pad.
Waveform Display
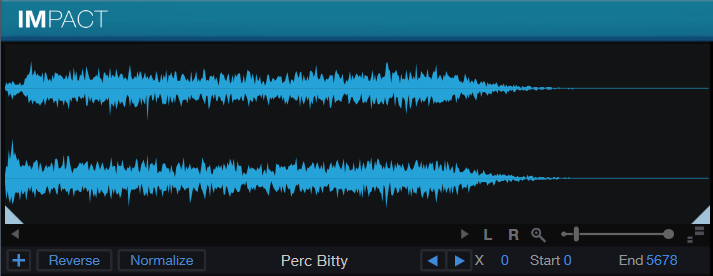
When you select a pad, its currently loaded sample is shown in this display. Here, you can set sample start and end by moving the triangle-shaped markers. If more than one sample is loaded in the pad, you can switch between them by clicking the numbered buttons above the waveform display. You can click-and-drag the demarcations between the sample selector buttons to set the velocity-switching values (for use with the Velocity Layer Mode).
-
Add Sample (+): Choose this option to add an additional sample to this pad.
-
Reverse: Enable this option to reverse the current sample.
-
Normalize: Enable this option to boost the amplitude of the current sample until its highest peak reaches a point just below full scale.
-
Load Next/Previous Sample in Folder: These buttons let you quickly swap the current sample for its neighbor in the enclosing folder. This allows for quick auditioning of a range of samples, to find just the right candidate.
-
X-Fade: In case there are any unwanted clicks due to unfaded samples, this option allows you to add fades (in and out) to samples. This option is enabled by default but only available while the Loop Trigger mode is active.
-
Start and End: Sets the sample start and end in samples.
Sample Controls
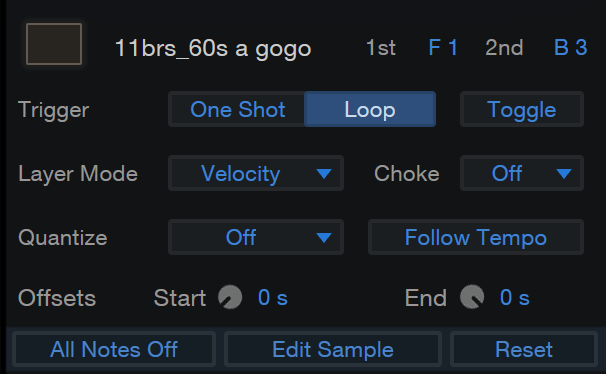
These controls let you fine-tune sample behavior for each pad:
-
Color: Choose a color with which to mark the pad.
-
1st and 2nd Note Assignment: Choose two MIDI note values to trigger this pad.
-
Trigger: Choose from the following options to determine how the sample will be played:
-
Choose One Shot to play the loaded sample once when a pad is struck, no matter how long it is held.
-
Chose Loop to continuously loop the sample as long as the pad is held.
-
Select Normal to begin playing the sample when the pad is struck and held down, and continue playing it until the pad is released.
-
Choose Toggle to begin playing the sample when the pad is struck, and continue playing it (even if looped) until the pad is struck a second time.
-
-
Layer Mode: This parameter lets you choose how multiple samples are treated if loaded onto a single pad.
-
Choose Velocity to switch between the samples depending on pad velocity.
-
Choose Round Robin to step through the samples one by one each time the pad is struck.
-
Choose Random to choose a sample at random each time the pad is struck.
-
Choose Stack to play all loaded samples simultaneously.
-
-
Choke: This parameter lets you specify the relationship between different pads, such as those set up to play closed and open hi-hat cymbals. Choose Self to allow a pad's playback to be stopped when the pad is played a second time (rather than continue to ring out). Choose a Choke group (1-32) to tie the playback of this pad to all other pads also assigned to that choke group.
-
Quantize: This parameter lets you limit your ability to play a pad to a preset rhythmic value. Choose from Off (no rhythmic limits), Bars (once at the start of each bar), Beats (once per quarter note), 1/2-Beats (once per eighth-note), and 1/4-Beats (once per 16th note).
-
Follow Tempo: Enable this option to automatically timestretch the current sample to fit the tempo of the Song. This is most effective when using rhythmic loops, such as drum samples.
-
Offsets: Introduce a playback offset of up to 2.5 seconds at the start or end of the loaded sample.
-
All Notes Off: Press this button to end playback for all currently playing samples.
-
Edit Sample: This button lets you specify individual settings for the currently selected sample, rather than changing those parameters for all samples, as done by default. If after you've made custom alterations to one sample, you wish to reunify all samples under the same settings, press Reset.
Pitch Controls
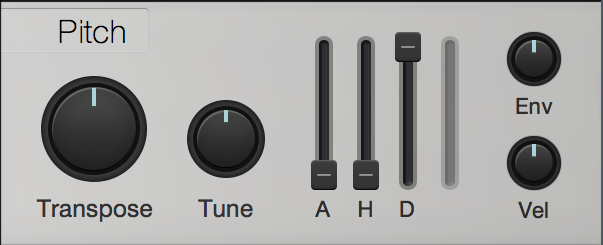
You can modify the pitch for each pad’s sample using the Pitch controls.
- Transpose: Adjusts the transposition in semitones for the selected pad. Variable from -48 to +48.
- Tune: Adjusts the tuning, in cents, for the selected pad. Variable from -100 to 100 cents.
- Pitch Envelope (One-Shot Trigger Mode Only):
- Attack: Adjusts the amount of time from when the pad is triggered to when the envelope value is reached. Variable from 0 s to 20 s.
- Hold: Adjusts the amount of time the envelope value is held after the attack period and before decay begins. Variable from 0 s to 20 s.
- Decay: Adjusts the amount of time it takes after the hold period to return to the envelope value. Variable from 0.98 ms to 20 s.
- Pitch Envelope (Loop and Normal Trigger Modes Only):
- Attack: Adjusts the amount of time it takes to reach the Env value from the original pitch of the sample once a sample has been triggered. Variable from 0 to 20 s.
- Decay: Adjusts the amount of time it takes to reach the sustain level after reaching full volume. Variable from 0 to 20 s.
- Sustain: Adjusts the Sustain level. Variable from -∞ dB to 0 dB. The sustain period continues until the sample trigger stops.
- Release: Adjusts the amount of time it takes to reach the original pitch after sample trigger has stopped. Variable from 0 to 30 s.
- Env: Adjusts the detune range of the pitch envelope in cents. Variable from -4 to +4 octaves. (The default value is 0, meaning the pitch envelope has no effect.)
- Vel: Adjusts the maximum detune value, in cents, that pitch is affected by velocity (the maximum detune value when triggered note velocity equals 127). Variable from -4 to +4 octaves.
Filter Controls
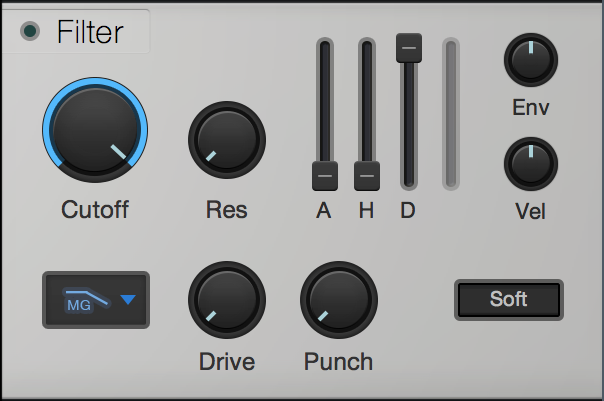
Each pad features a variable filter to allow anything from subtle tonal shaping to heavily processed filter sweeps.
- Cutoff: Adjusts the cutoff frequency of the filter. Variable from 20 Hz to 20 kHz.
- Res: Adjusts the resonance of the filter. Variable from 0 to 100.
- Filter Env (One-Shot Trigger Mode Only):
- Attack: Adjusts the amount of time it takes for the filter cutoff frequency to move from the frequency value to the envelope value once a sample has been triggered. Variable from 0 s to 20 s.
- Hold: Adjusts the amount of time the envelope value is held after the attack period and before decay begins. Variable from 0 s to 20 s.
- Decay: Adjusts the amount of time it takes to return to the cutoff level after reaching the envelope value. Variable from 0 s to 20 s.
- Filter Env (Loop and Normal Trigger Modes Only):
- Attack: Adjusts the amount of time it takes for the filter cutoff frequency to move from the frequency value to the envelope value once a sample has been triggered. Variable from 0 to 20 seconds.
- Decay: Adjusts the amount of time it takes to reach the sustain level after reaching the envelope value. Variable from 0 s to 20 s.
- Sustain: Adjusts the sustain level, which is the mix of the signal filtered at the envelope value with the signal filtered at the frequency value. Variable from -∞ to 0 dB. The sustain period continues until the sample trigger stops.
- Release: Adjusts the amount of time it takes the filter to reach the frequency value after the sample trigger has stopped. Variable from 0 to 30 seconds.
- Env: Adjusts the range of the filter envelope in octaves, relative to the cutoff value. Variable from -8000 to +8000. (The default value is 0, meaning the filter envelope has no effect.)
- Vel: Adjusts the maximum value in octaves affected by velocity . Variable from -100 % to + 100 % (the maximum value when triggered note velocity equals 127).
- Filter Type: Selects the filter type. Choose from LP24 Ladder, LP24 Zero-Latency, LP12 Ladder, BP12 Ladder, HP12 Ladder, LP12 State, BP12 State, HP12 State, and Eco Filter (lowest CPU use).
- Drive: This lets you specify an amount of filter overdrive, to add fullness and saturation artifacts to your sound.
- Punch: This control lets you add a range of percussive attack to the start of each note. At the lowest setting, dynamics are unchanged. At higher settings, the sound becomes more aggressive and more readily pops through the mix.
- Soft: This control lets you switch between two differing analog-modeled processing circuits within the filter. Engage Soft for a mellower, darker tone. Disengage it for a brighter, more aggressive sound.
Amplifier Controls
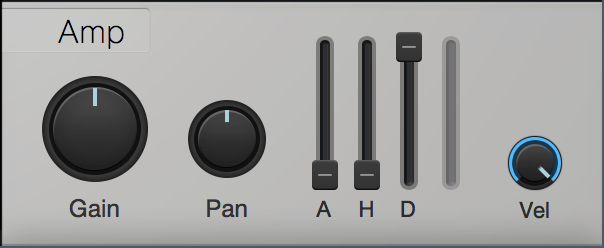
To adjust the amplitude for each pad, use the following parameters:
- Gain: Attenuates or boosts the amplitude, in dB, of the sample assigned to the selected pad. Variable from -144 to 20 dB.
- Pan: Adjusts the sample’s stereo pan for the selected pad. Variable from fully left to fully right.
- Amp Env (One-Shot Trigger Mode Only):
- Attack: Adjusts the amount of time from when the pad is triggered to when maximum amplitude is reached. Variable from 0 s (no attack, sample starts at maximum amplitude) to 20 s.
- Hold: Adjusts the amount of time the maximum velocity is held after the attack period, before decay begins. Variable from 0 s to 20 s.
- Decay: Adjusts the amount of time it takes after the hold period to reach an amplitude of -∞ from the maximum amplitude. Variable from 0 s to 20 s.
- Amp Env (Loop and Normal Trigger Modes Only):
- Attack: Adjusts the amount of time it takes to reach full volume once a sample has been triggered. Variable from 0 to 20 seconds.
- Decay: Adjusts the amount of time it takes to reach the sustain level after reaching full volume. Variable from 0 to 20 seconds.
- Sustain: Adjusts the sustain level. Variable from -∞ to 0 dB. The sustain period continues until the sample trigger stops.
- Release: Adjusts the amount of time it takes to reach a level of -∞ after the sample trigger has stopped. Variable from 0 to 30 seconds.
- Vel: Adjusts the maximum amplitude value, in dB, affected by velocity (the maximum amplitude value when triggered note velocity equals 127). Variable from 0 to 1.
Pad Focus
By default, the Pitch, Filter, and Amplifier controls act on the pad you most recently selected. To make editing easier when working on multiple pads, you can enable Pad Focus by clicking the [Pad Focus] button at the top of the plug-in window. When this mode is enabled, "focus" shifts to whatever pad you most recently played, letting you edit parameters for that pad.
Pad Focus and Control Linking
When in Pad Focus mode, if you use Control Link to assign a hardware control to a Pitch, Filter, or Amplifier control in Impact, that hardware control is linked in Focus mode. This means that the hardware control acts on the assigned parameter not only for the originally assigned pad, but for whatever pad is most recently played. Using Control Linking under Pad Focus mode can make editing many pads a faster and easier process.
Using Multiple Outputs
Impact provides 16 stereo outputs and 16 mono outputs for each pad. To change the output routing, click on the Output selection box below the desired pads and choose the desired Output Channel for each pad. If the Output Channel does not already exist in the Console, it is added automatically. Alternatively, Output Channels can be chosen from the Inspector (F4).
If you are using a single instance of Impact across multiple Tracks, you can quickly assign its outputs by group-selecting the Impact channels and using the “Assign in Ascending Order” option from the Output routing menu of the Inspector.
This is very useful if you would like to program each of your drum sounds on a separate Track!

Working with .soundx Files
Given that it's so easy to create new sample kits in Impact, you may find that you want to exchange them with other people. To export the current patch as a .soundx file for other Impact users to try, click the menu button and choose Export Sampler File... To import a multisample or soundx preset file into Impact, simply drag-and-drop it onto the plug-in window.
File Sharing with SampleOne
Once you've created some samples you love in SampleOne, you can import them to Impact using drag-and-drop. To do this, click and drag your chosen sample from the sample list in SampleOne, and hover your cursor over an Impact tab at the top of the Instruments window. Impact is then shown, and you can drop your sample onto any pad. You can also select multiple samples in SampleOne, then click and drag the group into Impact as described above. Samples can be dragged from Impact to SampleOne as well.
By default, when multiple samples are dropped onto a pad, they are all assigned to that pad and are played interchangeably, according to the current Layer Mode. To distribute multiple samples across multiple pads, press and hold [Shift] before dropping them. The first sample is assigned to the selected pad, and each subsequent sample is assigned to subsequent pads in ascending note order.
Drag and Drop from the Browser
If you have predetermined or preset samples you’d like to use in your pattern, you can drop samples directly into the editor without opening Impact. With the Pattern/Key editor and the Browser open, drag your sample from Browser and drop the sample into the editor. For this function to work as intended, Impact must be loaded in your Instrument Track and the pattern must be set to Drum Mode.
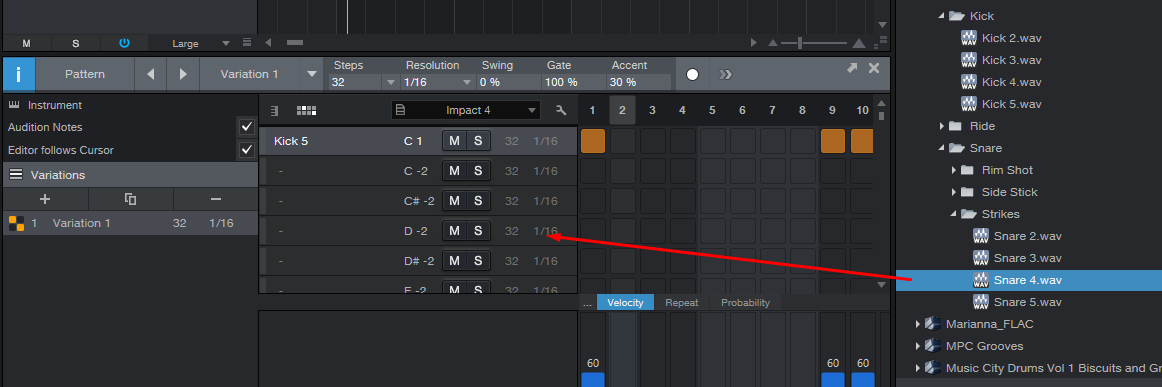
Note: Dragging your sample to editor or into empty space in the drum control list loads the sample into the first free pad. Alternatively, dropping your sample into the pitch lane replaces the previous sample.
Color Themes
Looking for a little personalization? Try clicking the PreSonus logo at the top right corner of the Impact window for a selection of new color themes.
In-Place Impact Editor
Editing a virtual drum instrument like Impact while editing patterns at the same time can be tedious, particularly on a small notebook display.
To simplify the process, there is an in-place editor for Impact that provides access to most instrument parameters (pads, pad and sample editor controls, etc.) without having to open the Impact edit window.
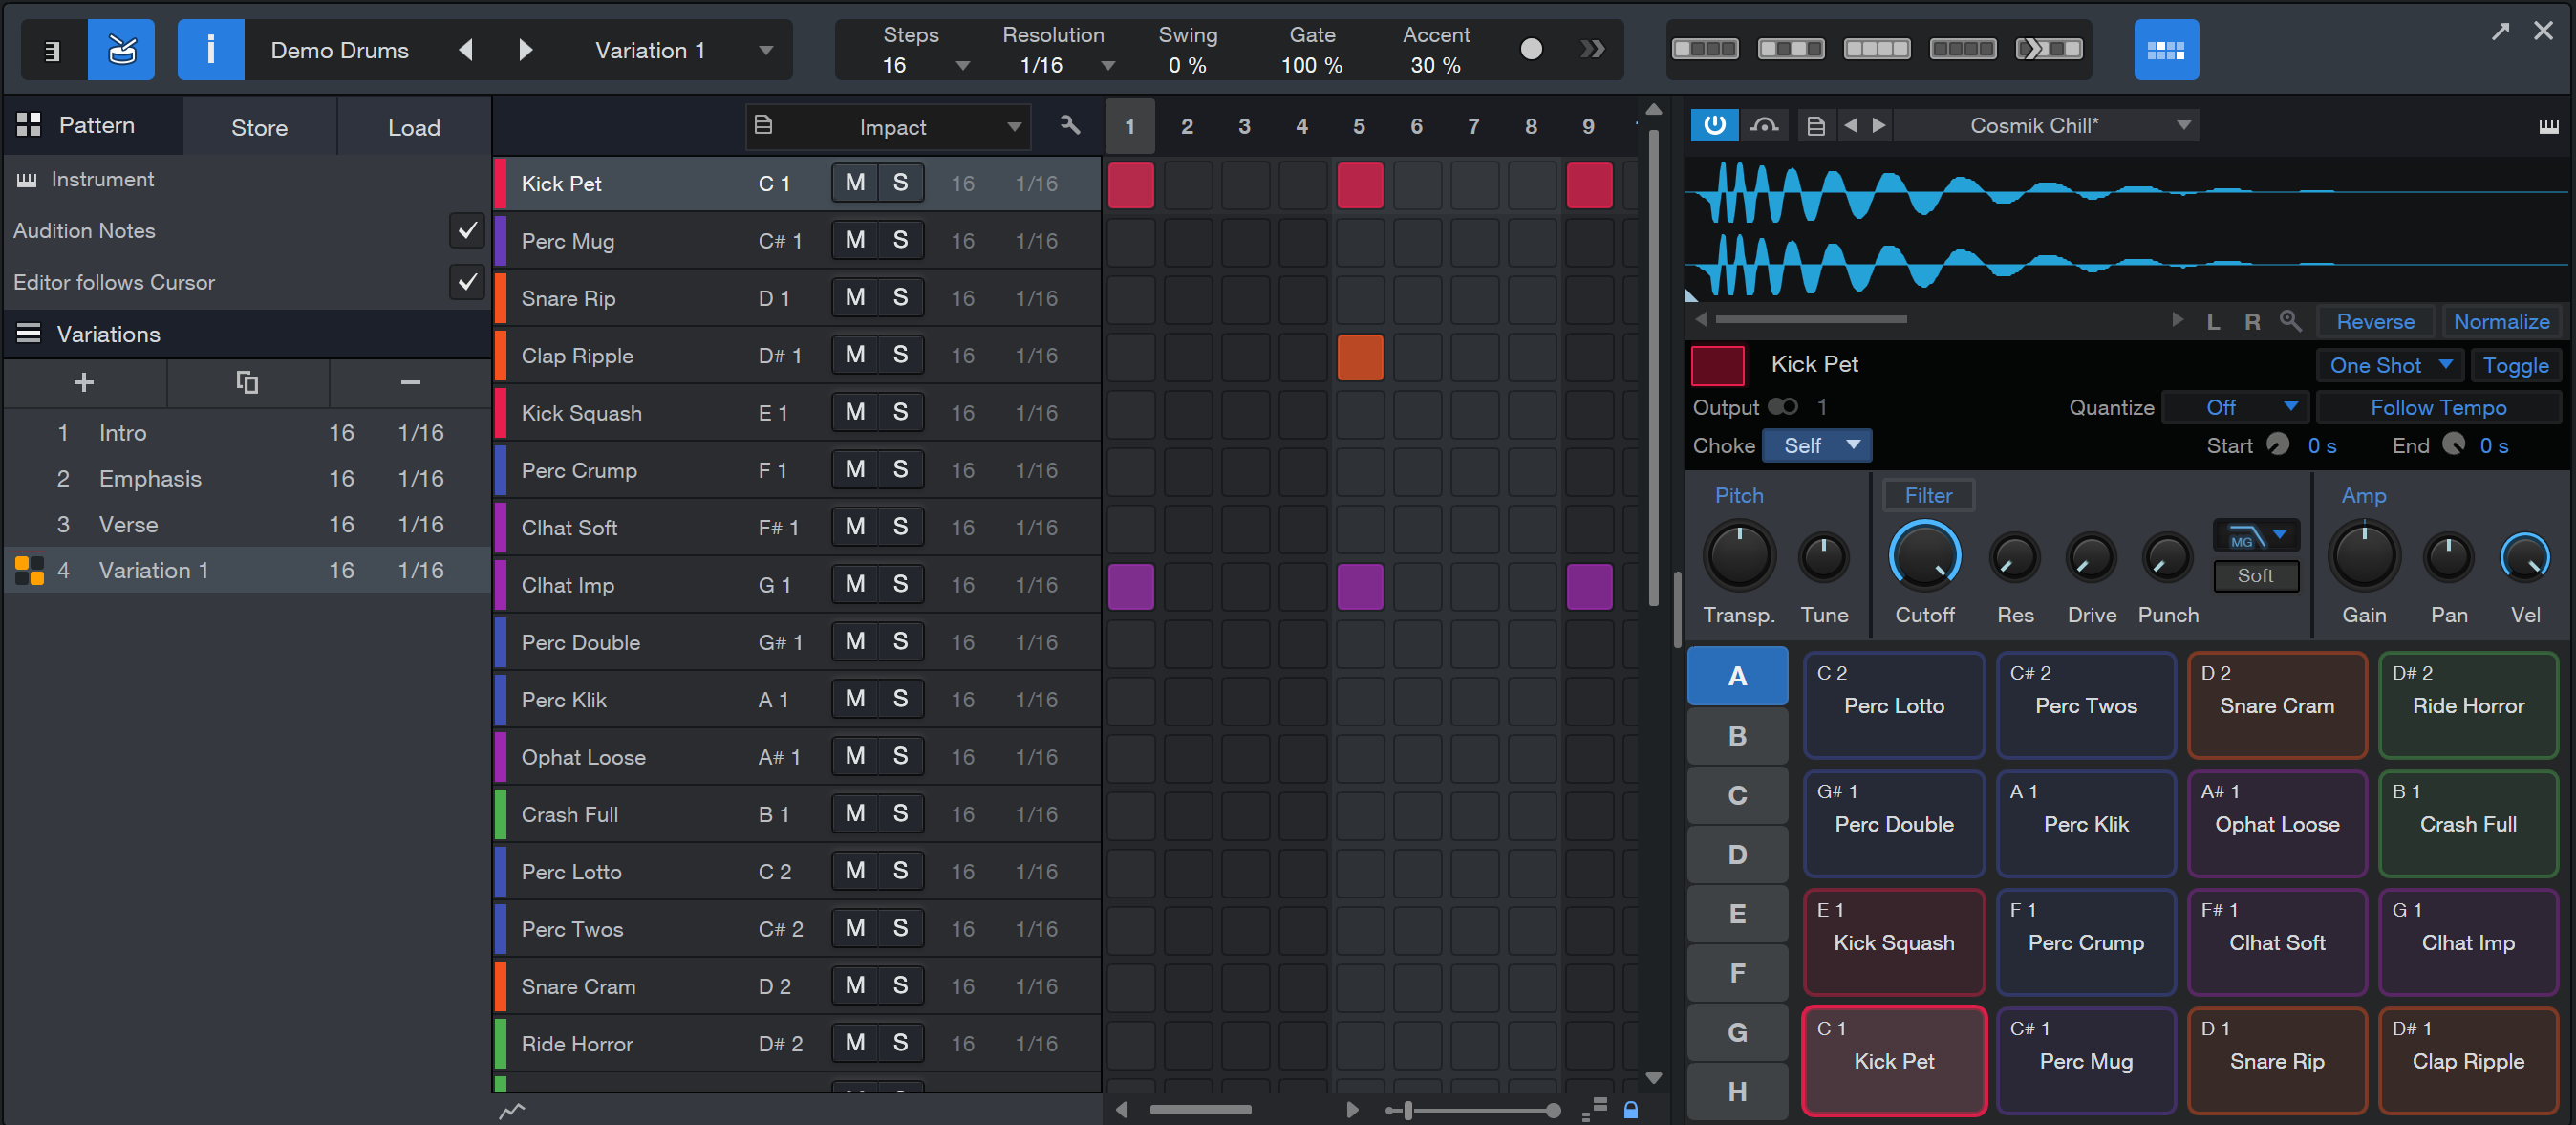
To access this, click onto the “Pad Controls” icon located at the far right side of the Note or Pattern Editor toolbar:

After clicking this icon, the in-place editor will appear to the right of the Editor grid. To have access to all of the available parameters at once, you must adjust the width and length of the Editor until it is large enough to display each feature:
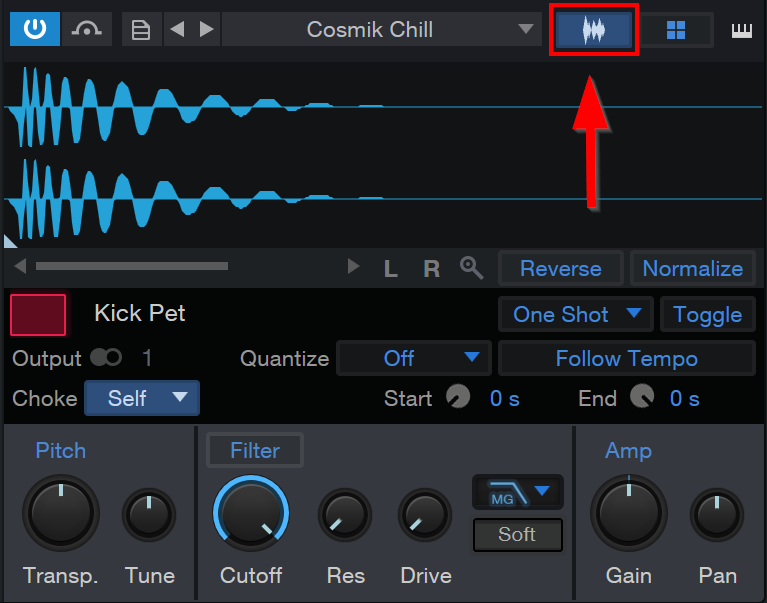
If you would like to take up less space while using the in-place editor, you can reduce the size of the Editor and toggle between Pad Controls and Drum Pad views.
Click the Pad Controls button to view to the waveform editor and pad parameters:
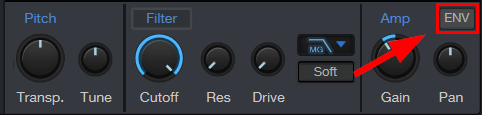
To access additional envelope controls from the Pad Control view, click onto the ENV button:
Click the Drum Pads button to view to the drum pads:
To open Impact in a separate window, click onto the “Instrument Editor” button located at the top right corner of the In-Place Editor.
Note: For this feature to work as intended, you must select Impact as the output virtual instrument on a new instrument track.