Common Editing Actions
Cut, Copy, and Paste
As with most software applications, Studio One Pro supports cut, copy, and paste actions. Once you have selected an Event or a range of Events, you can perform these actions:
- Cut: Press [Ctrl]/[Cmd]+[X] on the keyboard to cut the current selection.
- Copy: Press [Ctrl]/[Cmd]+[C] on the keyboard to copy the current selection.
- Paste: Once a selection is cut or copied, press [Ctrl]/[Cmd]+[P] on the keyboard to paste the selection. The Events are pasted on the selected Track, at the current playback cursor position. If you select and copy Events on multiple Tracks, then select another timeline location on the first Track, and then paste, the copied Events are pasted in the appropriate Tracks and locations, starting with the first (selected) Track.
- Paste at Original Position: If you want to copy and paste an Event from one Song into another Song (or another version of the Song), and want the Event to be placed at its original location in the timeline, copy the Event and paste by pressing [Ctrl]+[Shift]+[V].
Audio Event Slip
Often, after an Audio Event has been sized to fit a particular region of time, the audio clip the Event contains needs to be moved ahead or behind in time without changing the Event’s length and volume envelope. This action is commonly called “slipping” or “slip,” and it is often used alongside splitting, or splicing, to correct the timing of rhythm tracks. For instance, if one snare-drum hit is off the beat by a little bit, you could split the Event on either side of that section and then slip the audio into perfect time.
To use Slip, select the Arrow tool, and then press and hold [Ctrl]/[Cmd]+[Alt] on the keyboard, while floating the mouse over an Audio Event. The Slip tool icon appears. Click-and-drag on the Event to slip the audio left or right across the timeline. Multiple Audio Events can be selected and slipped at once, even across multiple Tracks.
When slipping the audio in an Audio Event, note that all of the Event characteristics remain unchanged, including the Event size, position, Inspector parameters, and volume envelope.
An Audio Event can be slipped only as far as the length of the audio clip it contains.
Audio Event Transpose and Tune
The ability to transpose and fine-tune audio adds a lot of flexibility when working with audio files. For instance, if you have a keyboard loop collection in which every loop is in the key of C, being able to transpose these loops to any other key opens up many possibilities.
In Studio One Pro, transposing and tuning are a part of the same set of advanced algorithms as timestretching, so the quality is extremely high.
To transpose any audio Event, select it and open the Inspector by pressing [F4] on the keyboard or clicking on the Inspector button above the Track Column. Then enter a value in the Transpose field, from -24 to +24 semitones.
Tuning is similar to transposing but the pitch is changed in cents, rather than semitones. Enter a value from -100 to 100 cents in the Tune field to fine-tune the audio Event.
Any number of Events can be selected and transposed or tuned simultaneously, but note that this change is not relative to the current setting of each Event. All selected Events are transposed or tuned to the same chosen value.

Global Transpose
From the Transport Bar, you can set a global transposition in semitones (from -12 to +12 semitones). Global Transpose applies to both Instrument and Audio tracks. Global Transport effects playback of all tracks that have “Follow Global Transpose” engaged in Track Inspector (see Track and Event Inspectors for more information).
![]()
[Right]/[Ctrl]-click onto the Global Transpose control in the Transport Bar to open its contextual menu. The option to “Freeze Global Transposition” will reset the Global Transpose to 0 (original pitch).
Nudge
Nudging is an alternative to moving Events and notes across the timeline with the mouse. To Nudge any Event or note, select it and do one of the following:
- Nudge: Press [Alt]+[Right Arrow] on the keyboard to move the Event or note forward in time by the current snap value in the Arrangement or Editor. With Snap disabled, nudging adjusts in milliseconds.
- Nudge Back: Press [Alt]+[Left Arrow] on the keyboard to move the Event or note backward in time.
- Nudge Bar: Press [Ctrl]/[Cmd]+ [Alt]+[Right Arrow] to move the Event or note forward by one bar.
- Nudge Bar Back: Press [Ctrl]/[Cmd]+ [Alt]+[Left Arrow] to move the Event or note backward by one bar.
Any number of Events or notes can be selected and Nudged simultaneously. The Nudge commands are also available in the Edit menu.
Duplicate
The Duplicate action essentially combines the Copy and Paste actions and intelligently places the pasted selection based on the musical timing of the selection in the Song. Choose Duplicate in the Edit menu or press [D] on the keyboard to duplicate the current selection. The duplicated Event is always placed after the original Event, and it is automatically selected once duplicated. As with the other editing actions, Duplicate can apply to any number of currently selected Events.
A good use of the Duplicate command is to quickly create copies of a loop across a region in a Song by selecting an Event and repeatedly pressing [D] on the keyboard. Another interesting use involves selecting very short regions within a loop, using the Range tool, and duplicating them several times, consecutively, in order to create a stutter effect that is popular in electronic music.
If you would like to duplicate an Event and push existing material to the right across the timeline to make room for the duplicated Event, press [Alt]+[D] on the keyboard to use the Duplicate and Insert command.
Duplicate Shared
When you duplicate an Event normally, each duplicate is treated as a separate Event, and edits made to one duplicate are not reflected in the other copies. If you want to duplicate an Instrument Part and link the content of the duplicates to that of the original Part, select the Part and choose Duplicate Shared from the Edit menu, or press [Shift] + [D] on the keyboard. A ghost icon appears on the original Part and any Shared duplicates, to alert you that those copies are now Shared. Any edits made to the original Part or a Shared copy are applied to all instances of that Part.
If you later decide you wish to edit one of the Shared copies of a Part individually, select it and choose Separate Shared Copies from the Event menu. The ghost icon disappears from that Part to alert you that the copy is no longer Shared, and can be edited without affecting the other copies.
Explode Pitches to Tracks
It is sometimes helpful to explode existing pitches within an Instrument Part to new Tracks, placing each pitch within individual Instrument Parts on separate Tracks. For instance, if you have a MIDI loop to use with a virtual drum instrument, you may want to have each piece of the drum kit on its own Instrument Track.
To do this, [Right]/[Ctrl]-click on an Instrument Part in the arrangement and select Explode Pitches to Tracks from the Instrument Parts sub-menu.You can also accomplish this by selecting the Part, and choosing Explode Pitches to Tracks from the Events menu.
Strip Silence
It is quite common that, as the result of continuous recording, some Audio Events may have gaps of silence or relatively low levels between performances. It may be helpful in these cases to remove the gaps and only keep the desired sections of the recorded Event. Studio One Pro's Strip Silence function, controlled from the Strip Silence panel, is designed to handle this task.
Open the Strip Silence panel by clicking on the Strip Silence button in the toolbar, or select Strip Silence from the View/Additional Views menu. Select the Audio Events from which you wish to strip silence, make the desired settings, and then click on [Apply]. Click on the [Default] button to return all settings in the panel to their defaults.
The result of the Strip Silence process is similar to using a gate processor to only allow the desired signal to be heard, except that the Event is edited.
When the small light indicator next to the [Apply] button is lit, this means that changing the Detection or Event options and then clicking Apply automatically undos the previous operation, making it easier to find the right settings by viewing the result of the Strip Silence process, then tweaking the settings if needed without having to undo manually. Any change in selection (or other editing operation) ends this automatic state, and the indicator is no longer lit.
The following describes each setting:
Detection: This determines how Studio One Pro identifies silence in the areas you wish to process.
- Material: The first three options set the Open and Close Threshold for the gate algorithm automatically.
- Lots of Silence: Choose this for material that contains lots of silence and single hits—for instance, a clean, typical single-drum recording (hat, kick).
- Little Silence: Choose this for material that has some action going on but still has some silence—for instance, minimal techno/single drum loops, ride, or snare tracks.
- Noise Floor: Choose this for material where there is almost no real silence—for instance, noisy drum recordings, overheads, drum mixes, and drum loops.
- Manual: Allows the Open and Close Threshold to be manually edited.
- Open Threshold: Set between -80 and 0.00 dB.
- Threshold Link: Engage to link the Close Threshold to the Open Threshold.
- Close Threshold: Set between -80 and 0.00 dB.
Events: This section determines the nature of the Events created after removing silence.
- Minimum Length: Determines the minimum length in seconds for any resulting Event.
- Pre-Roll: Determines the amount of time in seconds that should remain at the beginning of resulting Events from the time at which the previously detected silence ends.
- Post-Roll: Determines the amount of time in seconds that should remain at the end of resulting Events from the time at which newly detected silence begins.
- Fade-In: Determines the length in seconds of the linear fade-in applied to resulting Events.
- Fade-Out: Determines the length in seconds of the linear fade-out applied to resulting Events.
- Link: Enable this option to automatically set the Fade-In parameter to match the Pre-Roll setting, and the Fade-Out parameter to match the Post-Roll setting.
Audio Parts
It is often convenient to merge multiple separate Events into a single object in order to move them all together or simply to clean up the Arrangement. This is accomplished with Audio Parts.
To create an Audio Part, select the Audio Events and then press [G] on the keyboard. This makes the separate Events appear and function as a single Event in the arrangement while also appearing and functioning as separate Events in the Editor. It is then much simpler to, for instance, duplicate a chorus in the arrangement and retain access to the individual Events for editing crossfades and other details.
Note that Audio Parts support shared, or ghost, copies, with the exception of any Event FX which are strictly per Event instance.
An Audio Part has two options in the Event Inspector:
- Play mode
- Normal plays only the topmost Events, and any overlaps are not played.
- Overlaps allows any overlapping audio to play back mixed, rather than cutting off at the end of each individual slice. This often happens if individual slices are have been quantized but not timestretched.
- Slices is optimized for REX and Audio Loop files, and adds short fades to slices during playback. Each slice is triggered only once, and no overlaps are played.
- Stretch Events timestretches Events inside the Audio Part to match the Song Tempo.
To dissolve an Audio Part, [Right]/[Ctrl]-click on the Audio Part and choose Dissolve Audio Part from the contextual menu.
Crossfade
Crossfades are useful for blending one Audio Event into another seamlessly.
Select two or more overlapping Events using the Arrow tool and press [x] to quickly apply a linear crossfade to the overlapping portions. You can also use the Range tool to specify a crossfade’s start and end points; press [x] to apply the crossfade after selecting your Range.
When possible, gaps between Events will be automatically closed when a crossfade is applied.
Editing a Crossfade

Click and drag the control node in the center of the crossfade and drag the mouse up or down to create exponential crossfades.
Editing Options
The following options are related to Editing workflow.
Transport Options
![]()
Loop Follows Selection
With this option enabled, whenever you make an edit selection, the loop markers automatically snap to surround that selection. With Cycle mode enabled, this allows for instant looping of a selection when editing, without further mouse movements or keystrokes. To disengage this new loop bracket, click the mouse outside the current selection in Arrange view. These actions can only take place when the Transport is stopped.
To enable this behavior, select Transport/Options/Loop Follows Selection, or [Right]/[Ctrl]-click in the Transport bar and choose Loop Follows Selection from the pop-up menu.You can also enable this option by pressing [Alt]/[Option]+[Ctrl]/[Cmd]+[P] on the keyboard.
Enable Play Start Marker
With this option enabled, the playback start marker is made separate from the edit selection, which it normally follows. This lets you always start playback from a chosen location as you're editing, no matter where the edit selection currently lies. The play start marker appears as a triangular marker in the timeline. To move this marker (and set a new playback start position), click-and-drag the marker along the timeline.
To enable this behavior, select Transport/Options/Enable Play Start Marker, or [Right]/[Ctrl]-click in the Transport bar and choose Enable Play Start Marker from the pop-up menu. You can also enable this option by pressing [Alt]/[Option]+[P] on the keyboard.
Return to Start Position on Stop
Many people prefer that when playback is stopped, the playback cursor returns to the position from which it started. This allows fast auditioning of edits by repeatedly starting and stopping playback from a specific position in the timeline.
To enable this behavior, select Transport/Options/Return to Start on Stop, or [Right]/[Ctrl]-click in the Transport bar and choose Return to Start on Stop from the pop-up menu. You can also enable this option by pressing [Alt]/[Option]+[Num Pad 0] on the keyboard.
Locate to the Mouse Cursor
To quickly locate the playback position to the mouse-cursor position, press [Ctrl]/[Cmd]+[Space] on the keyboard. This is very useful when you want to quickly navigate to multiple edits for auditioning or further editing, without clicking in the Timeline.
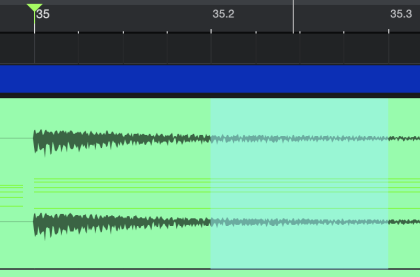
Ripple Edit

In normal operation, if you delete a Part (or a section of a Part) from the timeline, all other Parts on the timeline remain in position, and a space is left where the deleted Part was. If you'd like the Parts ahead of the deleted region to move backward to fill that space, say, when editing spoken word content where gaps are undesirable, enable Ripple Edit mode. To do so, press the Ripple Edit button in the toolbar
Apart from automatically filling in gaps when cutting or deleting content, Ripple Edit also introduces a sort of "displacement" behavior when editing. If you copy a Part and paste it in the middle of another, instead of replacing (or overlapping) that section of the target Part, the target Part is split at the edit point, and moved forward in the timeline, to make space for the pasted Part. If you move a Part to the start point of another Part, instead of replacing or overlapping the content below, the two Parts simply switch places.
Similarly, if you trim the end of a part to change its length, the Parts downstream move to maintain their relative position to the end of the trimmed Part. This behavior extends to other editing operations, such as Crop to Content and Nudge/Nudge Back.
Follow Song and Follow Edit Position
If you would like the Arrange view to follow the current playback-cursor position, engage Autoscroll in the toolbar, or press [F] on the keyboard. This keeps all audible Events in view.
There are three Autoscroll options available:
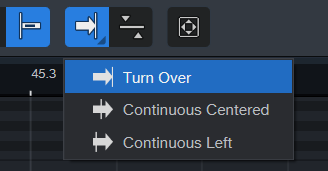
-
Turn Over: Rather than scrolling with the play cursor position, the Arrangement stays in place until the play cursor reaches the edge of the visible arrangement. Then, the next section of the arrangement automatically appears.
-
Continuous Center: Play cursor stays in the center of the Arranger while the arrangement scrolls by.
-
Continuous Left: Play cursor stays to the left of the Arranger while the arrangement scrolls by.
If you would like the playback cursor to follow the current edit position, engage Cursor Follows Edit Position, which is next to the Autoscroll options in the toolbar.

With this engaged, the playback-cursor position jumps to the beginning of any Event or group of events you select, any note being selected or moved, or to the position of any marker being moved.
Loop Tool
Alternatively, you can quickly loop any event (audio or instrument) using the loop tool. Clicking and dragging an event while the loop tool is engaged will loop the event according to the length of the original event.
The loop tool appears when hovering your cursor over the bottom right corner of an Event:

Once an Event is looped, the loop tool is accessible from all the Events height.
Note: if you do not see the loop tool appear over the bottom right corner of your Event, adjust the track height to a larger size.
Simply click and drag the event along the time grid. To avoid timing issues, it is important to loop events that are placed evenly within the time grid.
The event loop range can also be adjusted by dragging the loop handles within the events left or right:

Dragging the loop handle while holding Opt/Alt will adjust the loop start position of each looped event, while dragging the loop handle without holding the modifier key will adjust the loop’s end position.
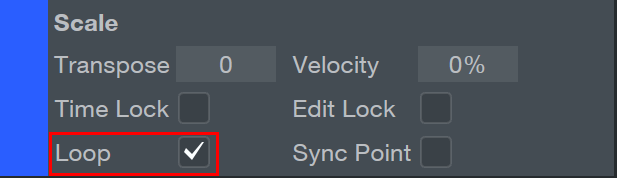
Instrument Parts that have been looped this way can still be treated as a single Events (as described in the Duplicate Shared section), which makes shared editing easy. Any edits made to the original event will carry over to the looped Events. Single loop sections can be moved and removed by setting a range via option + click on certain sections.
When the “Loop” state is disabled, all of the previously duplicated events will be removed at once. You can disable the loop state by unchecking the Loop option within the event context menu:
Set Bar (or Second) Offset to Cursor
In some situations, it is helpful to set the bar or second offset to the cursor position. The “Set Bar Offset to Cursor” and “Set Second Offset to Cursor” options allow you to offset the bars/seconds within the project for lead-ins or sync up with imported stems. This feature is especially helpful when composing to video.
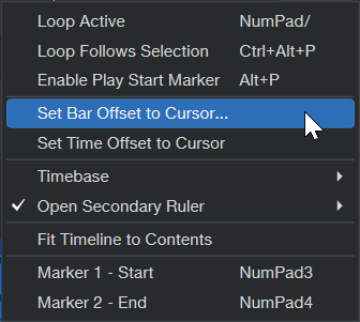
To set your bar or second offset:
-
Place your cursor to the specific bar or second where you would like the offset to occur.
-
[Right]/[Ctrl]-click onto the timebase ruler and select whichever “Set Offset to Cursor” option from the drop-down menu that you would prefer.
Note: You can also select this option from the Song drop-down menu.