Comping
Comping is the process of piecing together multiple performances into a single, continuous performance. For instance, you might record the vocals for a verse a number of times, then edit the best parts of each pass into a single, hybrid performance that, ideally, sounds as though it was performed in one pass. Comping and related information are covered in the following sections.
Takes and Layers
The most common comping scenario involves recording multiple takes of audio and then editing those takes. In Studio One Pro, each successive recorded take after the first can will be placed in its own layer by enabling the Record Takes To Layers option in the Record panel, opened with [Shift]+[Alt]/[Option]+[R], or by using the View menu.
With the Record Takes To Layers option engaged, all subsequent recordings are placed on layers, with one layer per take, and the layers are shown as soon as recording is stopped. The last recorded take is placed on the Track automatically. If only one take is recorded, no Layers will be created.
Note that this option also applies when recording Instrument Parts if the Record Takes option is engaged in the Record panel. See Instrument Track Recording Modes for a full description of the Record panel.
By [Right]/[Ctrl]-clicking on a Track, you can choose Add Layer to manually add a Layer at any time. You can then drag Audio Parts or Instrument Parts to the Layer just as you would drag it to the Track. This allows some very interesting creative comping possibilities beyond simply recording and editing. Note that once an Event has been dragged to a layer, it cannot be moved or copied to another location, so be sure to retain a copy if you plan to use it elsewhere.
To rename an Event within a layer, [Right]/[Ctrl]-click on it and double-click on the name to enter text (e.g., “great,” “not good,” “brilliant,” and so on). This is very helpful when organizing takes to be comped. Layers are displayed as lanes directly under the Track to which they belong.

To hide or show layers, click the Expand Layers button on a Track (which looks like this  ), or [Right]/[Ctrl]-click on the Track, and then choose Expand Layers from the pop-up menu.
If no layers are available, the layer controls stay at the bottom of the Track control area. When there is least one layer and the Track controls are zoomed horizontally to a certain level, the layer controls move from the bottom of the track to the top beside the track name.
Layers have their own Track controls, including Solo, Activate, Duplicate, and Remove. Click the layer’s Solo button to solo the layer on the Track. Clicking the Activate button places that layer on the Track, and the current contents of the Track take the place of that layer on a new layer located under the Track. Duplicate creates a duplicate of the layer on a new layer. Click Remove to remove the layer from the Track.
If you would like layers to follow the Track Event in the arrangement—for instance, when moved or duplicated—engage the Layers Follow Events option in the Inspector for the Track.
Switching Between Layers
There are several ways to switch between layers:
- Click the arrow between the Track name and the layer name in the Track control area, then select the desired layer from the pop-up menu. After this you can use the 4-way navigation arrows on your keyboard to switch quickly between the layers.
- With expanded layers, click one of the Activate Layer buttons (The up arrow icon) to make that layer the active layer for the Track.
- In the Inspector, click the Layers field and select the desired layer from the pop-up menu.
Takes and Layers Menu
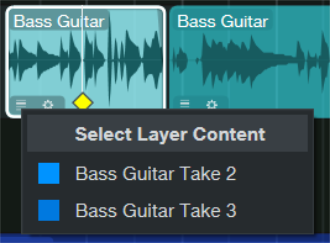
Clicking a layered Event’s [≡] icon opens a menu of Layer and Take options.
- Select Layer Content lists the Layers that contain any Events in the range of the currently-selected Event. Selecting a Layer copies these Events from the Layer to the Track.
- Select Take lists the Takes (loop recording passes) of the Event on the Track. Selecting a Take changes the Event range to that pass.
In cases where a Take is already present on a Layer, the “duplicate” item is now removed from the takes section.
Auditioning Takes
When comping, it is helpful to be able to quickly audition the various takes to determine the desired parts of each take. The Listen tool is well suited to auditioning takes on layers. When floating the mouse over any layer, click anywhere on any layer to hear it instantly, starting from where you clicked. Alternatively, if you've selected a range on any layer with the Arrow tool, hold [Shift] and click on the selected range within that layer. This solos the layer and automatically loops the selection for playback. If you hold [Shift] and click on part of the layer that's not selected, the entire layer will loop, starting at the beginning of the layer.
It is also possible to solo entire layers to quickly switch between takes, as only one layer of a Track may be soloed at a time. To do this, click on the Solo button on any layer, or select the layer and press [S] on the keyboard. Note that Track Solo is independent of this, so you can solo the Track or not, depending on whether you would like to hear the performances you are comping in the context of the other Tracks in your Song.
Copying Layer Ranges to the Track
Studio One Pro makes the comping process very simple. With the Arrow tool selected, floating the mouse over any layer switches to a special Range tool, indicated with the Range cursor icon. Click-and-drag with this tool to instantly promote any range of a take to the Track.
Once a range has been copied to the Track, it is highlighted in the Track color so that you can always be sure where material on the Track is coming from. Where a newly copied range overlaps with an existing range on the Track, an automatic crossfade is applied to help avoid clicks or other undesirable artifacts. This crossfade can be edited, just like any other, and it can be removed.
Any selected range on a layer can be sized left or right by floating the mouse cursor to the edge of the range and clicking and dragging, which alters the Track accordingly.
Comping with the Range Tool
You can use the Range tool to select areas and ranges within layers, without automatically promoting the selected layer range to the main track. This can come in especially handy when using the techniques outlined in Comping Keyboard Navigation. Once you have a chosen range selected within a layer, you can press the Copy Ranges to Track arrow in the controls for that layer, promoting the selected range to the main track.
Once you’ve selected your ranges, you can fine-tune the take ranges directly within the Track itself using the Arrow Tool.
Layer Editing
Many of Studio One Pro’s familiar audio editing tools can also be used on Layers, including the Range, Eraser, Paint, Mute, and Bend tools.
Note that the Bend Tool can affect several Layers simultaneously if you used the “Record Takes to Layers” option with a Loop.
Sections of Layers can be deleted using the Range Tool in conjunction with the Eraser tool or the Delete key. Note that you’ll want to use the Range Tool to select this Range, and not the Arrow tool - selecting with the Arrow tool and deleting will delete a section from your Comped Audio Event, not your Layer.
Layers can be moved horizontally and vertically by holding [CTRL/CMD] while clicking and dragging from the center of the Layer Event, and can be trimmed by holding [CTRL/CMD] while clicking and dragging from a Layer Event’s borders.
Comping Keyboard Navigation
Given that you can select a range within a layer, it can be very useful to be able to quickly move that selection around within the available layer content, especially when comping tracks with many takes. You can use the following keyboard commands to quickly move and re-range your selection within the layers in a track:
- [Arrow Up/Down] Navigates vertically through the stack of layers.
- [Arrow Left/Right] Moves the Range tool selection to the previous or following range, as determined by the chosen Event ranges on the main track.
- [Shift] + [Arrow Left/Right] Extends the Range selection left or right.
The selection you end up with after extending or contracting an existing Range selection with [Arrow Left/Right] can be moved with the arrow keys just like the original selection.
Quick-Switching Content on the Main Track
Once you've done some comping, you'll notice that the comped sections in the main track have a menu button at the bottom. Click this button to open a pop-up menu that lets you choose between all available layers for that section of the main track. You can switch between takes even more quickly by hovering the mouse pointer over the section of your choice, then pressing and holding [Alt] on the keyboard as you move the mousewheel or press [G] (for up) or [D] (for down).
Comping With Groups
If one or more Tracks are in a Group, and comping is performed on any of those Tracks, identical edits are performed on the other Tracks in the Group. For instance, comping can be performed on a single Track within a drum Group, and those identical edits are performed across the other Tracks in the Group. This applies to soloing, activating, and removing layers, as well.
While it may be best to avoid the scenario, comping can be performed across grouped Tracks with a differing number of layers; layer positions under the Tracks determine the behavior of the edits.
Layer Naming
By default, layers in a Track are given names in ascending order from top to bottom— Layer 1, Layer 2, and so on. Even if you re-order layers within the stack, their original names stay the same, to avoid confusion. You can rename a whole layer by double-clicking its name. You can rename content within a layer by [Right]/[Ctrl]-clicking the content, and double-clicking the name shown in the pop-up menu. As layer content is added to the main track, you'll see that those Events are named with the track name and layer name, or layer number, if you have not assigned a custom name.
You can choose to re-name your Tracks and corresponding Channels automatically to that of the active Layer by choosing Enable ‘Layers Follow Events for New Tracks’ in the Advanced Options menu. Changing the active Layer with this feature enabled will again change the displayed Track name.
Color-Coding Layers
Much like you can with Audio and Instrument Tracks, you can assign colors to layers within a track. This can be helpful when establishing a color code for take quality, or simply to give more clarity to which layer is used in a given section of the main track. To set the color for a layer, click the color picker, next to the layer's solo button, and choose a color from the pop-up selector.
What Next?
After comping on an Audio Track, it is common to consolidate, or bounce, separate Audio Events into a single, continuous Event. You can do this quickly by selecting the Audio Events on the Track and pressing [Ctrl]+[B] on the keyboard. This renders a new audio file and Event, and places it on the Track at the correct position.
A more flexible way is to merge the separate Audio Events into an Audio Part by selecting the Audio Events and then pressing [G] on the keyboard. Any comping performed under the range of the Audio part results in the comps being copied directly into the Audio part.