Metering
Metering is a critical part of the production process. Studio One Pro’s meters visually display audio levels according to your choice of metering style, and you can meter these levels at various stages in the signal path. The meters automatically display in mono or stereo depending on the audio source.

Two Metering Mode menus are available: one for the Output Channels and another one for the other Console Channels. Use [Right]/[Ctrl]-click to access the Metering Mode menu for the desired set of Channels. Note that the Pre-Fader Metering setting is applied globally to all meters, including the Output Channels. Changing that setting in one menu will change it automatically in the other menu.
The menu for most of the Console Channel Types allows a choice between Peak or Peak/RMS metering modes. The selection will be applied to all Channels in the Console except the Output Channels.
Peak meters are not available for the Output Channels, which feature Peak/RMS metering with K-System Metering options.
[Right]/[Ctrl]-click on any meter to adjust the Peak Hold and Hold Length settings globally for all Channels.
Peak Meters
Peak meters measure the instantaneous audio level from moment to moment at a very fast resolution and display the highest output level at any instant. These meters help ascertain the relationship between a given audio level and other audio levels in the mix. Many effects plug-ins feature peak meters at the input and output so that any level attenuation the effect imparts on the audio signal can be seen.
Peak/RMS Meters
Peak/RMS meters simultaneously show both peak and RMS levels. Whereas a peak meter shows the highest output level at any instant, an RMS meter shows an average of the peaks and troughs of an audio signal over time. An RMS meter is intended to indicate the perceived loudness of the audio being measured by functioning in a way similar to the human ear and is therefore often used as a true measure of perceived loudness.
Pre-Fader Metering
[Right]/[Ctrl]-click on any meter to access the menu and enable or disable Pre-Fader Metering. When it is enabled the level meters show levels independent of fader position. When it is disabled the level meters respond to fader position. This is known as Post-Fader Metering. The selection you make will be applied globally to all Channels, including the Output Channels.
Main Out Clip Counter
The Main Out Channel features a Clip Counter above its Peak/RMS meter.
The counter turns red when the Main Out signal clips and counts the total number of clips that occur. Use the counter to help prevent clipping the final stereo mix of your Song. The counter resets when clicked or when the Main Out fader is adjusted.
K-System Metering
The Peak/RMS meters in the Output Channels also feature K-System metering options. The K-System is an integrated metering system tied to monitoring gain, and it is intended to standardize the levels at which sound is mixed and mastered. This metering system features three different meter scales called K-20, K-14, and K-12. These three scales are meant to be used with different types of audio production and have been described by K-System inventor Bob Katz in his Audio Engineering Society technical paper “An Integrated Approach to Metering, Monitoring, and Leveling Practices.” Katz wrote:
“The K-20 meter is for use with wide-dynamic-range material, e.g., large theater mixes, ‘daring home theater’ mixes, audiophile music, classical (symphonic) music, hopefully future ‘audiophile’ pop music mixed in 5.1, and so on. The K-14 meter is for the vast majority of high-fidelity productions for the home, e.g., home theater and pop music (which includes the wide variety of moderately compressed music, from folk music to hard rock). And the K-12 meter is for productions to be dedicated for broadcast.”
To switch to any K-System meter, [Right]/[Ctrl]-click on an Output Channel meter and choose an option from the menu.
When using any of the three K-System scales, the 0 VU mark should be calibrated to 85 dB SPL from your monitors, which you should measure with an SPL meter. For instance, playing back a -14 dBFS sine wave in Studio One Pro while using the K-14 scale causes the meter to read 0 VU for both the peak and average levels, and your monitors should be adjusted so that the SPL meter at the listening position reads 85 dB SPL.
Performance Monitor
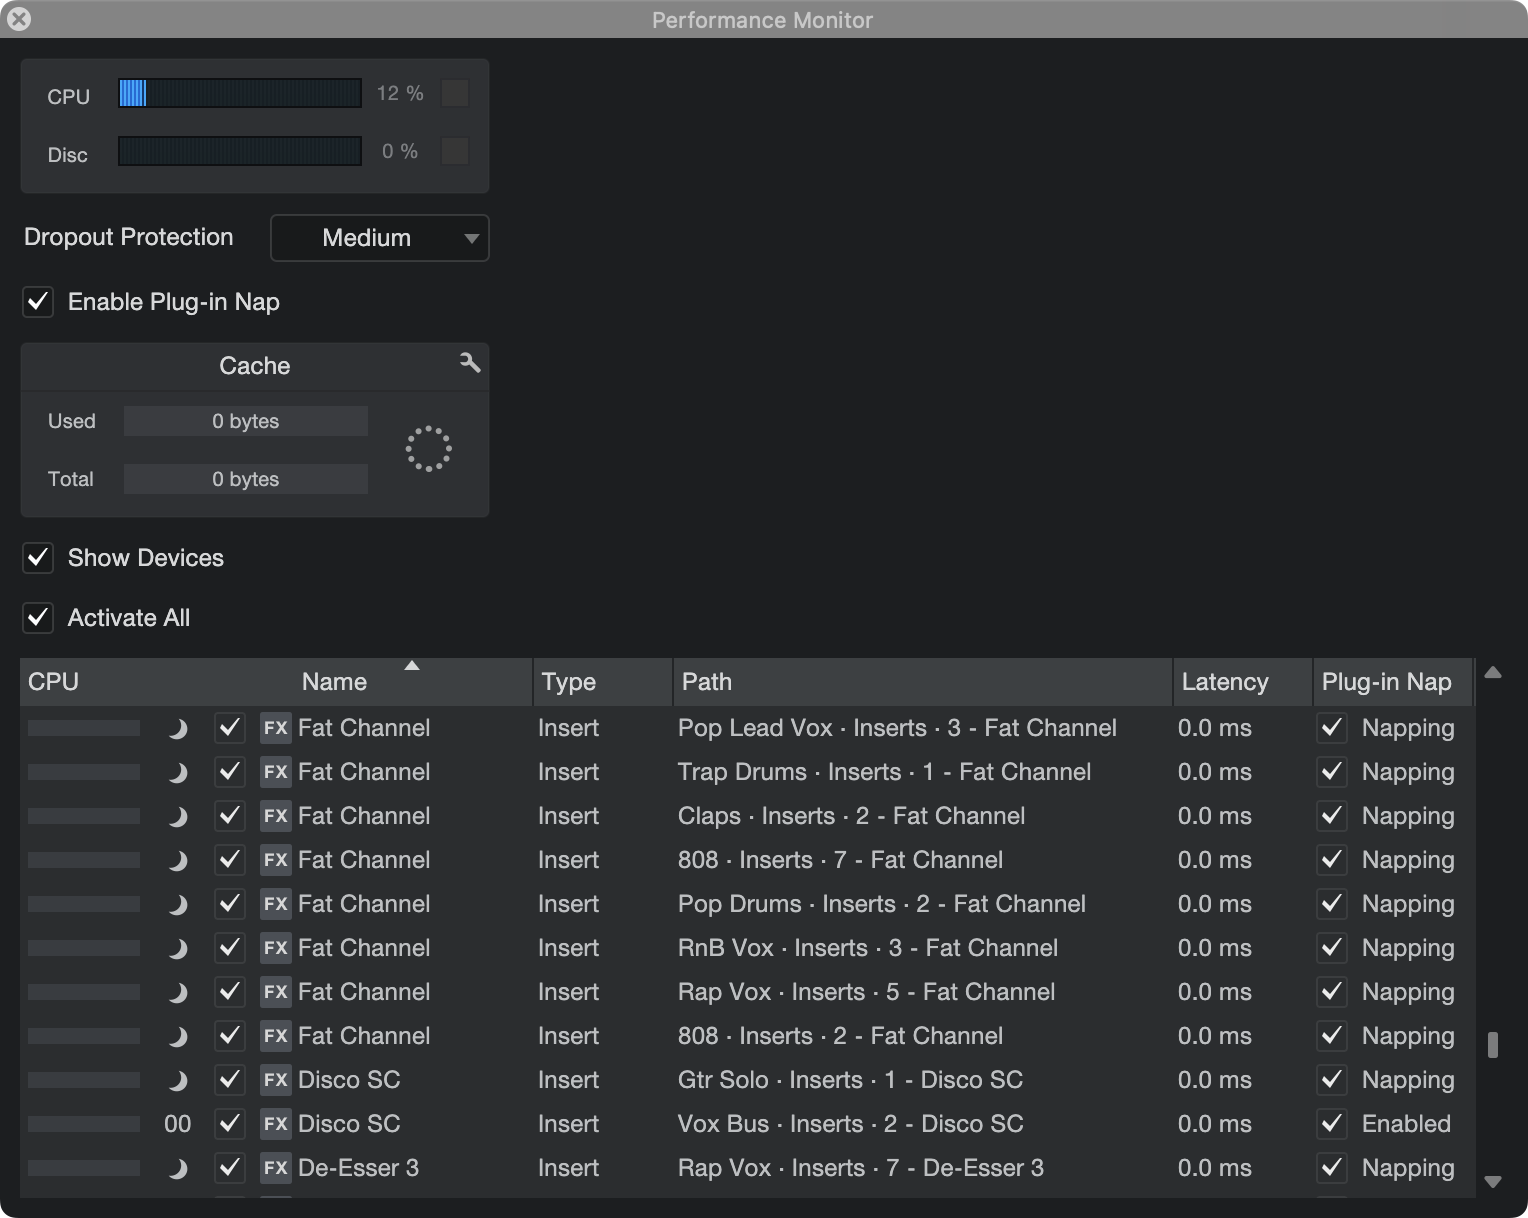
You can open the Performance Monitor window by navigating to View/Performance monitor. This window displays the current total CPU and disk usage, as well as specific usage data for Insert effects and Instruments. To open the editing window for an Insert or Instrument, double-click its name. To deactivate an Insert or Instrument (to free up the associated RAM and CPU), click the check-box next to its name. To activate a deactivated item, click the check-box again, or click the Activate button on the Insert or Instrument slot in the Console.
You can also activate/de-activate multiple plug-ins quickly by clicking a tickbox and dragging up or down the entire list.
The Cache section shows you the amount of audio data currently in the Audio Cache, with options to show its contents or clean up unused items in the cache.