Arranger Track
The Arranger Track is an arrangement tool that lets you work with portions of your entire Song as though they were individual Events, and rearrange them quickly and easily. This saves you the time and challenge of traditional editing, which can be difficult when dealing with many Tracks at once.
Using the Arranger Track
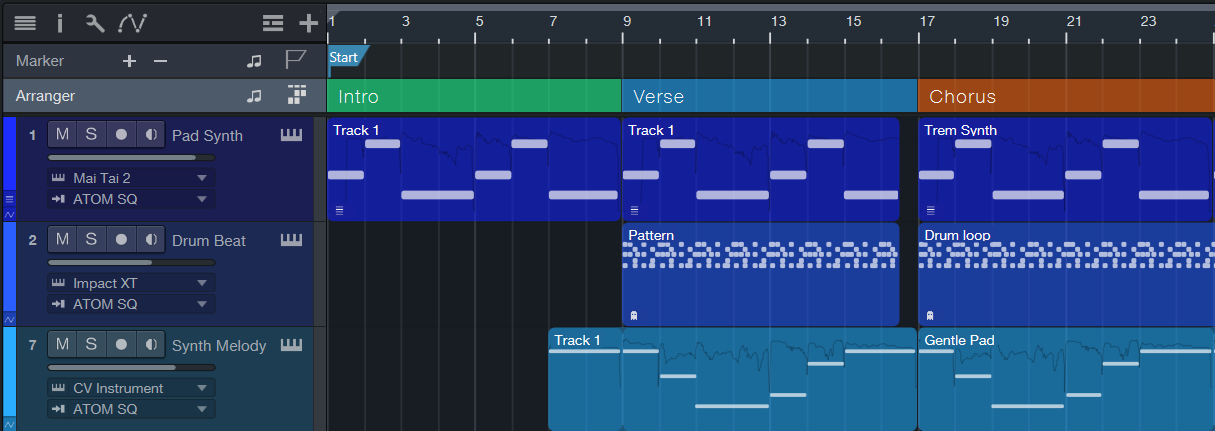
The Arranger Track sits at the top of the Arrange view, and you can show or hide it by clicking the Open Arranger Track button, which looks like this:  At first, the Arranger Track is empty, showing that no Arranger Track sections have been defined in your Song. Once you define sections, you can freely move them along the timeline, insert them between other sections, copy/cut and paste, or delete them.
These actions are performed across all Tracks in your Song that exist in the time covered by the section, including all Events, Parts, Markers, tempo changes, and automation data.
Defining the Sections of Your Song
To define a section in the Arranger Track, follow these steps:
- If the Arranger Track is not visible, click the Open Arrangertrack button to show it.
- Enable the Paint tool, or press and hold [Ctrl]/[Cmd] to temporarily switch to the Paint tool while leaving a different tool selected.
- Click-and-drag in the Arranger Track, over the part of your Song you wish to define as a section. A section of the Arranger Track is marked, signifying that the section of the Song is now defined in the Arranger Track.
Each new Arranger Track section is given a default title, but you can enter a new title by [Right]/[Ctrl]-clicking the section and double-clicking its title in the pop-up menu, then typing the new title into the provided text field.
To change the color of a section, [Right]/[Ctrl]-click the section, then click on the colored square in the pop-up menu to choose a new color.
To remove the Arranger Track definition from a section of your Song, select the section and press [Backspace] or [Delete], or [Right]/[Ctrl]-click the section, and choose Delete from the pop-up menu.
To remove an Arranger Track definition as well as the time on the timeline that it covers (along with any Events or Parts that lay within it), [Right]/[Ctrl]-click the section in the Inspector or Arranger Track and choose Delete Range from the pop-up menu that appears.
Timebase Button
Notice the Timebase button to the right of the Arranger Track in the Track column. The musical-note icon on the Timebase button indicates that Arranger Track sections will adhere to their position based on bars and beats, so if the tempo changes, the sections move forward or backward in time in relation to their musical position.
If you click on the Timebase button, it switches to a clock icon, indicating that the sections will adhere to their absolute position in time. If the tempo changes, the sections do not move, as they are locked to an absolute time position in the timeline.
Editing Sections in the Arranger Track
Once you've defined the sections of your Song, you can begin working with them. Using the Arrow tool, you can accomplish the following actions:
- Move: Click-and-drag a section to move it to a new location on the timeline.
- Move Arranger Track Section Only: Click-and-drag a section, then press and hold [Ctrl]/[Cmd] and [Alt]/[Option] to move only the Arranger Track section, without any of the content that sits within it, to a new location on the timeline.
- Insert: Click-and-drag a section between two other sections. When a line appears between the sections, let go of the mouse button to insert the section there. This automatically moves the sections to the right of the insertion point forward in time, to make space for the inserted section.
- Replace: Click-and-drag a section over another section. Let go of the mouse button to delete the existing section and replace it with the new section.
- Partially Replace: Click-and-drag a section over another, longer section while holding [Shift]. Position the section at your location of choice within the larger section, and let go of the mouse button to replace that portion with the new section.
- Copy/Cut and Paste: Select a section and copy or cut it, using the standard keyboard shortcut ([Ctrl]/[Cmd]-[C] to copy, [Ctrl]/[Cmd]-[X] to cut) or by [Right]/[Ctrl]-clicking the section and choosing Copy or Cut from the pop-up menu. Place the cursor in your chosen place in the timeline, and either press [Ctrl]/[Cmd]-[V] to paste the section, or [Right]/[Ctrl]-click on the timeline and choose Paste from the drop-down menu. You can also click-and-drag a section while holding the [Alt]/[Option] key to create a copy of the section. Let go of the mouse button to place the copy in your location of choice.
- Create Markers from Arranger Sections: [Right]/[Ctrl]-click a section in the Arranger Track and choose Create Markers from Arranger Sections from the pop-up menu to create markers in the Marker Track that coincide with the titles and placements of the sections in the Arranger Track.
- Select Events in Section: [Alt]/[Option]-double-click a section to select all Events and Parts across all tracks, within the bounds of the section. You can also do this by [Right]/[Ctrl]-clicking a section in the Arranger Track and choosing Select Events in Section from the pop-up menu.
- Delete Range: [Right]/[Ctrl]-click a section and choose Delete Range from the pop-up menu to delete the range of time that the section covers, and all content within it, from the Song. Any content to the right of the deleted section is moved to meet the content in the preceding section.
- Zoom: Double-click a section in the Arranger Track to locate the transport to the start of that section, and zoom the view to show the section in full.
Arranger Track Sections and Scratch Pads
You can drag defined sections of your Song from the Arranger Track into a Scratch Pad for safe keeping or for later use, much like you can with normal Events and Parts. Simply clicking-and-dragging a section into a Scratch Pad creates a copy of that section in the Scratch Pad, with all elements and data intact. If you would rather move a section to a Scratch Pad, rather than copy it, hold [Alt]/[Option] while dragging.
You can also [Right]/[Ctrl]-click any section in the Arranger track and choose Copy to new Scratch Pad from the pop-up menu to create a new Scratch Pad containing a copy of the section. Alternately, choose Move to new Scratch Pad to remove the section from the main timeline, and create a new Scratch Pad containing the section.
For more information on working with Scratch Pads, see the Scratch Pad section.
Arranger Track Inspector View
When you've selected an item or area in the Arranger Track, the Track Inspector shows a list of all defined sections in your Song, as well as any sections currently contained in a Scratch Pad. You can perform actions on the sections in this list much like you can in the Arranger track.
To locate the transport to the start of a section, click the section in the Inspector list, or double-click to the left of the section to locate the transport and start playback from the start of the section. A playback cursor appears to mark the section that is now playing. To rename a section, double-click its name in the list and enter the new name into the provided field.
To copy a section to a new location, drag the section from the list to the location of your choice in the main timeline or onto a Scratch Pad. [Right]/[Ctrl]-click any section in the list to access a pop-up menu with other section-editing commands as outlined in Editing Sections in the Arranger Track.
Arranger Track Sections and Marker Track Markers
For flexibility, you can automatically create Arranger Track sections based on currently placed Marker Track markers, or vice-versa. To create Markers based on Arranger sections, [Right]/[Ctrl]-click an Arranger Track section and choose Create Markers from Arranger Sections from the pop-up menu. Markers are created marking the start and end of each Arranger section.
To create Arranger sections based on currently placed Markers, [Right]/[Ctrl]-click in the Marker Track and choose Create Arranger Sections from Markers from the pop-up menu. Arranger sections are created, beginning at each Marker location, and ending at the location of the next Marker in the timeline.
Triggering Arranger Sections Manually
You can trigger Arranger sections manually on the Song page, jumping your playback to any section of the Arranger Track with musical timing and without breaking rhythm. This is ideal for prototyping the sound of new song arrangement on-the-fly during your production process, but before committing to your changes by reordering the Arranger Sections manually. With this you may discover that a second bridge after the third chorus is just what your song needed—and the discovery is just a double-click away!
With the Arranger Track selected and the Inspector open [F4], simply [double-click] an Arranger Section in the Inspector to prompt a playback jump to it. The chosen Section will receive a jump indicator icon. The timing of the jump will adhere to the Sync Mode option setting chosen in the Arranger Track Inspector: 1 bar, 2 bars, 4 bars, or after the Arranger Section’s End. You can also trigger a jump by a [double-click] on a Section in the Arranger Track itself.
Sync Modes govern the timing of a Jump from one Arranger Section to another. Options include:
-
Off: Jump occurs immediately upon double-clicking an Arranger Section with no Sync
-
1 bar: Jump occurs at the next bar start after the current play position
-
2 bars: Jump occurs at the end of a 2-bar section, relative to section start
-
4 bars: Jump occurs at the end of a 4-bar section, relative to section start
End: Jump occurs at the end of the currently-playing Arranger section, regardless of how long the selected Arranger section is.
A specialized version of the Arranger Track is also available on the Show Page. Visit Show Page Overview for more info.