The Show Timeline
The Overview window
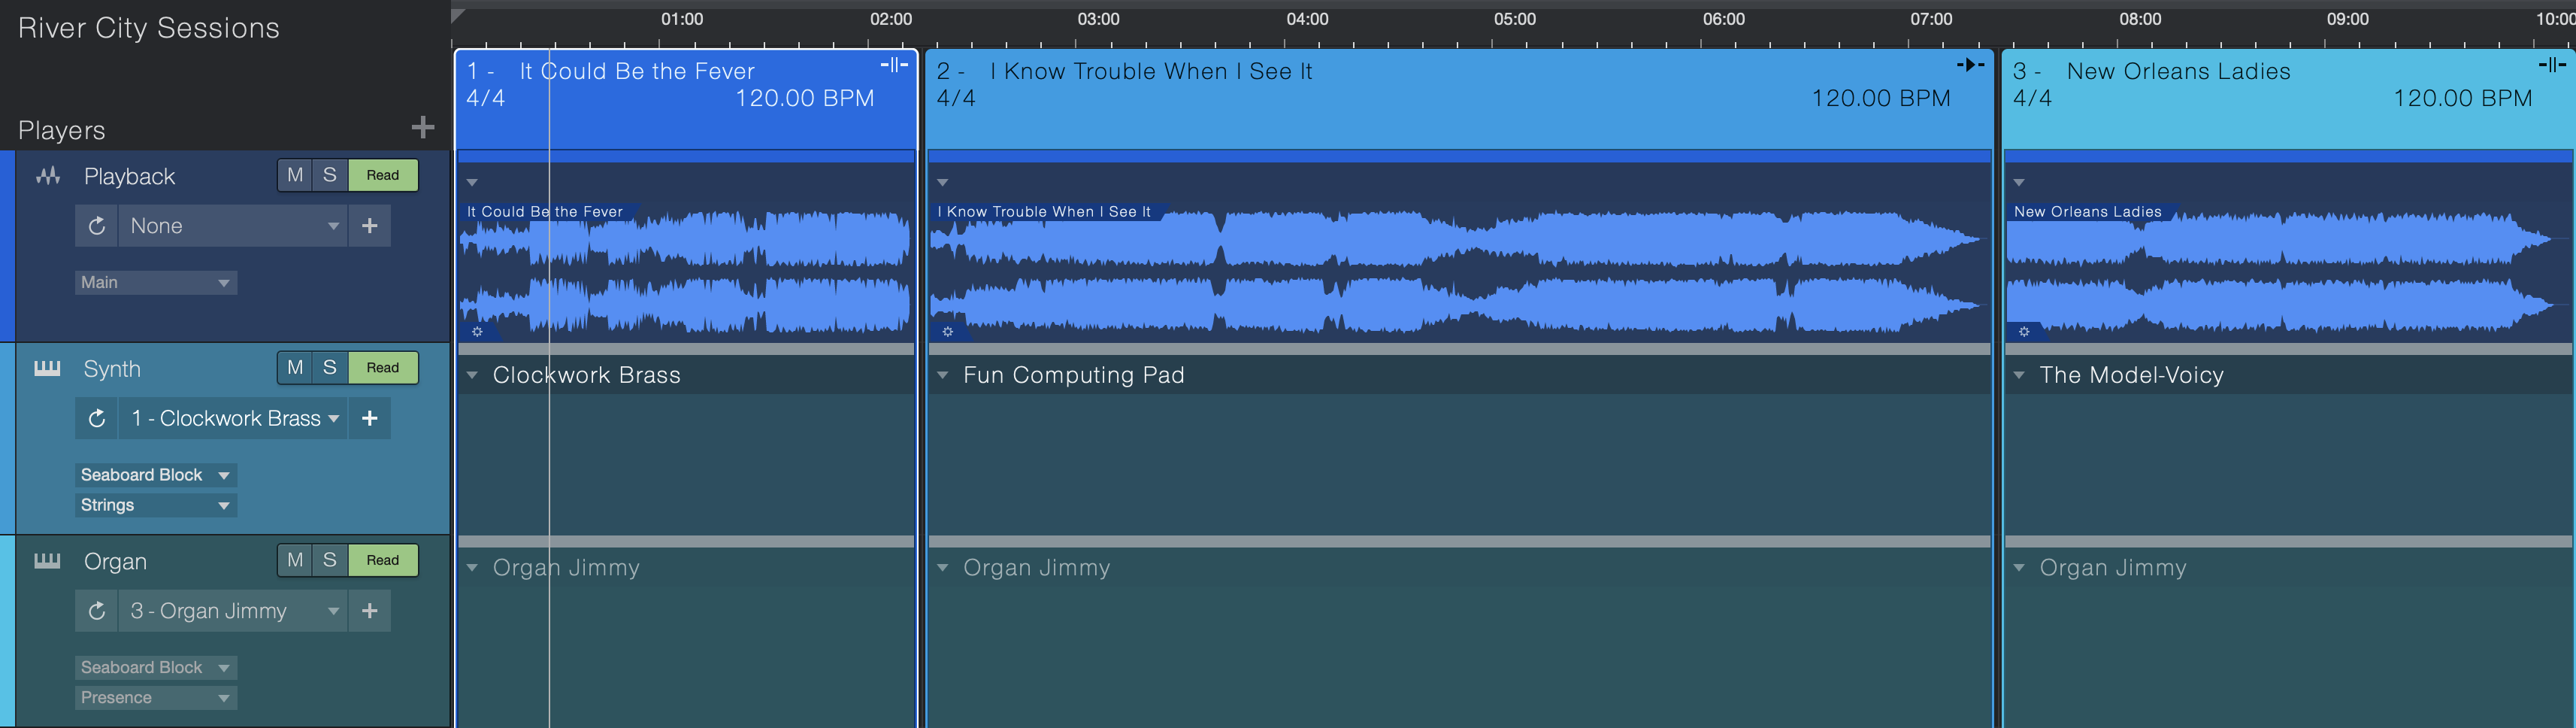
The Overview displays the Setlist Items in vertical columns and the Players in horizontal lanes. The columns and lanes are color-coded: the columns are outlined by the Item color, and the lanes are filled with the Player color.
Item Columns
The head of a column shows the Item name, its Playback Mode, as well as the time signature and tempo for the Item. Each of these is described in the Setlist section. Note that the Item name and Playback Mode can be changed here (see context menu section below), but the time signature and tempo must be changed in the Setlist.
Beneath the column head are the slots where the column intersects with the lane for each Player in the Show.
Click-and-drag the column head to reorder Setlist Items in the Overview window, which also changes their order in the Setlist. Drag an Item in either place, it affects the other.
Click-and-drag the left edge of the column head to the right to add or increase a Pause (this value changes at the same time in the Setlist Inspector window). If a Pause exists, drag the left edge of the column head to the left to reduce the Pause value. A small window appears while dragging the left edge and shows the new Start Time, the amount of deviation from the previous Start Time, and the Pause length.
Double-click an item column to set the Horizontal Zoom to fit the screen.

Click-and-drag the right edge of the column head to the left or right to change the Setlist Item length. A small window appears while dragging the right edge to show the Item length.
Note that you can change the size of the Players with the buttons at the bottom of the Players list.
Contextual Menu per Column
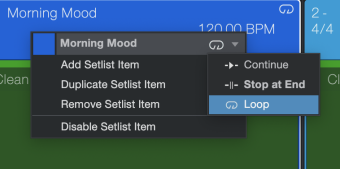
[Right]/[Ctrl]-click the head of an Item column to open a contextual menu. From this window you are able to select the Item color, change its Playback Mode, or Add, Duplicate, Remove or Disable the Setlist Item. The changes made here are also made in the Setlist.
Player Lanes
The intersection between a column and a lane is called a "slot".
Patch Selection per Slot
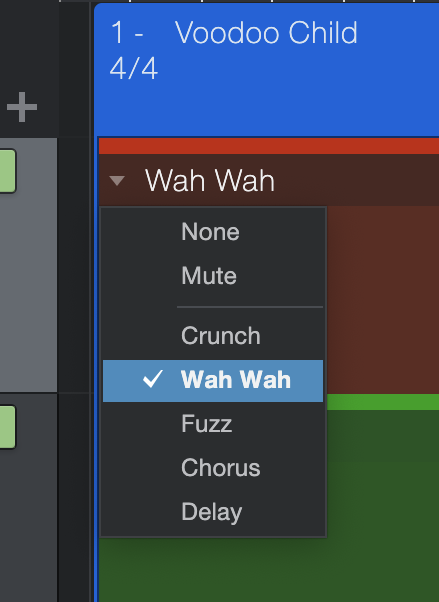
Automated Patch changes for each Player can be applied per Setlist Item or Arranger Section, and any number of additional Patches can be recalled manually during a Performance. A Player can have a list of Patches, one of which can be designated as the default Patch for the entire lane. You can override the default Patch for any slot; simply click the arrow at the top of a slot to open the Patch list and make a selection.
There are two other options in the Patch list for each slot in addition to the Patches:
- None means that no automatic Patch change happens for this Player when the Setlist Item begins.
- Mute silences the Player during that Setlist Item. This also activates the Mute button for that Player in the Player list for the duration of the Setlist Item. The Player is unmuted by the next slot that has a Patch assignment.
If your Show uses backing tracks then the Patch you assign to a slot is recalled automatically during playback. However, if your Show does not use backing tracks, then you'll need to navigate the Setlist manually. This can be done using a mouse, keyboard shortcuts, pre-assigned buttons on a hardware controller, or with the Studio One Pro Remote app.
Contextual Menu per Slot
[Right]/[Ctrl]-click on an Item slot to open a contextual menu. The options available in this window depend on the Player type.
For the Backing Track Player type only, [Right]/[Ctrl]-click the audio file inside the slot. The options in this contextual menu can
- Delete the file from the slot;
- Duplicate the file in the next slot in the lane, or
- Select in Pool, which opens the Browser/Pool tab with the audio file selected.
If you [Right]/[Ctrl]-click a different slot in any lane after selecting an audio file inside a slot, you have the additional options of Select All, Deselect All, and Undo/Redo last action.
If you [Right]/[Ctrl]-click a slot in the lane for a Virtual or Real Instrument Player, only Undo and Redo are available. The other options are grayed out.
Chord Track
Chord track is available per Setlist item (column) on the Show Page. Chord Track is automatically included with any Song imported to the Show Page.
To show or hide the Chord Track, click this button ( ) above the Players list.
Chord Track functionality in the Show Page is display-only, intended as a helpful visual chord reference for musicians to follow live in Performance View that displays the current and next Chord. Unlike in the Song Page, the Show Page’s Chord Track will not pitch-manipulate musical information in Backing Track, Real Instrument, or Virtual Instrument Players.
There are two options in the chord track inspector: Chord Display Mode and Chord Display Style.
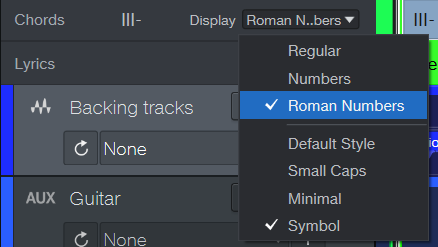
There are three different Chord Display Modes:
-
Regular: Displays the chords as letters rather than numbers. A major chord is represented by the root note alone (e.g., C). A minor chord is indicated by adding "m" or "min" after the root note (e.g., Cm or Cmi).
-
Number: For those who like to use the Nashville Numbering system, you can set your chords to be represented as numbers. A number by itself (without any other notation) is assumed to represent a major chord. Minor chords are noted with a dash after the number or a lowercase m (you can set whichever you’d prefer by changing the Chord Display Style).
-
Roman Numbers: You can also use Roman numerals to indicate chord function within a key (e.g., I for the tonic, IV for the subdominant, V for the dominant).
There are four different Chord Display Styles to choose from as well:
-
Default: There is no special Chord Display Style added when “Default” is chosen.
-
Small Caps: The Small Caps option uses letters and numbers rather than symbols ("mi" for minor, "aug" and "dim" instead of "+" and "°", etc.).
-
Minimal: This sets the style so that chord variations like minor or maj7 are displayed minimally (“m” for minor chords, “M7” for major 7 chords, etc.)
-
Symbol: This sets the style to symbols to match Nashville notation style (“-” for minor chords, “Δ7” for major 7 chords, etc.).
When a Song is imported to the Show Page using Add to Show, the Song’s Chord Track information will be carried over on import.
Alternatively, a new Chord Track can be created from scratch if none was available on import.
See the main section on Chord Track for more information on its robust compositional functionality in the Song page.
Lyrics Track
Lyrics Track is available for Lyrics editing and display for any Setlist Item on the Show Page. ideal for audience participation. You can even move the Lyrics Display to a separate monitor to act as an automated teleprompter!
Enter Lyrics directly into the Global Track or via the Lyrics Display , just like in the Song Page.
To show or hide the Lyrics Track, click this button ( ) above the Players list.
Global Lyric Track content is automatically included with any Song imported via the “Add to Show” command on the Song Page. Lyrics created in the Lyrics Lane of the Note Editor for specific Instrument Tracks are ignored.
The Show Page also supports Lyrics Display, which can be accessed from View > Lyrics.
See the main section on Lyrics Track for more information.
Arranger Track
Arranger track is available per Setlist item (column) on the Show Page. Arranger Track is automatically included with any Song imported to the Show Page—or you can set up a new Arranger Track from scratch.
Simply [Double-click] on your Arranger Track to create a new Section. Right-clicking a Section will bring up a contextual menu where you can change a section’s color, loop behavior, and more. For more information on editing the Arranger Track in the Song page, click here.
To show or hide the Arranger Track, click this button,  above the Players list.
As in the Song Page, The Show Page’s Arranger Track allows you to create verse/chorus-style arrangements in your Player Events, while also providing the following functionality:
Patch changes can be assigned coincident with Arranger Track sections. This allows for virtual instrument patch changes to automatically occur, for example, at the transition point from a chorus to an outro. When double-clicking the Arranger Track to create a new Arranger section, Players will receive a drop-down menu within the slot, aligned to the new Arranger Track section, to select a Patch. You can also use this option to automate effects Patch changes on Real Instrument Players, or selectively Mute backing tracks. Note that Patch Automation must be set to “Read” in your Players for these changes to take effect.
Triggering Arranger Sections manually
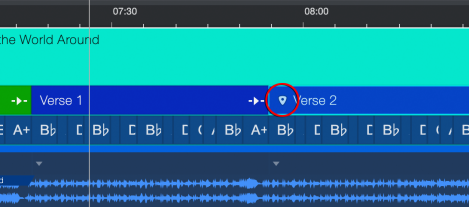
The Show Page allows you to trigger Arranger sections manually during performance, jumping your playback to any section of the Arranger Track with musical timing and without breaking rhythm. This is ideal for improvising new song arrangements on-the-fly during live performance! If you discover that the chorus of your new song is a hit during your live show, now you can choose to double it live.
Simply double-click an Arranger Track Section to prompt a jump to it. A triangular “pending jump marker” will appear at the head of the Arranger Track Section to indicate that it is the next to play. The timing of the jump will adhere to the Sync Mode option setting chosen in the Setlist inspector.
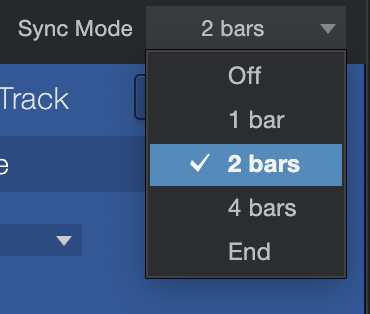
Sync Modes govern the timing of a Jump from one Arranger Section to another. Options include:
-
Off: Jump occurs immediately upon double-clicking an Arranger Section with no Sync.
-
1 bar: Jump occurs at the next bar start after the current play position
-
2 bars: Jump occurs at the end of a 2-bar section, relative to section start
-
4 bars: Jump occurs at the end of a 4-bar section, relative to section start
-
End: Jump occurs at the end of the currently-playing Arranger section, regardless of how long the selected Arranger section is.
Performance overrides
Additional useful performance override commands are also available during playback. Most of these can be triggered by a user-defined keyboard shortcut or via Studio One Pro Remote.
-
Jump immediately, bypassing sync: [OPTION + Double-click]
-
Toggle Section Playback Mode Loop/Continue [User-definable]
-
Stop at end of Section [User-definable]
-
Stop at end of Bar [User-definable]
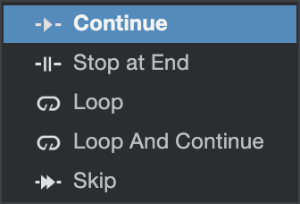
Playback Modes allow you to set automated loop points in each Arranger track section. These can be used to repeat individual Arranger sections indefinitely, or a specified number of times, before playback proceeds to the following section.
-
Continue: Section playback proceeds normally to the next section
-
Stop at End: Playback stops at section end
-
Loop: Current Arranger Track section loops indefinitely
-
Loop And Continue: Current Arranger Track section loops X times before proceeding to the next section. X is specified in “Number of Repeats” field of the [Right-Click] contextual menu of the Arranger Track.
-
Skip: Arranger Track section will be bypassed entirely for the next section in the sequence.
Note that the Show Page does not support grouped relocation of musical content by clicking-and-dragging Arranger sections. We recommend using the Song Page to set up and the Chord Track and Arranger Track to your liking before importing your finalized Song to the Show Page.
See the main section on Arranger Track for more information on its functionality in the Song page.
Arranger Track sections can also be viewed and navigated from the Performance View’s Sections View.