Performance View
It's possible to run a live show from the Show Page edit window, but Performance View offers the ideal combination of factors – large controls, a basic layout, easy to read onstage, and a screen that tells you instantly what's happening now and what's happening next. It's perfect for a notebook computer, which invariably has a smaller screen than what people use in their studios.
To enter Performance View from the Show Page, click the Perform button in the toolbar or navigate to Show/Perform. You also can use [Ctrl]/[Cmd]+[Enter], where “Enter” is the Enter key on an extended keyboard.
Holding [Alt]/[Option] and clicking onto the Perform button will open Performance View in a separate, re-sizable window suitable for use on a secondary monitor. When this window is closed, its size and position will be recalled by Studio One Pro the next time you open it.
Visibility and Control
The Performance View display is remarkably uncluttered for all the features it contains. Depending on the size of the screen used, the text and controls are scaled to make the best use of the available space.
Performance View contains three unique Views of its own: Controls, Patches, and Sections. We will address each of these in greater detail farther on—but first, we’ll discuss the critical performance features that are shared by all Views when running Studio One Pro in Performance View.
The Setlist
Most Shows revolve around a Setlist, so we made it easy to find by placing it in a drop-down menu on the top left The Setlist Items are listed from top to bottom.
If your Setlist has multiple Setlist Items, you can select them directly from the list in Performance View. After selecting a Setlist Item from the Setlist, you can then use the up and down arrows on your computer keyboard to move through the Setlist.
As each Setlist Item is selected, it triggers the Patches on all the Players to change their sounds and mix snapshots. If no backing tracks are used, this is the way to navigate the Setlist (instead of using the transport controls). You can also select Patches manually. If you don't want Patches to change automatically at all, just set the Patch Automation of the respective Players to Off. This is done inside the Players Column in the Show page edit view.
Note that automatic Patch selection is also affected by the "None" and "Mute" settings for each Player in each Setlist Item. For more information about this, see Patch Selection per Slot.
Players and Patches
A list of Players and the Patches they use for each Setlist Item is displayed on the top right. After selecting a Player from the menu, you can then use the navigation arrows on your computer keyboard to select the Players: the up and left arrows move upward through the list, and the down and right arrows move downward.
After selecting a Player, you can switch Patches manually for that Player. At the top of the list of Patches, there is a Mute setting which can be used to silence that Player for the duration of the Setlist Item. Your choices are remembered for each Setlist Item.
Selecting a Patch returns focus to the Setlist, so you can use the up and down arrows to move through the Setlist again. This makes it easy to change which Patch the selected Player uses for any Setlist Item: click the desired Patch, change the Setlist Item, click the desired Patch, etc. This can be done within seconds while the curtain is rising, without leaving Performance View.
Performance and Timeline Information
The area below the Setlist, Player, and Patches interface displays vital information about what is happening right now in the Show and what is next in the queue.
- The Title of the Setlist Item currently playing displays at the top left of the Timeline, followed by its Playback Mode (Continue/Stop at End/Loop). If the Setlist Item contains an audio file, a blue progress bar under the Setlist Item name indicates the current location inside the Setlist Item.
- The large Time/Bars counter tells you where you are in terms of Seconds or Bars, depending on the Timebase setting for the Show. This selection is made in the Show page edit view by clicking under the numbers immediately to the left of the Transport.
- Time/Total: Select the Time button if you want to view the elapsed time of the current Setlist Item. Select the Total button when you want to know the time that has elapsed since the Show began.
- Remaining: This displays the amount of time that remains for the current Setlist Item.
- Next: This shows the name of the next Setlist Item.
Transport
The transport provides three buttons: Stop, Play, and Loop/Continue. You can also use the spacebar on your computer keyboard to start and stop playback.
-
Loop/Continue affects playback behavior of the current arranger section.
-
Continue will direct the Show to play on to the next section.
-
The Loop function will Loop the current Arranger section until Loop/Continue is clicked again or the playback is stopped. This is a temporary override that will not change your Show’s original settings. Clicking it changes the Sync Mode of the currently playing section for a single section; it returns to the original setting when the next section plays.
Utility Buttons
The two buttons at the bottom right of Performance View are there to help you to manage the unexpected.
- The Mute button mutes all output from all Players.
- Use the All Notes Off button if you get a stuck note on one of your MIDI instruments.
Level Meter
Performance View provides a level meter that stretches vertically almost the entire height of the screen. It shows the combined output of all Players at any given moment during the show.
Performance View Views: Controls, Sections, and Patches
At the bottom center of Performance View, you’ll find three small buttons that control the current View setting for Controls, Sections, and Patches. Click them to choose between the following views. You can also click and drag the screen left or right to scroll to these views.
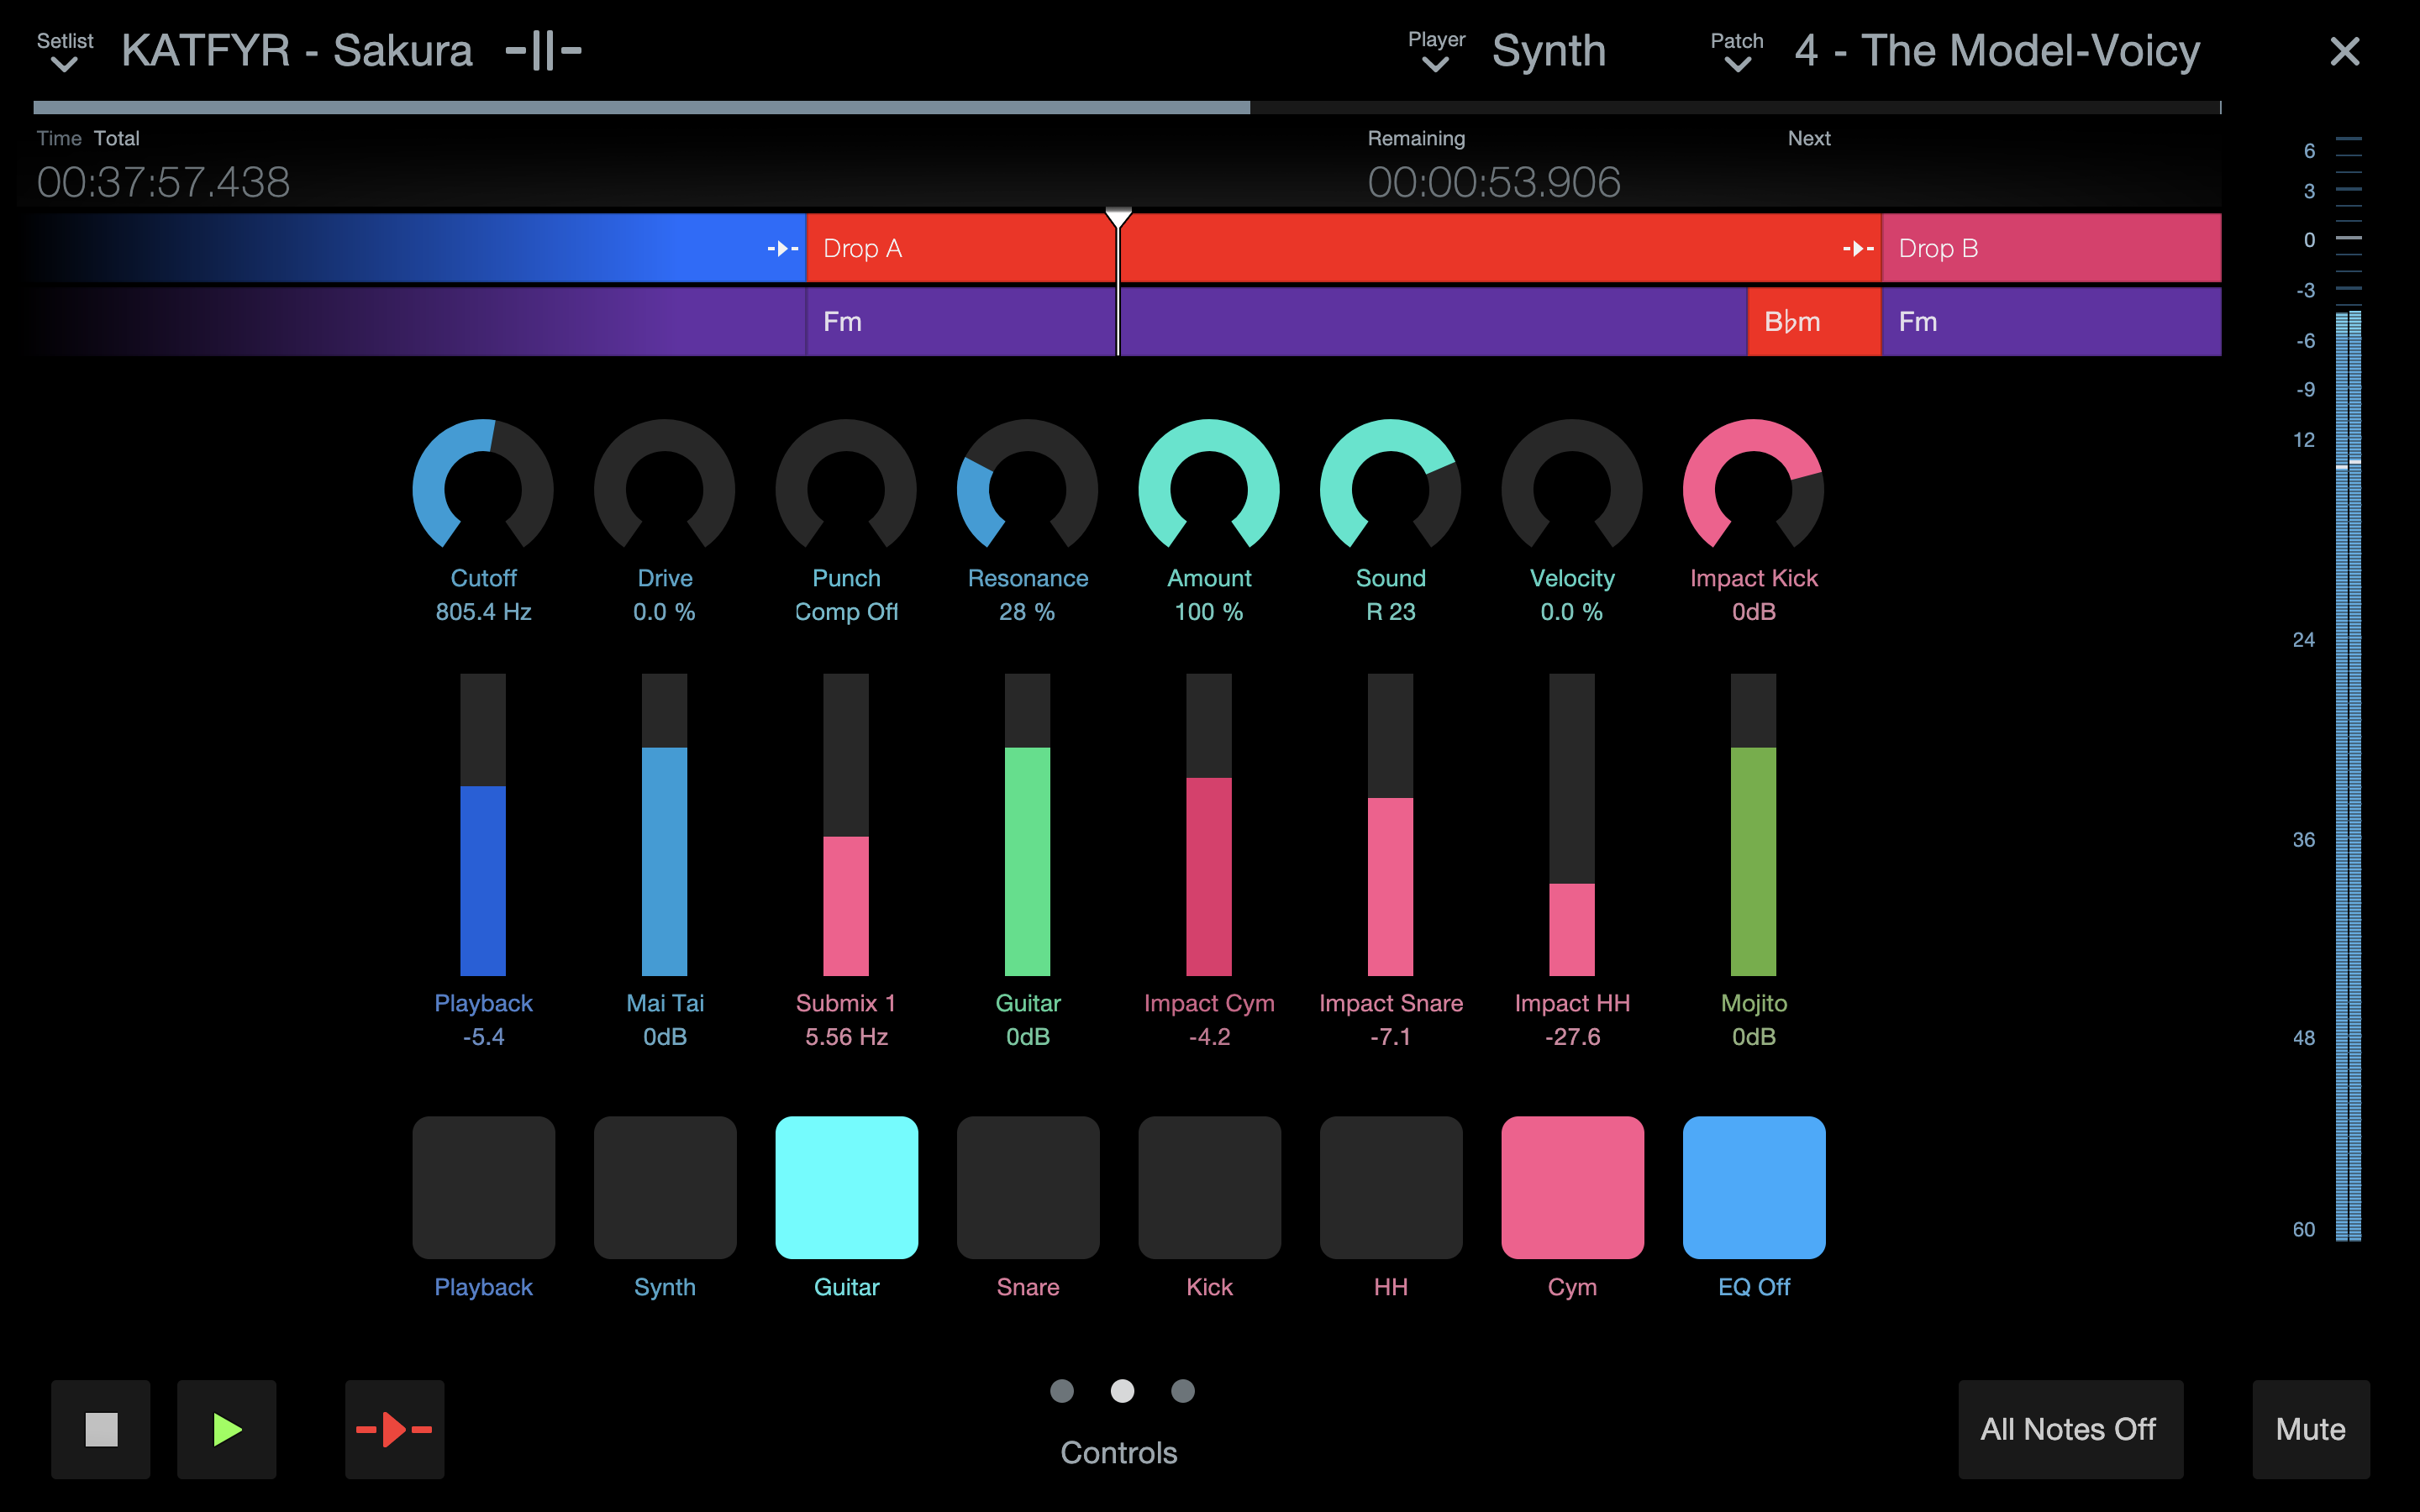
Controls View
The default view for Performance View; it contains all of the knob, fader, and button controls currently mapped to your Player instruments, plug-ins, and console controls.
Performance Controls
The majority of the Controls View is occupied by huge, color-coded controls that are visible from across the stage. You can adjust the controls with your mouse as needed, but it's much faster with a controller like the PreSonus FaderPort 16 or a controller keyboard.
As in the Show page edit view, you can double-click the name field under a control to rename it. Double-click the value field under a control to enter a specific value. You can also click-drag knobs or faders to change their values, and you can click inside a fader to jump to a value. The status of a button can be toggled by a click.
If you’re looking for more information on setting up your Controls, visit Show Controls.
Patches View
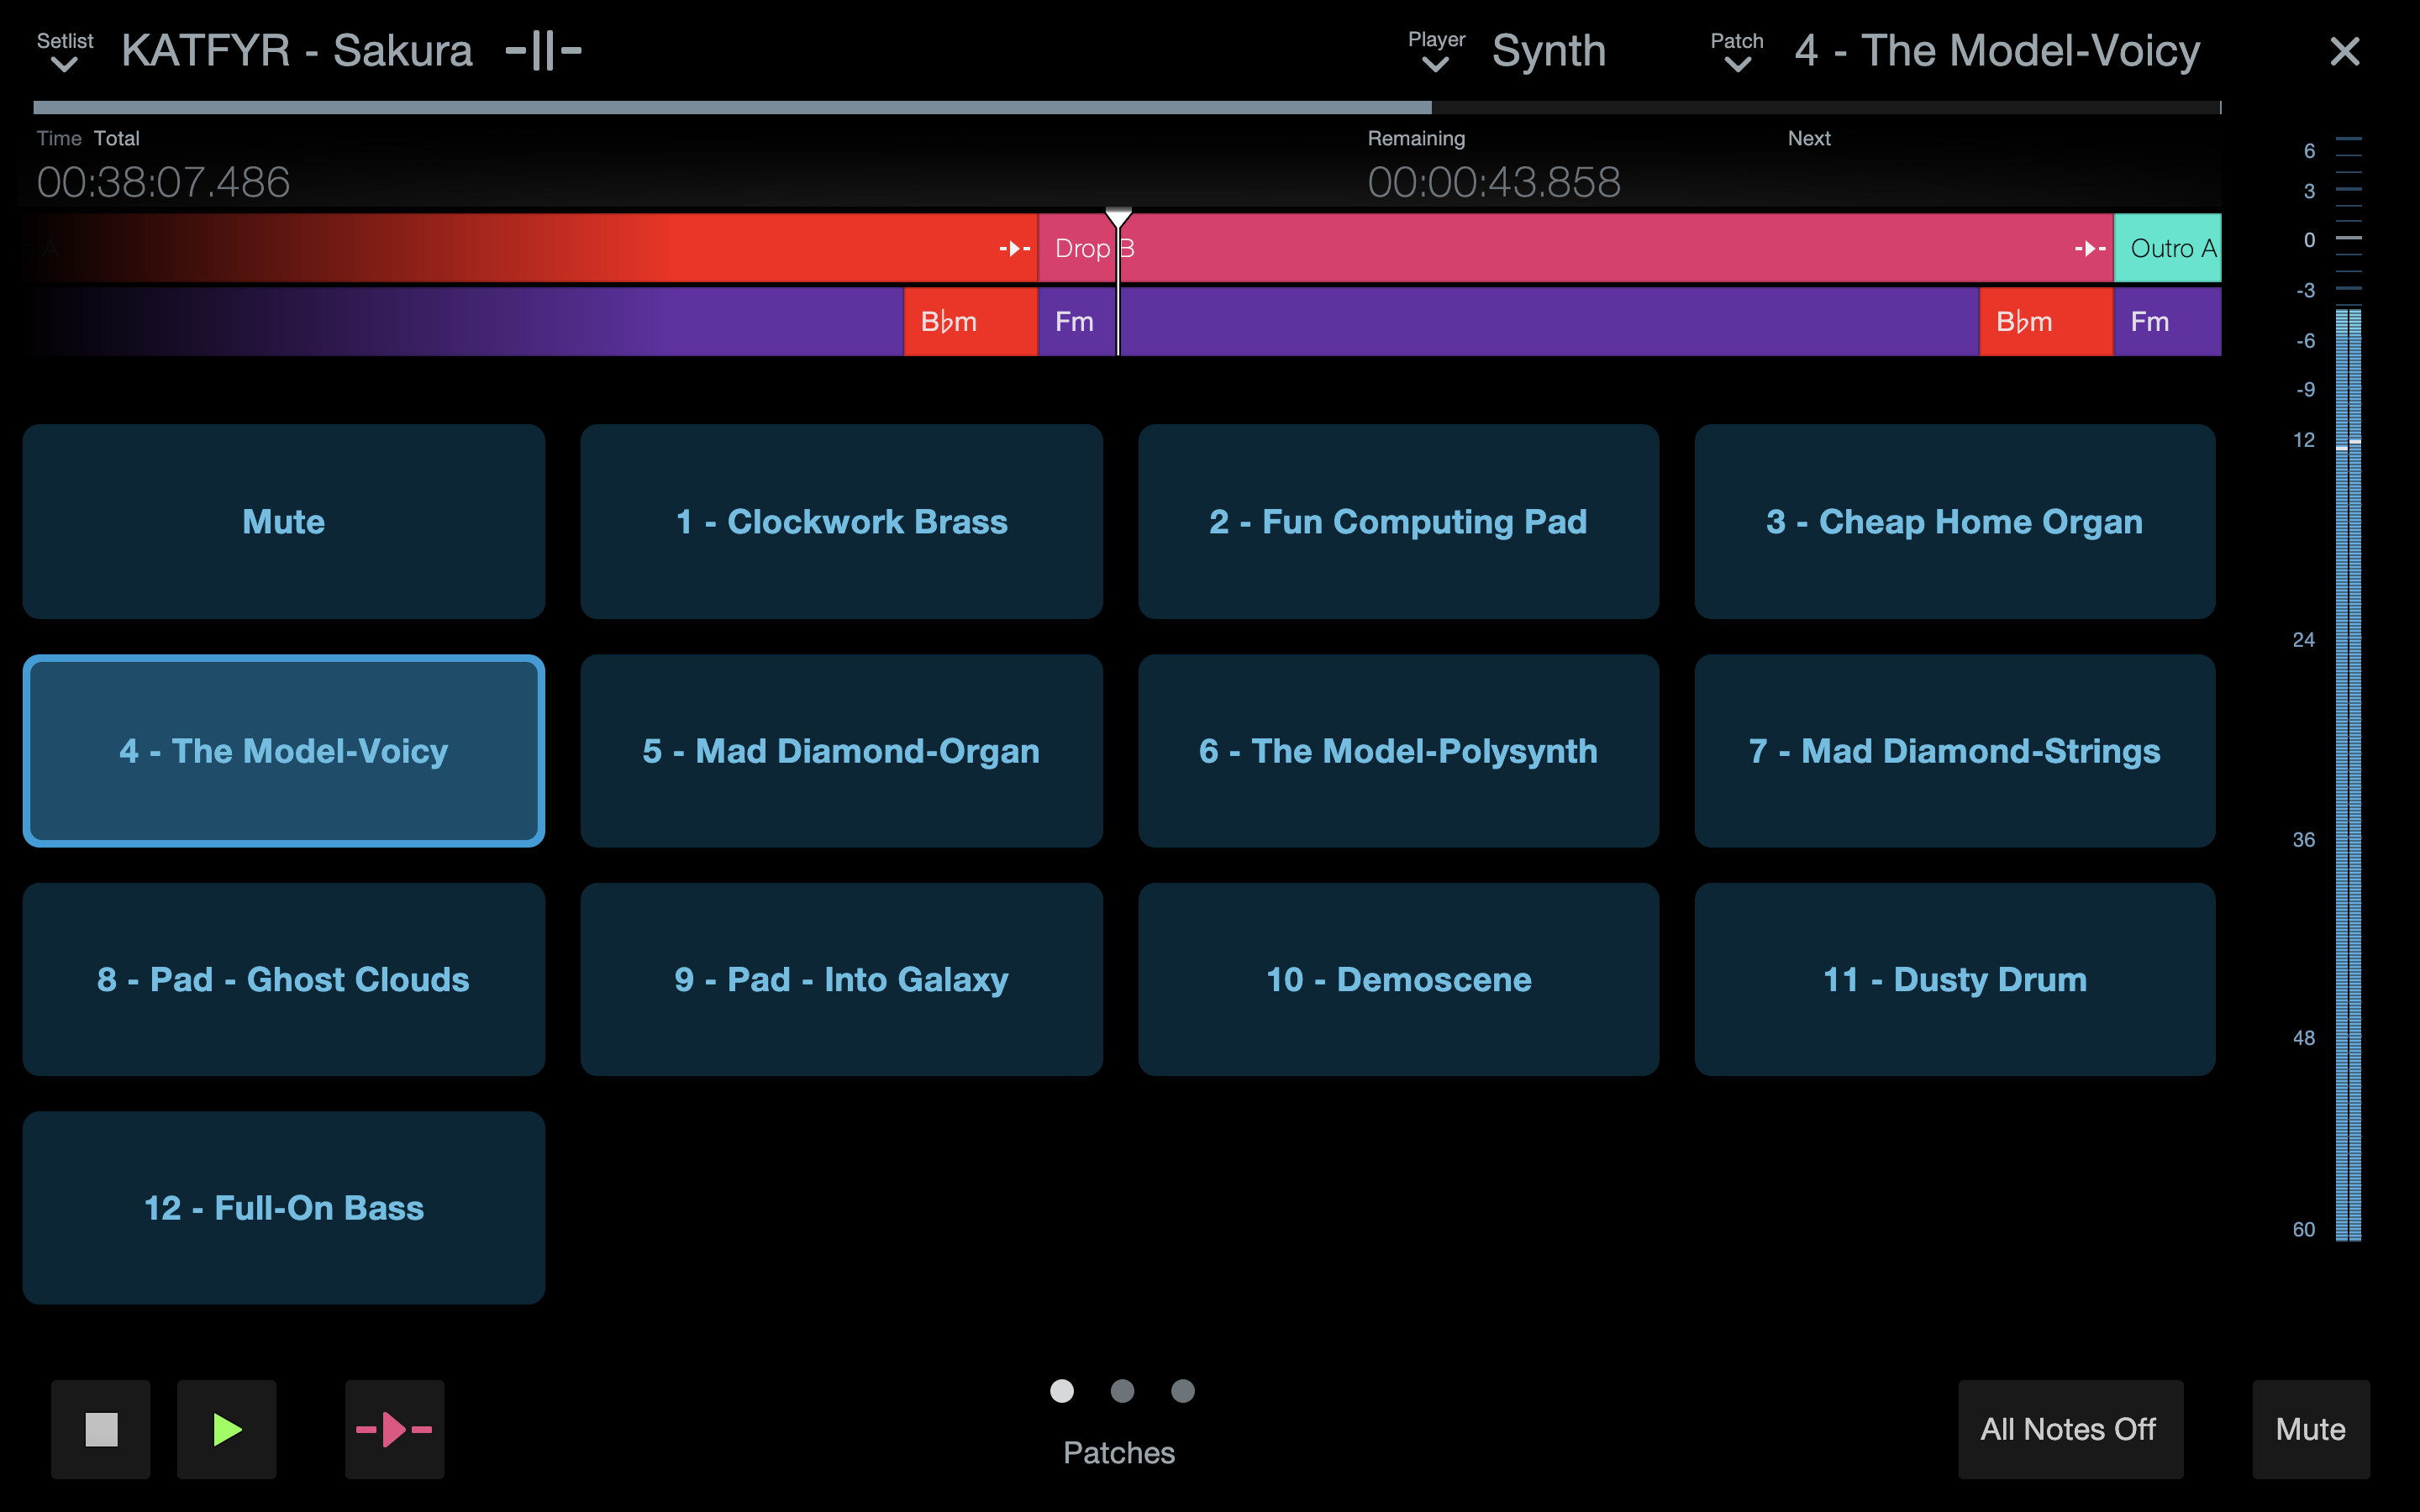
Patches view gives you ready, one-click activation of any of the Patches you’ve set up in the Show Page for both real and virtual instruments via a simple, easy-to-read button interface. Use this View to make live changes to your instrument presets, mute status, and more during a show. Patches can be used to control your Console settings as well.
Note that the Patch buttons displayed in Patches View are Player-dependent; to change the group of Patches displayed, choose the desired Player from the drop-down menu on the top right. Then, simply click on the desired Patch to activate.
Note that regardless of which Player you’ve chosen to navigate on the Patches View, you will always find a button here for the handy Mute setting.
For more on setting up your Show’s Patches, read up on Players and Patches.
Sections View
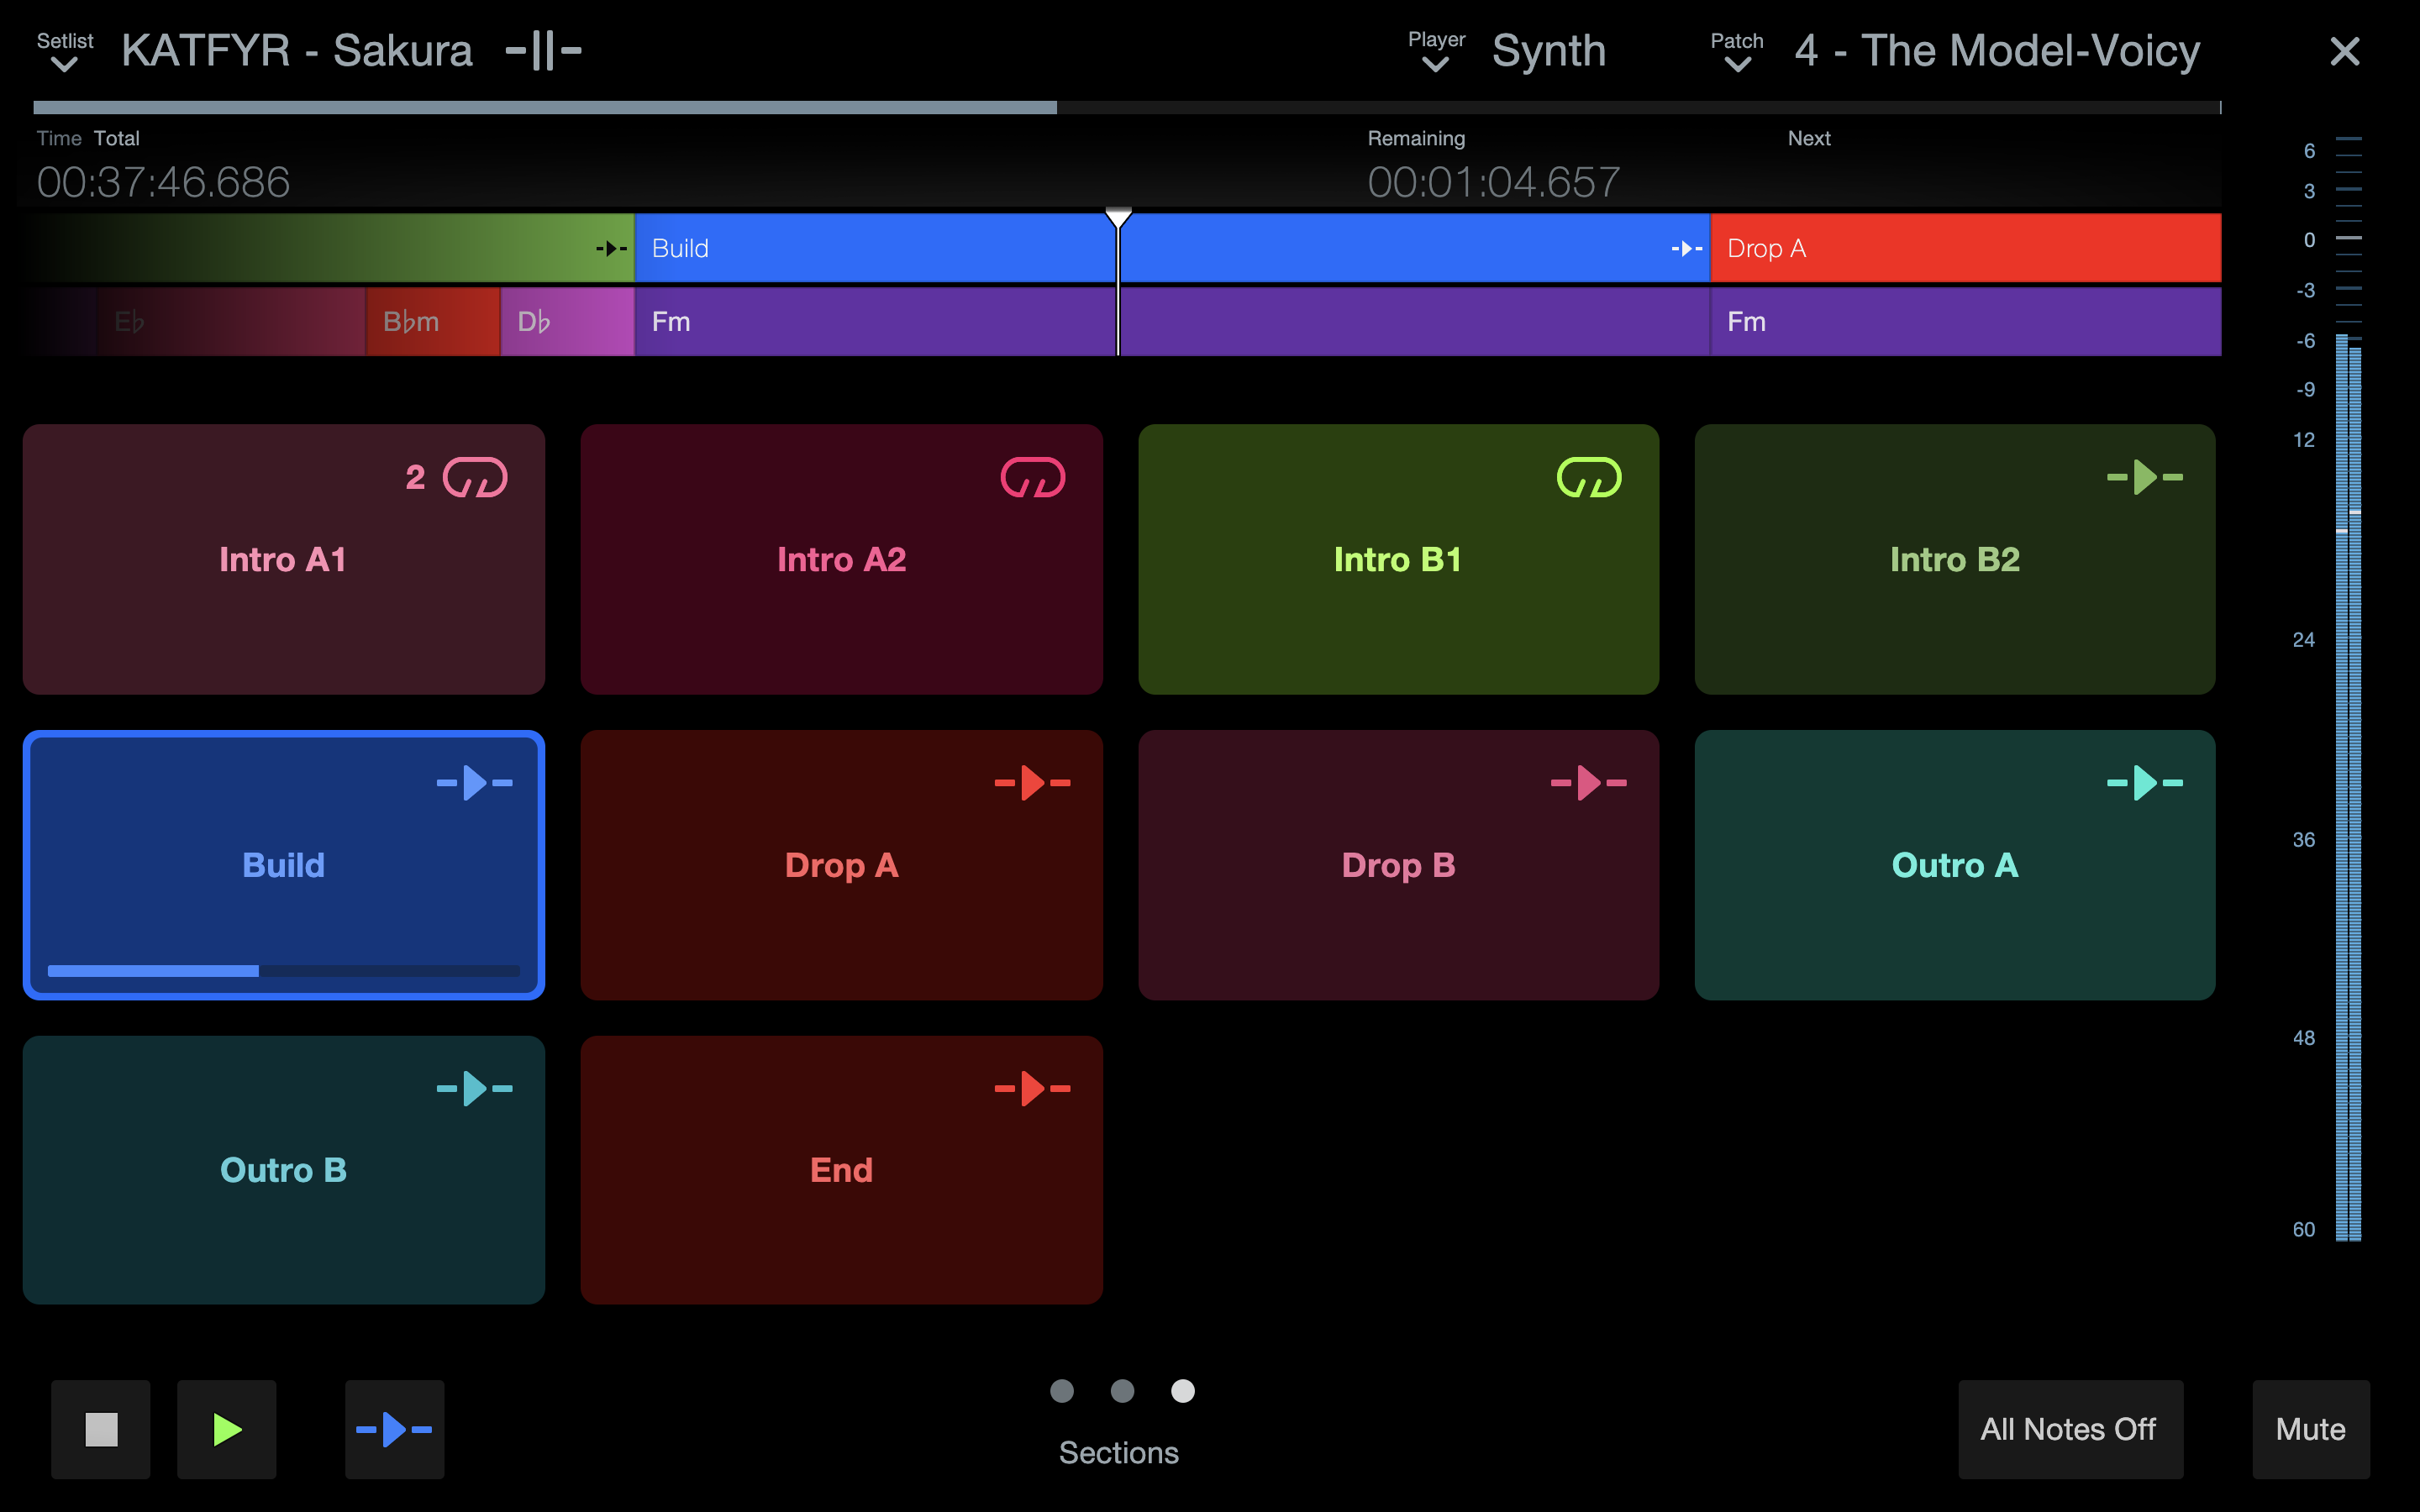
Sections View allows you rearrange a Setlist Item live. You may find during a live performance that your audience really likes the new chorus you wrote. With live arranging via Sections View, you can choose to double that hit chorus on the fly.
The Sections displayed here are populated by a Setlist Item’s Arranger Track—note that any Songs brought into the Show page will have their Arranger Tracks brought with them.
Single-Click a Section to schedule a jump to it. The Section will receive a jump indicator icon at the far left of its position in the Arranger Track in anticipation of the jump.
The jump will occur based on the Sync Mode chosen for the Section in the Show Page Edit View: Off, 1 Bar, 2 Bars, 4 Bars, or End (For more on these Sync Modes, visit Arranger Track).
Don’t forget that if you decide to change a Sync Mode setting while running a Show in Performance View, you can go back to the Show Page Edit View by clicking the X on the top right or pressing [ESC]. The Show won’t stop, and you can make the necessary changes and then re-enter Performance View. You can also use the Loop/Continue button.
Once an Arranger section is playing, it will adhere to the rules of its Playback Mode, as set in the Show Page Edit View:
-
Continue: Section playback proceeds normally to the next Section.
-
Stop at End: Playback stops at section end (be careful with this setting in live performance!)
-
Loop: Section loops indefinitely.
-
Loop And Continue: Section loops X times before proceeding to the next section. X can be specified in the Show Page Edit View.
-
Skip: Section will play normally when clicked in Sections View, but will be otherwise bypassed. The icon for Sections set to “Skip” are greyed out in Sections View to reflect this behavior.
Lyrics View
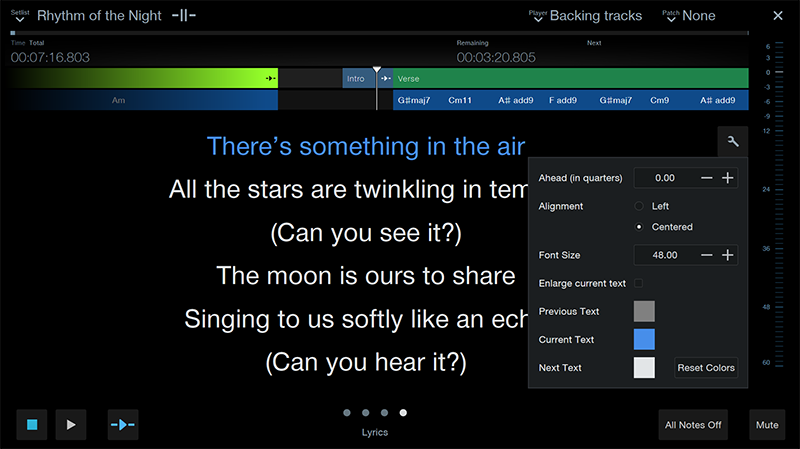
Lyrics View makes it easy to display the Lyrics of the currently-playing Setlist Item in teleprompter-style, suitable for reminding your band/choir of the current song’s lyrics. Lyrics View can be displayed on a separate monitor and in Studio One Pro Remote.
The familiar appearance features available in Lyrics Display are available in Lyrics View as well. From the Lyrics Display settings, the font size, color and alignment are freely customizable, as well as the read-ahead timer, measured in quarter notes. You can also enlarge the size of current text by selecting the “Enlarge current text” option. Click onto the boxes next to the previous, current or next text options to customize the text display colors.
Performance overrides
Additional useful performance override commands are also available during playback. Most of these can be triggered by a user-defined keyboard shortcut or via Studio One Pro Remote.
-
Jump immediately, bypassing sync: [Double-click a Section button]
-
Toggle Section Playback Mode Loop/Continue: [User-definable]
-
Stop at end of Section: [User-definable]
-
Stop at end of Bar: [User-definable]
We’re really excited to see what you come up with using Sections view and live arranging!
Let the Show Begin!
Press Play or hit the spacebar on your computer keyboard to start the Show. Instantly, the Bar/Time counters start counting, and the progress bar starts progressing. Note that while the Show is in playback, Performance View will only let you select Players, Patches, and Views. This way you can’t accidentally relocate to another part of the Show by clicking the progress bar, clicking a different Setlist Item, or using the up and down arrows.
Remember, each Setlist Item has a Playback Mode that can be set to Stop at End, which means the Show stops automatically when playback reaches the end of the longest audio file in that Setlist Item. But you can stop the Show at any time, if needed. Simply click the Stop button or hit the spacebar.
During Playback: The Show Must Go On!
If you need to make a change in the Show page edit view without stopping playback, you can. Simply click the X to close the Performance View, or use [Esc] and then click the X. The show keeps playing unless you hit the spacebar or the Stop button in the transport.
Once you are on the Show page edit view, you can disable Setlist Items, rearrange them, etc. This allows you to be as responsive as possible to the mood of the crowd, broken guitar strings, or any number of impromptu decisions you might need to make on the fly.
Performance View and Studio One Pro Remote 1.6
Performance View can also be used from Studio One Pro Remote for mobile devices, allowing for tablet control of your Show! Performance View functions identically on both Studio One Pro Remote and Studio One Pro; there are no interface changes.
There are a number of applications for Performance View on Studio One Pro Remote, including but not limited to:
-
A great touchscreen controller for live re-arranging and remixing
-
Multi-touch control of backing track volume, panning, etc.
-
Guitarists can get one-touch patch changes for Ampire and Stompbox
-
Keyboardists can get one-touch patch changes for Presence or their virtual synth(s) of choice and control effects with Controls View
-
Instrumentalists can follow the Chord Track live on a tablet to improvise in key while anticipating future chord changes
Furthermore, you can even connect multiple mobile devices to the same computer running Studio One Pro, granting multiple users simultaneous access to their individual Patches. This opens the door to exciting live collaboration possibilities.
Note this also means that anyone in your group running Studio One Pro Remote with access to your Studio One Pro network can change anyone else’s Patches… or jump to a new Arranger Section... or perhaps even stop the show—so be sure to share this access to people you trust!