Players and Patches
The Players column can hold as many Players as you need for a Show. A Player can be a backing track, a virtual instrument, or a live audio input with its associated Channel, through which a live musician or singer is combined with all of the other Players in your Show.
In addition to its location in the Players column, each Player has its own color-coded "lane" in the Overview. The Overview also displays the Setlist Items in columns. The intersection between a lane and a column is called a "slot". Each slot in a Virtual or Real Instrument Player lane can hold one Patch, which will be explained later.
Each Player is associated with one or more Channels in the Console. Use [F3] to show or hide the Console, or double-click an empty space inside any Player.
The Players Column
The Players column lets you assemble a list of the Players you need for the Show. You can navigate through the Players column with the left and right arrows on a computer keyboard, or click a specific Player to select it.
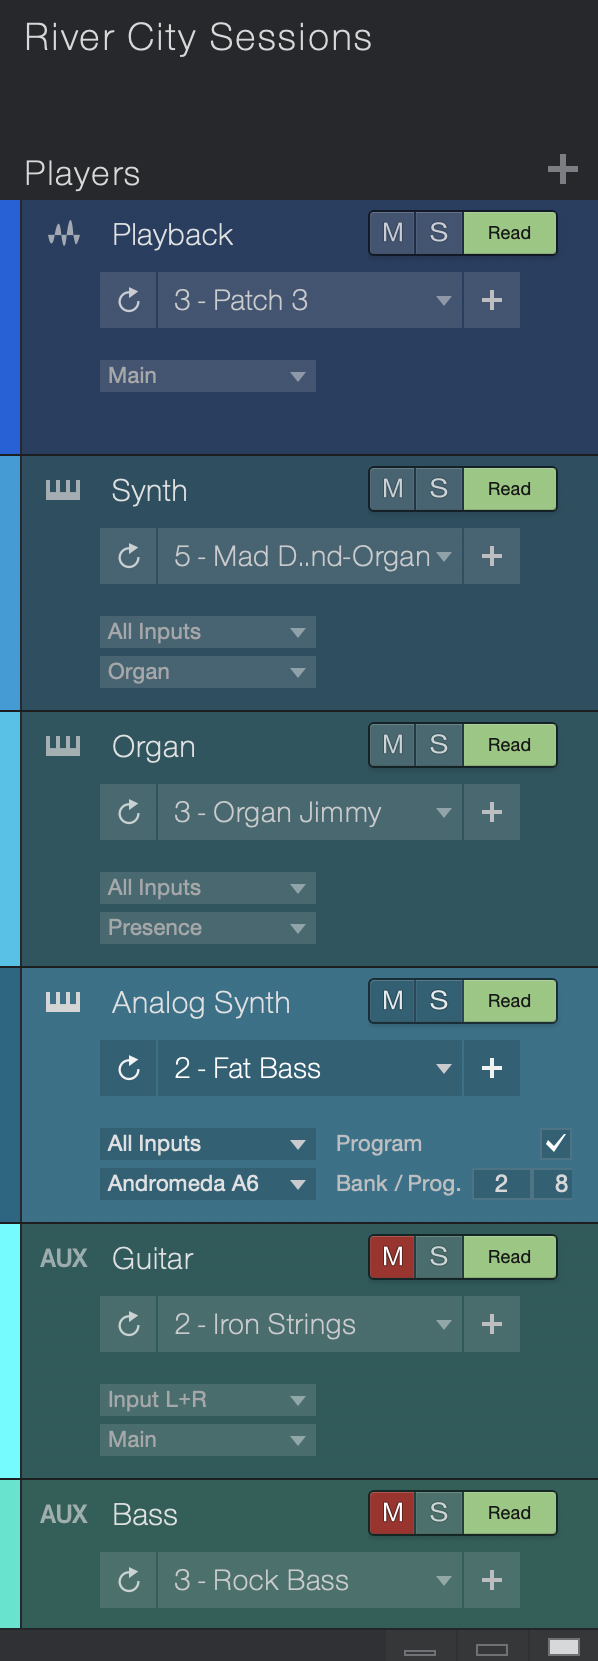
The Players column provides these features:
-
Title: Click the field once to enter a name for the Player.
-
Add Player: This button lets you add a Player to the Players column.
-
Color: As Players are added they are assigned a color automatically. This becomes the color for the lane as well. Click the color field to select a new color.
-
Instrument Editor: Click the keyboard icon to open the Editor for a Virtual Instrument Player.
-
Mute/Solo: These buttons allow you to silence or solo a specific Player.
-
Patch Automation: Each Player can be set to Read or Auto: Off. See the Patch Automation section below for details.
-
Size buttons: At the bottom of the Players column are three buttons that let you specify the Player size (Small, Medium, or Large). This naturally affects the lane size in the Overview.
The larger Player sizes show more options, which include:
-
Update Patch: Click this button to update the current Patch with any changes you have made to a Virtual Instrument or an plug-in effect.
-
Patch Menu: The arrow opens a menu, which is described in the next section.
-
Save Patch: The
 button opens the Save menu, which lets you save the current Patch. Give it a new name if you like, and click OK.
 -
Input/Output: These menus provide the same options you see when adding a similar Player.
Note that an asterisk next to the Patch name means the Patch has been changed. Use Update Patch or Save Patch to preserve any changes you want to keep.
Patch Menu
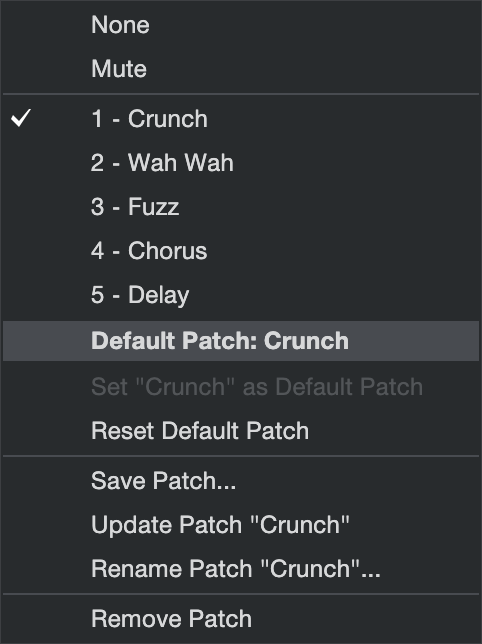
Each Player in the Players column has a drop-down menu with the following options:
-
Patch list: If you have saved Patches for this Player they appear at the top of the menu. To reselect "None" for the Default Patch, use the Reset Default Patch option described below.
-
Default Patch tells you which Patch is the current default for the Player. The default Patch is automatically applied to all slots in the Player lane. You can select a different Patch for each Item using the menu for that slot.
-
Set (Patch name) as Default Patch sets the current Patch as the default for the Player.
-
Reset Default Patch clears the Default Patch selection but retains the Patch in the Patch list for the Player.
-
Save Patch... opens the Save menu so you can name the Patch and save it.
-
Update Patch updates the current Patch with any changes you have made.
-
Rename Patch opens a window that allows you to give the Patch a new name. Click OK to save it.
-
Remove Patch deletes the current Patch from the Patch List for the selected Player.
Remember, an asterisk next to the Patch name means the Patch has been changed. Use Update Patch or Save Patch to preserve any changes you want to keep.
Contextual Menu per Player
[Right]/[Ctrl]-click on a Player inside the Players Column to open a contextual menu containing these features:
- Save/Update/Rename Patch: These features are described in the previous section.
- Duplicate Player: This adds another Player of the same type below the selected Player.
- Remove Player: This option deletes the selected Player from the Players column, and removes its lane from the Overview.
- Add Player...: Use this to open the Add Player window, which provides specific assignment options for the Player. Or if you want to add a Player with the default settings, select Add Backing Track Player, Add Real Instrument Player, or Add Virtual Instrument Player.
Add a Player
Click the  at the top of the Players column to add a Player to the Show. Each Add Player window type has slightly different options, but they are similar to what you see when adding a Track.
- The options for the Backing Track and Real Instrument Players are similar to the ones you see when Creating an Audio Track:
- Name: Click here and type in a name for the new Player.
- Count: Choose the number of Players you would like to create.
- Color: Choose a color.
- Auto-Color: Check this box if you would like your Players auto-colored.
- Preset: Choose an FX Chain to be pre-loaded on the Players.
- Input: Assign an audio Input to the new Player(s). When creating multiple Players, you can engage the Ascending option to assign Inputs to each Player in ascending order (Player 1, Input 1, Player 2, Input 2, etc.).
- Output: Assign an audio Output to the new Player(s). When creating multiple Players, you can engage the Ascending option to assign Outputs to each Player in ascending order (Player 1, Output 1, Player 2, Output 2, etc.).
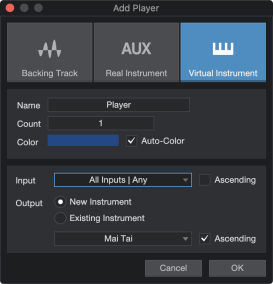
- The options for the Virtual Instrument Player are similar to the ones you see when Creating an Instrument Track:
- Name: Click here and type in a name for the new Player.
- Count: Choose the number of Players you would like to create.
- Color: Choose a color.
- Auto-Color: Check this box if you would like your Players auto-colored.
- Input: Assign a MIDI input Device to the new Player(s). Choose All Inputs | Any to accept input from any connected MIDI Device. When creating multiple Players, you can engage the Ascending option to assign inputs to each Player in ascending order of device and MIDI channel.
- Output: Assign an Instrument to the new Player(s). To create a new instance of a software instrument for each new Player, choose New Instrument and select an instrument from the provided list. To assign the new Players to a hardware instrument or to a software instrument already in use in the Song, choose Existing Instrument, and select from the provided list.
When creating multiple Players, you can engage the Ascending option to assign Outputs to each Player in ascending order of Instrument and MIDI channel.
Each of the Player types has features of its own.
Backing Track Player
The Backing Track Player is for playing mono or stereo audio files. These can be Song mixes, stems, .wav, .mp3, etc. You can drag what you need directly into the Players column from the Browser. Note that individual stems require individual Backing Track Players.
- When you drag a file to the blank space under an Item, it adds a new Player and adds the audio file to that Item, all at the same time.
- If you drag a file onto an empty slot in the lane of an existing Player, the file becomes part of the Item at that location.
- When you drop the file onto a slot that already has an audio file, the new file replaces the old one.
- If you drop a file at the end of the timeline, it adds a new player and a new Item to the Setlist. The new Setlist Item is given the name of the file.
Real Instrument Player
The Real Instrument Player is designed for external audio sources that are processed through a Channel in the Console. This could be a live guitar or bass routed through Ampire, for example, or a singer's voice routed through his signature FX Chain. You can drag FX presets or entire FX Chains from the Browser onto a Player, if you like, or drag them onto a Console Channel.
Virtual Instrument Player
The Virtual Instrument Player can be used for any type of virtual instrument. Options include the Studio One Pro Multi Instrument, which allows more complex combinations like splits and layers. You can drag an instrument from the Browser to add a new Player or replace the instrument for an existing Player. You can drag specific presets, too, which saves a step later.
This Player can also be used for external MIDI devices, which is described below in the External Instruments section.
If an instrument or preset is dragged onto a specific slot in a Virtual Instrument Player lane, it becomes the selected Patch in that slot. If it is dragged into the Players list on top of a non-empty Player, two options are available:
- Insert adds the preset with a new instance of the instrument (recommended).
- Load/Replace adds the preset using the same instance of the instrument (if it’s the same) or replaces the existing instrument with the new instrument and preset.
Insert is the default option. Press [Alt] when dragging the instrument or preset to choose Load/Replace.
We generally recommend the use of separate instrument instances per Patch, especially when working with samplers. This allows for faster switching during a performance.
For example, if you plan to use two multi-sampled Presence instruments in the same Player, here's the best way:
- Drag the first preset onto a slot in a Virtual Instrument Player lane.
- Drag the second preset onto the next slot in the same Player lane.
This adds separate instrument instances for each preset. Now when the Show crosses from the first Setlist Item into the second, the Player switches instantly from the first Presence instrument to the second Presence instrument, rather than loading a new set of samples into the first Presence instrument.
Note FX and the Players List
Dragging one of the Note FX or a Note FX preset from the Browser/Instruments tab onto an empty spot in the Players List creates a new Player and a new Multi Instrument, to which you can add other instruments. If you drag one of the Note FX or a Note FX preset onto a Player with an existing Multi Instrument, the effect is added to that Multi Instrument.
External Instruments and the Players List
Dragging an External Instrument from the Browser/Instruments tab onto an empty spot in the Players List creates a new Player. The Large view displays a checkbox to enable or disable MIDI Program changes, and two fields are available to enter Bank and Program numbers. These are transmitted to the external instrument when a slot that uses this Patch is selected in the Player lane. For more information, see the Set Up Your MIDI Devices and Set Up External Hardware Instruments sections.
For the curious: If you drag a virtual instrument preset onto a Player with an existing External Instrument, for example, the new instrument is added as a Patch to that Player. We recommend using separate Players for virtual and external instruments, though.
Patches
The current state of a Player can be saved into a Patch, including a complete snapshot of all instrument, plug-in and mixer settings. There are two ways to save a Patch:
- All views: [Right]/[Ctrl]-click and select Save Patch... from the menu.
- Medium / Large views: You can also click to open the Save Patch window.
In either case, give the Patch a name and click OK to confirm.
Working with Patches
Here's a quick description of some of the ways Patches can be used:
- When you drop an instrument preset into an empty slot in an existing lane, this loads the instrument and preset and automatically creates a new patch with the same name as the preset.
- After saving a Patch you can make this Patch the default for every unassigned slot in the lane. A slot that already has a Patch assignment will not change.
- If the Player has a default Patch, you can add another preset to the same Player and save it as a Patch too. After this you can select it as the Patch for any Item slot in that lane instead of the default preset.
- For a Virtual Instrument Player you can simply drag the new preset from the Browser to the desired slot and it is substituted for the existing Patch without altering the default Patch selection.
- If you change an instrument parameter, you can save that edit as a new Patch inside the current slot without the need to store it as a preset for the instrument.
Creating Patches with Drag and Drop
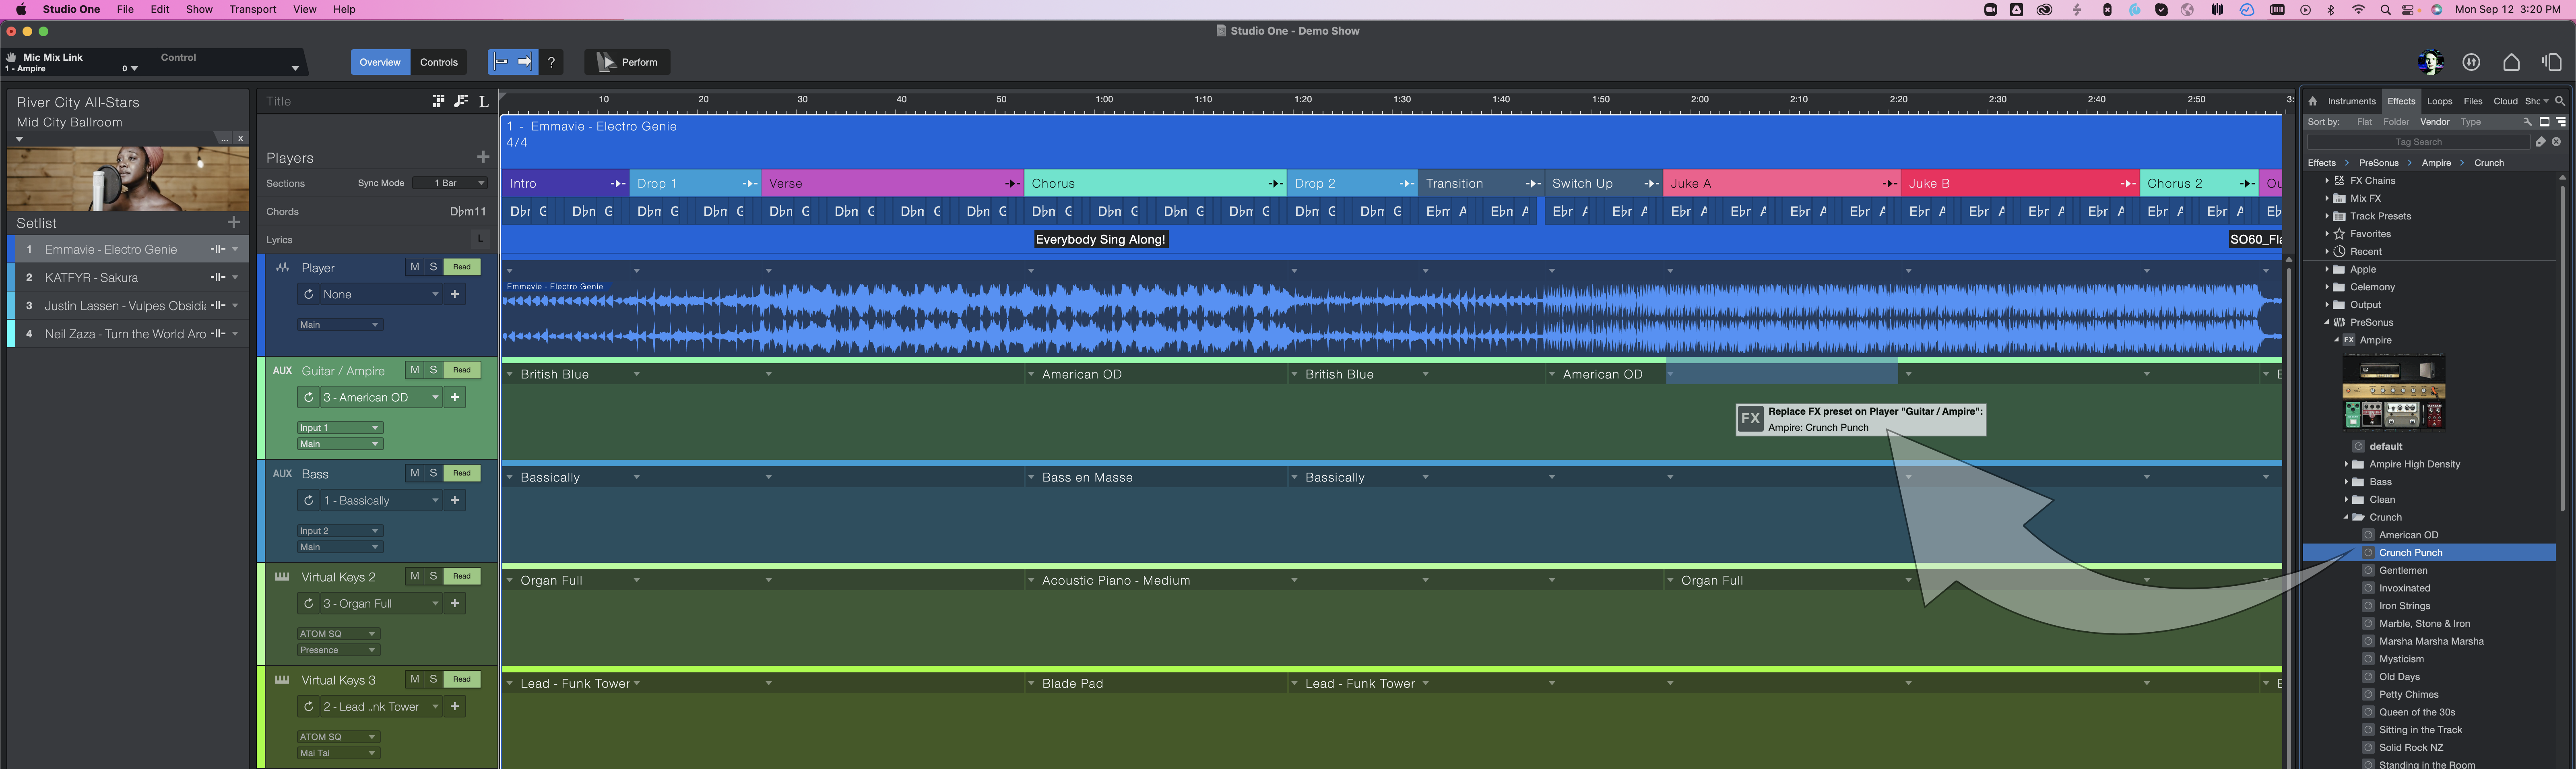
You can create Patches for Virtual Instrument, Real Instrument, or Backing Track Players by dragging and dropping Instrument Presets, Effects Presets, or Effects Chains from the Browser to your lane.
-
Dragging a single virtual instrument Preset from the Browser to a Patch slot of a Virtual Instrument Player adds the instrument, selects the Preset, and creates a new Patch with the same name.
-
Dragging an Ampire preset from the Browser to a Patch slot of a Real Instrument or Backing Track Player adds the plug-in, selects the Preset, and creates a new Patch with the same name.
-
Dragging a complete FX Chain to a Patch slot of a Real Instrument or Backing Track Player adds all of the plug-ins, and their settings, and creates a new Patch with the same name.
This can be used to quickly and easily set up and automate patch changes for guitar tones or synth patches that better suit more dynamic or relaxed passages during the flow of a song.
Patch Automation
As stated previously, each slot in a Virtual or Real Instrument Player lane can hold one Patch. Having Read mode enabled for a Player means that when a Setlist Item is activated, either manually or during playback, the Patches that were assigned to each slot for that Player lane are recalled. If Patch Automation is disabled (i.e., set to Auto: Off), Patches are not recalled unless they are selected from the Patch menu or from the Patch List in Performance Mode.
Because an entire instance of a virtual instrument or effect is created for every Preset you place in an Arranger section, transitions from one Preset to another across Arranger sections will result in non-audible, seamless patch changes.