The Console
Mixing in Studio One Pro is primarily done in the Console. Open the Console by clicking on the [Mix] button or by pressing [F3] on the keyboard.
Each channel of audio in your Song is represented by a Channel in the Console. Audio Tracks in the Arrange view are directly represented by Audio Channels in the Console, whereas Instrument Tracks have no direct representation in the Console. Instead, Instrument Channels represent the audio output of virtual instruments. There are several other Channel types discussed below, including Input, Output, Bus, and FX Channels.
It is important to note that the Console opens by default in Large mode, and the following descriptions assume this mode is engaged unless otherwise noted. For more on this topic, refer to the Alternative Console Layout section of this chapter.
Channel Features
The following features are common to all Channels.
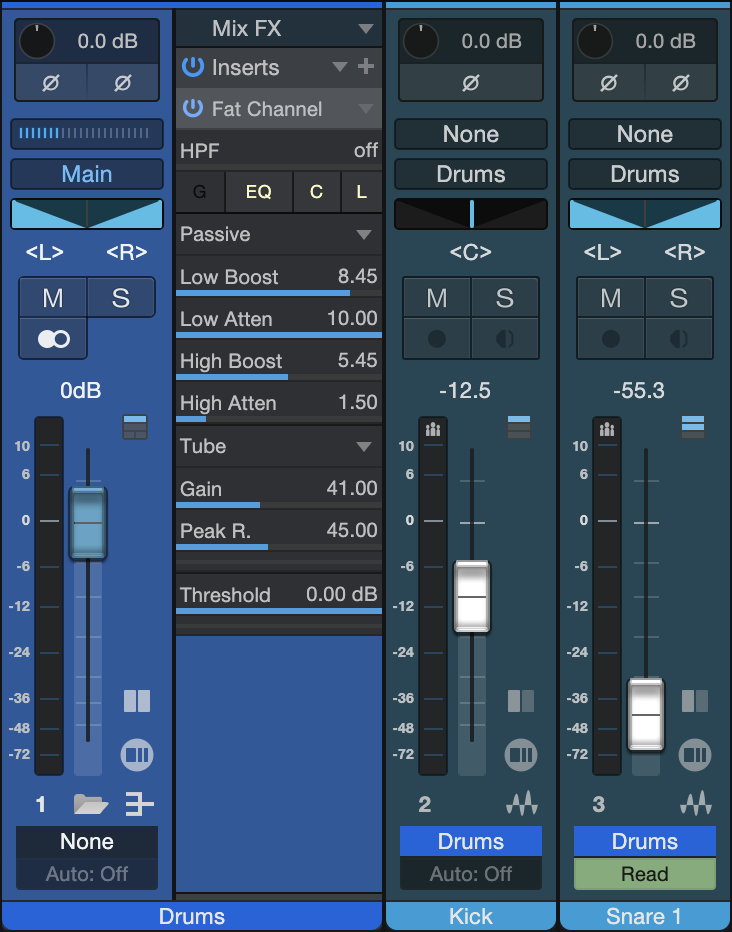
Input/Output
At the top of each Channel is a display of its configured Input and Output, with the Input shown at the top and the Output below it. All Channels are configured with Main Out as their Output by default.
Audio Channels show the hardware audio input selection. Instrument Channels display the name of the virtual instrument from which they get their input. Bus and FX Channels display a graphical count of the number of Tracks assigned or sent to them, rather than a discrete display of input channels, as their input source is usually from multiple Channels. Click on the Input area on a Bus or FX Channel to display a pop-up list of all assigned/sent Tracks. Clicking on a Track in this list selects and expands that Track in the Mix view.
Click on any Input or Output to display and choose from a list of available routing options for any Channel. If several Channels are selected, they can be assigned instantly to the same Input or Output by making a selection for any one of the selected Channels. It is also possible to assign all selected Inputs or Outputs in ascending order based on the audio hardware configuration.
Clicking on the Input for an Instrument Channel opens the interface for the source virtual instrument.
Panner and Fader
All Channels feature a horizontal panner and vertical volume fader below the I/O-selection display. The panner can be clicked-and-dragged horizontally, allowing the audio for each Channel to be positioned left or right in the stereo field.
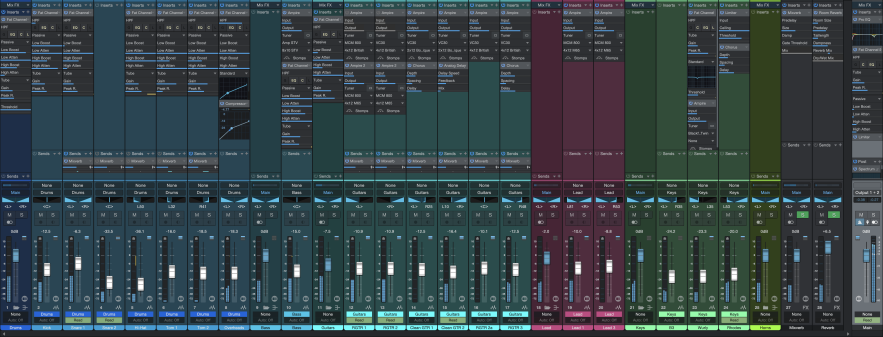
Panning options
Right-click the panner to bring up the contextual menu of panning options.
You can choose from:
-
Balance: The default mode which allows you to position the Channel’s signal left to right in the stereo image.
-
Dual: A stereo panner that allows for independent left/right panning.
-
Binaural: A stereo panner that employs mid/side processing to manipulate the perceived width of stereo signals, from mono to double the normal width.
Note that Dual and Binaural pans don’t apply to Mono channels.
Double-click the pan interface to pop up a larger panner interface suitable for fine control over your pan adjustments. These pop ups will display for the currently-selected channel when you press the left/right arrow keys to navigate across the console.
Select “Use Binaural/Dual for New Channels” to set all new Channels to use your desired pan type.
The volume fader can be click-and-dragged vertically to control the output volume for each Channel. Volume and Pan can be edited on multiple Channels simultaneously when Channels are Grouped. Numerical values may also be entered for pan and volume.
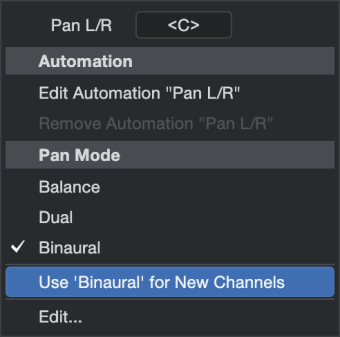
When using Dual Pan:
-
Click and drag on the middle of the interface to change the joint balance of both panners (Alternatively, use the mousewheel).
-
Click and drag on an endpoint of the interface to balance a single side at a time.
-
Click and drag up or down to widen or narrow the stereo width (alternatively, CTRL+mousewheel).
Note that you are able to drag the stereo width into the negative direction when crossing the zero-width point. This will be indicated by a red color change in the interface.
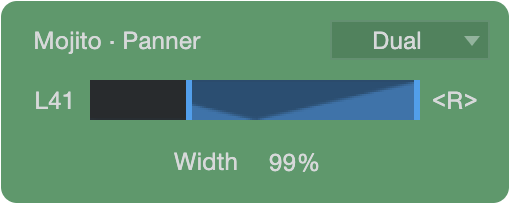
When using Binaural Pan:
-
Click and drag the panning interface left or right to adjust balance.
-
Click and drag the width control left or right to adjust width. Double-click the width control to enter the width value with the keyboard. Alternatively, mouseover the width control and adjust via the mousewheel.
More advanced stereo panning control can be had by using the Dual Pan and Binaural Pan plug-ins.
Volume and Pan settings
The volume fader can be click-and-dragged vertically to control the output volume for each Channel. Volume and Pan can be edited on multiple Channels simultaneously when Channels are Grouped. Numerical values may also be entered for pan and volume.
Studio One Pro uses a -3 dB pan law for all channel panning. On stereo channels, the panner adjusts the balance of left and right signal levels.
Mute/Solo
Solo mode is also known as Solo-in-Place, or SIP. Channels can be muted or soloed by clicking on their Mute and Solo buttons, respectively. You can also press [M] for Mute or [S] for Solo on the keyboard to mute or solo selected Channels. Muting silences the Channel’s audio from the Console so you won’t hear it. Soloing silences all except the audio for the soloed Channel, so you only hear the soloed Channel. Any number of Channels can be muted or soloed at one time.
When using the [M] or [S] keys to mute or solo an Instrument Track that has a virtual instrument attached to it, mute or solo is applied to the note data Track in the Arrangement view, rather than to the audio Track in the Mix view. [M] and [S] have no effect on Bus or FX Channels (see Solo Safe below).
You can perform a Global Solo Off, which disengages Solo on any Track that has it engaged, by pressing and holding [Ctrl] on the keyboard and then clicking on any Solo button. Performing the [Ctrl]-click again recalls the previous solo settings, returning any previously soloed channels to the solo state. This can be useful when comparing a group of soloed Tracks to other Tracks in your mix.
Solo Safe
It is possible to place Console Channels in Solo Safe mode. When any Channel in the Console is soloed, all Channels with Solo Safe engaged are also soloed, and all other Channels are muted. To engage Solo Safe on any Channel, [Shift]-click on its Solo button in the Console. The Solo button is green when Solo Safe is engaged.
Note that FX Channels have Solo Safe engaged by default because effects may be critical to how soloed Channels sound in the mix.
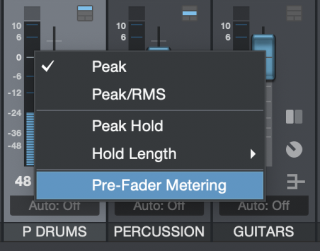
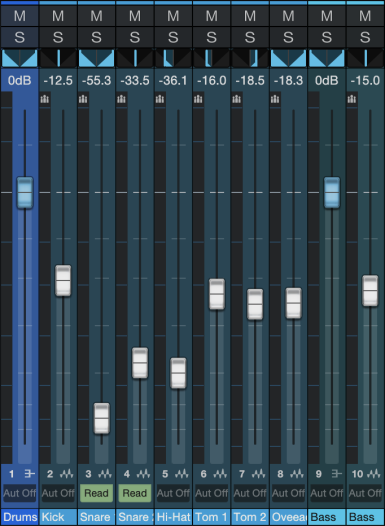
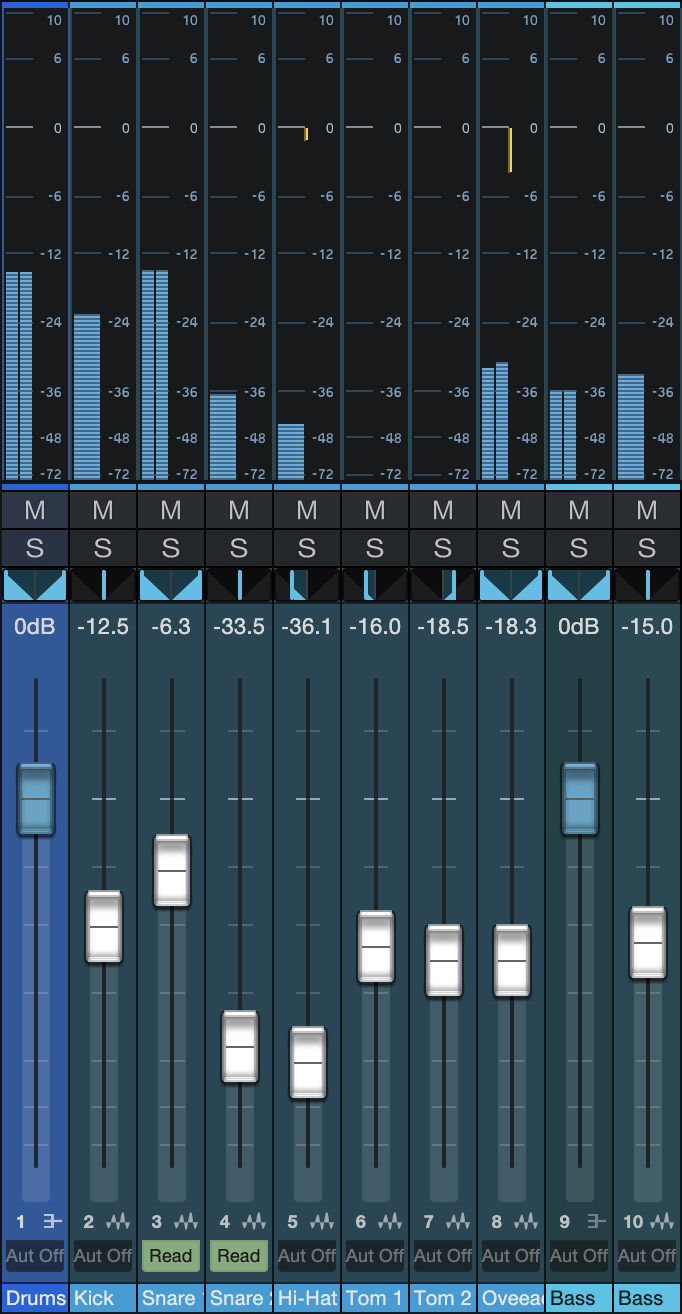
Metering Mode
Each Channel has a level meter to provide a visual display of audio levels. Several metering modes are available: Peak, Peak/RMS, and Pre-Fader Metering. To select the metering mode, [Right]/[Ctrl]-click inside the meter of any Channel.
Peak and Peak/RMS modes are described in the Metering section of this manual. They are mutually exclusive. Note that this selection does not affect the metering mode of the Main Out or Sub Outs. Either mode can use Pre-Fader Metering.
Pre-Fader Metering is not enabled by default. When it is enabled, the level meters show levels independent of fader position. When it is disabled, the level meters respond to fader position. This is known as Post-Fader Metering. The selection you make will be applied globally to all Channels, including the Main Out and Sub Outs.
Copy/Paste Channel Settings
It is possible to copy the settings of one Channel in the Console and paste them onto another Channel, or multiple channels simultaneously. This allows you to carry the level, panning, and insert/send effects between Channels in the current Song, the Channels of other Songs, and even to the Channels on other pages (Song, Project, Show, etc.). Any Channel type can be a source or destination: Audio, Instrument, Aux, Bus, VCA, or Master, with the exception of the Listen Bus.
This is as simple as using the normal copy/paste commands:
-
Click to select a Channel.
-
Use [Ctrl]/[Cmd]+[C] to copy its settings.
-
Select another Channel or group-select Channels using [Shift] or [Cmd]-click.
-
Use [Ctrl]/[Cmd]+[V] to paste the settings.
These commands are also available in the contextual menu: [Right]/[Ctrl]-click a Channel and you'll see those options near the top of the list.
Automation Mode
The Automation mode for each Channel is displayed at the bottom of the Channel. By default, this mode is set to Off. Click on this display to choose an Automation mode or to add and remove automation parameters.
Name
Channel names are shown at the bottom of each Channel in the Console. Double-click on the name, type a new name, and then press Enter to change the name of any Channel.
To find a specific Channel, use [Ctrl]+[Alt]/[Option]+[C] to open a dialog box, then type the Channel name or number. This method works whether the Console is visible or not.
Insert and Send Device Racks
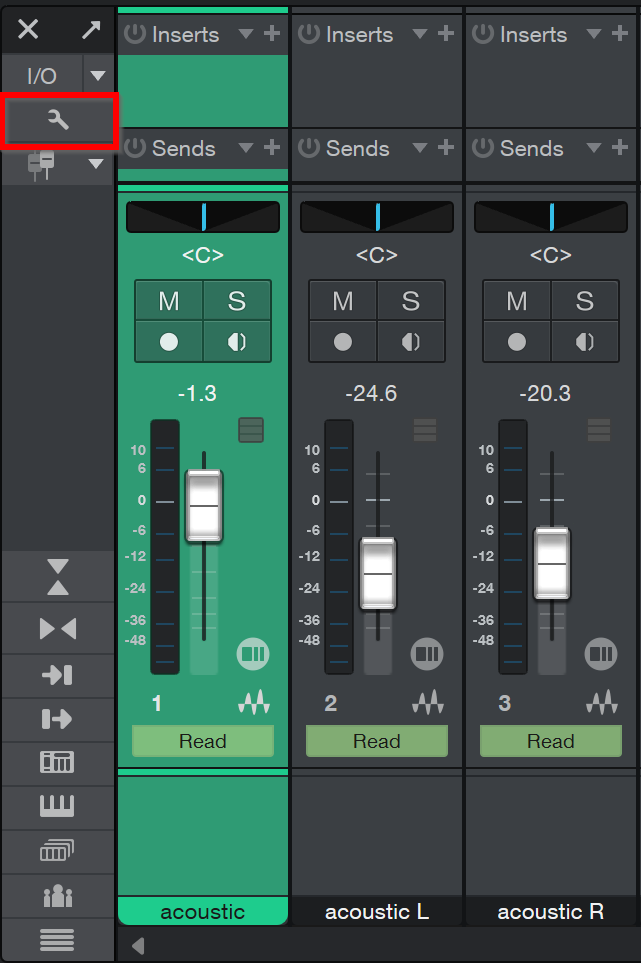
Each Channel in the Console can have its own set of Device Racks. Audio, Instrument, FX, and Bus Channels include Insert and Send Device Racks. Send Device Racks can be hidden or displayed: Open the Console options (the wrench-shaped button) and change the setting of the Sends/Cue mix option inside Channel Components. Note that the Insert Device Racks are hidden in Small Console mode.
In Large Console mode, the Insert and Send Device Racks can be sized vertically by clicking-and-dragging on the divider between them. Hold [Shift] while dragging the divider to change the size of the Insert Rack for a single Channel. Double-click the divider to unify the Insert Rack size for all Channels, or hold [Ctrl]/[Cmd] while dragging the divider.
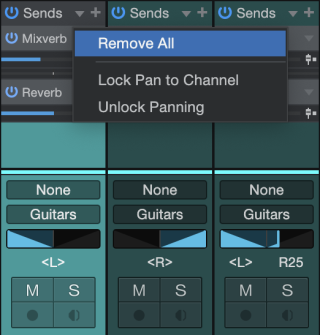
In any Send Device Rack, all Sends can be removed simultaneously by choosing “remove all” from the Send Device’s drop-down menu. This can be applied to several Channels at once when they are group-selected.
Channel Types
Input
Input Channels represent the configured hardware audio inputs. They can be mono or stereo, depending on the configuration of the hardware input they represent. Use the Input Channels to accurately meter inputs or to add effects processing to an input.
Audio
Audio Channels are direct representations of Audio Tracks in the Arrange view. Each Audio Track has a corresponding Audio Channel in the Console, with corresponding Record Enable, Monitor Enable, Solo, and Mute controls.
Instrument
Instrument Tracks in the Arrange view have no directly corresponding Channels. An Instrument Track outputs to a virtual instrument, and the virtual instrument then creates sound. Thus, virtual instruments output audio to Instrument Channels in the Console. A virtual instrument might have any number of outputs, as described in the Set Up Multiple Virtual Instrument Outputs section of the Recording chapter, and each has a corresponding Channel in the Console.
Aux
An Aux Channel allows an external audio source to be controlled by the Console without the need for an associated track. The incoming audio can be processed by the native plug-in effects, and its volume can be controlled through the sample-accurate automation provided by Studio One Pro. For more information, see Set Up an Aux Channel.
Bus
The audio output of multiple Channels can be routed directly to a single Bus Channel. This lets you create a submix so that the audio from several Channels can be processed together before being routed to the main output. Although less common, it is also possible to use Sends to route audio to Bus Channels.
For instance, several drum Tracks might be routed to a Drum Bus, where the audio is compressed and equalized, and then routed to the main output. That audio could also be routed to an FX Channel, through a Send, to apply a reverb effect, which would be applied to all audio routed to that FX Channel.
From the source list of your Bus channel, you can select individual channels or click the “Select All” option to select all subordinate channels routed to the Bus Channel.
Bus Channels can be mono or stereo. Click the Channel Mode button in the Bus Channel to select the desired option.
FX
FX Channels are what are traditionally known as effects return channels, used to apply effects to multiple signals simultaneously through the use of Sends. Audio can be routed from any Channel through a Send to an FX Channel, which can have any number of effects inserted in its Insert Device Rack. For instance, several keyboard Tracks and a guitar Track could be routed via Sends to an FX Channel with a reverb plug-in inserted, so that all of the instruments sound like they are in the same physical space.
Dragging an audio effect or FX Chain to the Send slot of a Channel in the Console creates a new FX Channel with the same name as the effect or FX Chain, and routes audio from the original Channel to the new FX Channel, via a Send.
Output
Output Channels are routed directly to hardware audio outputs and can be stereo or mono, depending on the configured outputs to which they connect. Every Song has at least one stereo Output Channel, which is named Main Out by default. The Main Out is, by default, where the entire Console mix of all other Channels is routed. You generally listen to this output when monitoring your mix, as this is the output from which exported mixdowns are derived.
The Main Out Channel is always locked to the far right end of the Console and cannot be moved. This output features a stereo Peak/RMS Meter, as well as K-System Metering. Other configured hardware outputs are represented in the Console by a type of Output Channel called a Sub Out. Sub Outs appear to the right of the mixer when the Outputs panel is open.
The Main Out and Sub Out Channels feature Metronome controls, allowing independent metronome on/off and level control for each hardware output. Note that every stereo Output Channel also features a Mono switch to allow for quick summed-mono monitoring, which is commonly used to check a mix for mono compatibility.
Console Navigation Column
From the Console Navigation column (located at the far left of the Console), you can access all of the console features and toggle on or off various settings. For more information about each of the Console Navigation column options, see the subsections below.
Audio I/O Setup
To easily access the Input and Output song setting. click onto the Audio I/O Setup. After clicking, the Audio I/O Setup preferences will appear in a separate pop up window. Here, you can assign your desired I/O setup. For more information about this window, check out Audio Device Input/Output Setup .
From the drop-down arrow beside the I/O icon, you can quickly add a Bus, FX, VCA, or Aux Channel:
![]()
Console Options
Click the Options button (shaped like a wrench) to bring up a menu with options that let you shape the behavior of the Console to suit your needs and organizational style.
The following options are available:
Grouping Options
- Keep FX channels to the right: Enable this to cause all FX Channels to be placed together, at the right end of the Console. This can aid in keeping track of FX Channels in a large-scale Song.
- Keep bus channels to the right: Enable this to cause all Bus Channels to be placed together, at the right end of the Console. This can aid in keeping track of Bus Channels in a large-scale Song.
- Keep VCA channels to the right: Enable this to cause all VCA Channels to be placed together, at the right end of the Console. This can aid in keeping track of VCA Channels in a large-scale Song.
- Preserve order of channels with folder track: Enable this to ensure that any Bus Channels that are associated with a Folder Track remain next to the Folder Track's enclosed Channels when the Keep Bus Channels to the Right option is enabled.
Visibility Options
- Link visibility of Track List and Console: Enable this to link the show/hide status of the Track List and the Console. When you hide an item in the Track List or Console, it is hidden in the other as well.
- Link expansion and visibility of Folder Tracks: Enable this to hide Console Channels associated with a Folder Track when the Folder Track is collapsed in the Arrange view.
- Auto-expand Selected Channel: When enabled, this option makes it easier to view expanded Channels in the Console one at a time. Double-click the first Channel to expand it, and when the next Channel is selected, two things happen: The currently selected channel auto-expands, and the previously selected channel collapses. If you hold [Alt]/[Option] and click the second Channel, the previous Channel does not collapse.
- Colorize Channel Strips: Enable this option to apply channel color coding to full channel strips in the Console. Normally the color only shows on the channel labels.
- Colorize Plug-in Header: Enable this option to apply channel color coding to the open editor window of a plug-in. This is handy when the same plug-in is being used for several Console Channels (the PreSonus Compressor, for example).
Channel Components
- Audio device controls: This option can be accessed when a suitable PreSonus audio interface is connected. When this is the case, enabling this option reveals controls on the right side of the Console that are specific to the PreSonus audio interface (e.g., Talk button routing and level, headphone options, speaker selection, etc.).
- Input controls: Enable this option to display the Input Gain and Polarity Invert controls at the top of each Channel in the Console. These are present for every Channel Type except Output Channels and VCA Channels. The controls are described in the Inputs and Outputs section of this chapter.
- Sends/Cue mix: Use this option to show the Sends above the fader on each Channel in the Console. When enabled, click the + sign to select an existing destination Channel, add a new one, or make a Sidechain connection. Prefader buttons and Send Level controls are provided for each Channel.
- I/O connections: Enable this option to display Input / Output routings above the fader on each Channel in the Console.
- VCA connections: Enable this option to display VCA Channel connections beneath the meter on each Channel in the Console. When enabled, you can click this selector to assign a Channel to any available VCA Channels.
- Group assignment: Enable this option to display Group assignments above the labels on each Channel in the Console. When enabled, you can click the Group assignment field and assign the Channel to a different Group.
- Channel Notes: Enable this option to display Channel notes beneath the faders on each Channel in the Console. When enabled, you can double-click the small window and add more information about the Channel.
- Channel Icons: Enable this option to display Channel Icons beneath the faders on each Channel in the Console. When you click onto the empty Channel Icon box, a window will appear with many different icon options (Brass, Drums, Guitars, etc.). Including an icon below each channel can be handy if you’d like to quickly navigate between channels without reading the channel names.
Bus Settings
- Enable Listen Bus: This option activates the Listen Bus. It can provide an audio feed to the control room monitors or headphones that is separate from the Main Out Channel. The Listen Bus is completely independent from the other Solo modes.
- Solo through Listen Bus: This option is independent of the Enable Listen Bus checkbox. After it is engaged, soloed Channels are routed through the Listen Bus. When it is disengaged, soloed Channels are heard through the Main Out Channel and all other Channels are muted.
-
Automatically Create Instrument Busses: With this option enabled, a corresponding bus channel is created for multi out instruments (e.g. Impact).
Restore Audio Device Settings
Clicking this icon in the Console will restore the parameters of integrated PreSonus hardware to the states they were in at your last Save operation. Software-controllable parameters of select PreSonus interfaces vary, and can include Mute, Mono, Dim, Talkback features, and Headphone source, but the most common application is the editing of preamp gain (for more on software-controllable hardware parameters, consult your hardware manual).
PreSonus hardware that supports this feature includes Studio 192-series interfaces, Quantum, and Quantum 2.
Console Panel Overview
The Console features several panels that can be shown or hidden as needed. Each panel has different functions and is accessed from the Console Navigation column to the far left of the Console. Click one or more of the buttons to view the desired panels.
Alternative Console Layout
The Console has two viewing modes: Small and Large. Additionally, each mode can be made Narrow. The Console can also be detached from the rest of the single-screen user interface. The Console layout is strictly a matter of preference: There is no audible difference between the Small and Large mode, nor does detaching the Console affect its functions.
The Small Console
The Console is in Large mode by default. To switch to Small Console mode, click on the Small/Large button ( ) at the top of the Console Navigation column. Alternatively, you can press [Shift]+[F3] on the keyboard when the Console is open.
In Small Console mode, the Insert and Send Device Racks are hidden, allowing a more efficient use of screen space. To view the Device Racks for a Channel, click the Expand button that appears above the Channel Editor button next to the Fader in Small mode. This expands the visible Channel to the right, revealing further Console routing possibilities. Note that the Expand button is only visible in Small mode when Normal view is selected. It is not visible in Narrow mode.
Narrow Mode
Both the Small and Large Consoles can be made narrow via the Narrow/Normal button to the far left of the Console (![]() ). Narrow mode has been designed to maximize the number of visible Channels from left to right in the Console.
). Narrow mode has been designed to maximize the number of visible Channels from left to right in the Console.
When in Narrow mode, the Small Console Channels change so that a volume-fade handle is overlapped on the level meter, with Mute and Solo controls above the meter. It remains possible to expand a Channel to reveal its Inserts and Sends by double-clicking in open space on the Channel.
The Large Console in Narrow mode replaces the Insert and Send Device Racks with channel level meters, in addition to narrowing the other controls. To expand any Channel to show its Insert and Send Device Racks while in Narrow mode, double-click on any open space in the channel display or use its Expand button. Doing so again collapses the display for that Channel.
Inputs and Outputs
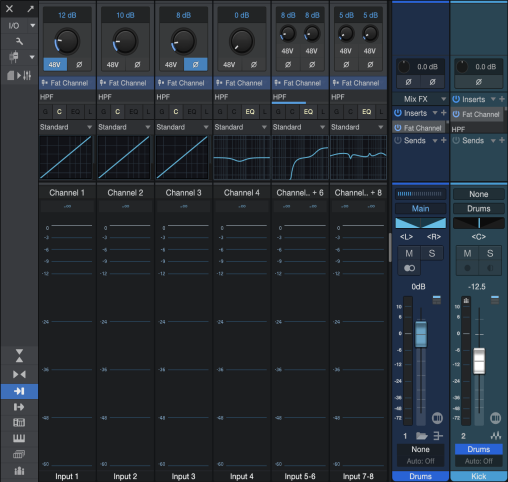
The Inputs panel is closed by default and can be opened and closed by clicking on the Inputs button in the Console Navigation column (![]() ). The Inputs panel displays Audio Channels in the Console for each configured hardware audio input, as described in the Channel Types section of this chapter.
). The Inputs panel displays Audio Channels in the Console for each configured hardware audio input, as described in the Channel Types section of this chapter.
The top of each Input Channel has controls for Input Gain and Polarity Invert. For stereo channels, there will be two of each control; for mono channels, there will be one. These perform the following functions:
- Input Gain: These controls adjust the Input Gain for the signal before it is sent anywhere else. The range is from -24.0 dB to +24.0 dB in increments of 0.1 dB.
- Polarity Invert (Ø): Click this button to invert the polarity of the signal for that Input Channel. When it is lit the polarity has been inverted. The buttons are independent for stereo Input Channels. Click either Ø icon to invert phase polarity on both sides of a stereo input; shift-click to invert phase of left/right channels independently.
The Outputs panel is closed by default and can be opened and closed by clicking on the Outputs button in the Console Navigation column (![]() ). The Outputs panel displays Audio Channels in the Console for each configured hardware audio output.
). The Outputs panel displays Audio Channels in the Console for each configured hardware audio output.
External Devices
The External Devices panel is closed by default and can be opened and closed by clicking on the External button in the Navigation column. The External panel displays a list of configured External Devices, including Keyboards, External Instruments, and Control Surfaces.
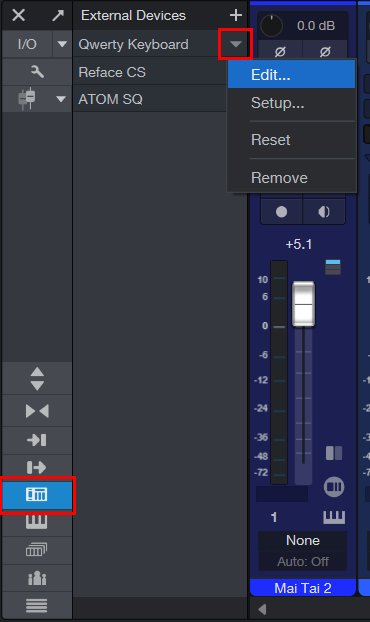
The configuration for each device can be accessed and edited by clicking on the menu arrow for the device (or [Right]/[Ctrl]-clicking anywhere on the device) and selecting one of the following from the menu:
- Edit: Select this option for control mapping configuration and to set up an Aux Channel (external instruments only).
- Expand/Collapse: Select this option to show/hide the Aux Channel assignments of a hardware instrument.
- Setup: Select this option for device configuration (MIDI routing, etc.).
- Reset: Select this option to reload the device in Studio One Pro.
- Remove: Select this option to remove the device from the list.
Click on the Add External Device button to add an external device. To quickly access the Edit dialog for a device, double-click its name in the External panel.
Instrument Rack
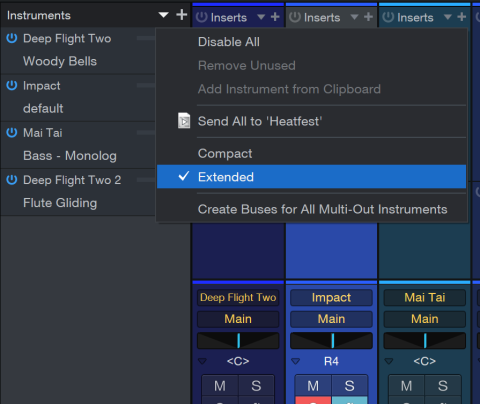
The Instrument Rack is open by default and is closed and opened by clicking on the Show Instrument Rack button in the Navigation column. The Instruments Rack displays all currently loaded virtual instruments, with each occupying an Instrument Slot. If an Instrument is not connected to an Instrument Track, it is grayed out.
Instruments that have not been used on any Tracks can be removed from the Instruments Rack list. To do this, click the menu arrow at the top of the Instruments list and select Remove Unused. There is also an option here to disable/enable all instruments with a single action.
At the bottom of the Instruments panel are two buttons that allow you to decide how much information is displayed for each Instrument Slot.
- Compact displays only the virtual instrument, an Activate button to enable or disable the instrument, and an arrow that opens a pop-up menu (described below).
- Extended widens each Instrument Slot to display additional information for each virtual instrument: a meter that shows its CPU load, and the name of the Preset the instrument is using.
To manually add Instrument Buses for all instruments in a song, select the Create Buses for All Multi-Out Instruments option from the dropdown menu of the instrument rack. As this option is enabled by default in the Studio One Pro Console preferences, the option is normally grayed out within the instrument panel dropdown menu.
Each Instrument Slot pop-up menu offers the following options:
- Edit...: Select this option to open the Instrument Editor window. You can also [Right]/[Ctrl]-click the device name and select Edit, or simply double-click anywhere inside the Instrument Slot.
- Expand/Collapse: Expand lets you choose from an instrument's available outputs (if applicable). Select Collapse to hide that information again.
- Rename...: Allows you to rename the instrument, which can be useful when working with multiple instances of the same instrument.
- Bypass: This lets you silence the instrument without deactivating it. The instrument remains attached to its Track, which keeps the instrument from being affected by the Remove Unused feature.
- Favorite: Use this to designate a virtual instrument as a Favorite. Then, it can be located easily in the Favorites folder of the Browser Instruments tab.
- Store Preset...: Select this option to save the current settings for any virtual instrument as a Preset. You can enter a Name and Description for the preset, as well as specify a Subfolder within the preset list to store the preset.
- Copy to Clipboard: Use this option to Copy the virtual instrument and its preset to the Clipboard. After this it can be added to the Instruments panel of another Song or a Show. To do this, switch to the desired Song or Show and use the Add Instrument from Clipboard command, which is inside the menu at the top of the Instruments list.
- Disable/Enable: Use this to disable an instrument if it is not needed in the Song temporarily, such as after transforming an Instrument Track into an Audio Track. This is one way to reduce the CPU load. Select Enable if you need to make changes to the Instrument Track.
- Remove: This option removes the virtual instrument from your Song.
-
Remove Instrument Bus: Select this option to remove an Instrument Bus manually.
-
Note: Alternatively, you can right-click onto the instrument channel, and from the context menu, there is a Create/Remove Instrument Bus option. There’s also an option in the preference settings to automatically create buses for multi-out instruments. You can disable this if you no longer wish for Studio One Pro to automatically create Instrument Buses.
-
-
Show Micro Edit Controls: After selecting this option, various micro edit controls will appear underneath the instrument slot.
-
Show Channel Setup: This shows a list of available output channels which can be enabled or disabled. This applies to all instruments with multiple outputs.
- Send to Song/Show: This performs the "Copy/Add Instrument" routines described above with a single action. Note that there must be an existing target, such as a second Song or a Show, or this command is not visible.
-
Sound Variation Editor: Click here to open the Sound Variation Editor. The Sound Variations Editor is your home for defining, mapping, and organizing your Sound Variations, as well as storing and recalling their presets. Using this interface, you’ll be able to import and create complex articulation controls suitable for use with robust orchestral virtual instruments.
The Instrument Editor window
Double-clicking inside an Instrument Slot opens the Instrument Editor window. If more than one virtual instrument is present in the Song, you can switch between them using the tabs above the Instrument Editor window.
The menu at the top of the Instrument Editor window provides unique options such as Enable MPE and Show in Console, and also contains many of the features from the Instrument Slot pop-up menu: Rename, Favorite, Copy to Clipboard, Send to Show, etc.
The Built-in Studio One Pro instruments that support MPE (Presence, Mai Tai, and SampleOne) are always MPE-enabled.
Show Scenes
Scenes let you specify which Channels and Tracks you want to work with during a session. For example, you could create a Scene called "Drums" and recall it whenever you want to focus on the drum mix for a while. You can save multiple versions of the drum mix with different FX and EQ settings, etc., save each as a Scene, and audition them one after the other to see which one you prefer. Any number of Scenes can be saved and recalled within each Song.
Scenes can be accessed through the Show Scenes button in the Console Navigation column (![]() ) or by using [Ctrl]+[Alt]/[Option]+[S] to open a dialog box and typing the Scene name or number. This method is available whether the Scenes list is open or not.
) or by using [Ctrl]+[Alt]/[Option]+[S] to open a dialog box and typing the Scene name or number. This method is available whether the Scenes list is open or not.
For more details, see the Scenes section.
Show Groups
It is possible to group multiple Channels together so that when one of the faders within the Group is moved, they all move. Their movements are relative to one another, so that the correct dB value relationships are maintained.
Groups are accessed through the Show Groups button in the Console Navigation column (![]() ). To learn more, see the Groups section.
). To learn more, see the Groups section.
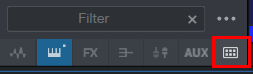
Channel List
Click the Channel List button (![]() ) to view a list of the Channels that can be shown or hidden in the Console. If a Channel is in a Group, the Group name is displayed next to it in the Group column of the Channel List.
) to view a list of the Channels that can be shown or hidden in the Console. If a Channel is in a Group, the Group name is displayed next to it in the Group column of the Channel List.
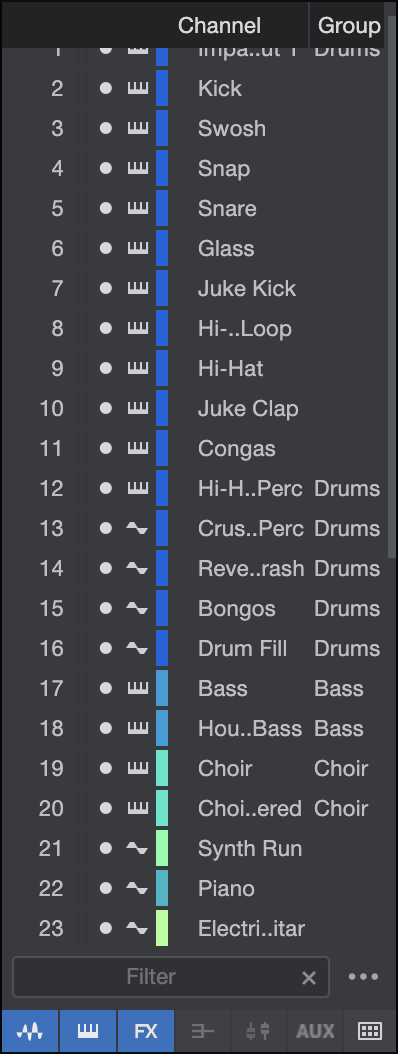
Click the round button next to any Channel name in the list to show or hide that Channel. Click-and-drag quickly through the round buttons to hide or show any number of Channels. Hidden Channels are not visible in the Console, but they remain faintly visible in the Channel List.
View only the Channels you want to see by typing in the Filter field near the bottom of the Channel List, placing a comma between search terms. For example, to view only Channels named "Bass" and "Guitar", you could enter "bas, guit" in the Filter field. Clear the Filter field by clicking the X.
Icons for each type of Channel are visible at the bottom of the Channel List. Click them to hide or show all Channels of that type.
The Console Channel List can be synced to the Track List, so that any Tracks hidden or shown in the Track List have their related Audio Channels hidden or shown in the Console, and vice versa. To do so, click the wrench-shaped Options button in the Channel List and enable the Link Visibility of Track List and Console option.
Remote Bank
The Remote button appears when the Channel List is open. The Remote Bank is a special Scene that governs which Channels are shown and available for manipulation on a connected control surface. Click the Remote button to show this scene, then show/hide tracks as necessary to set which channels are available for control. To hide the Remote Bank, click Remote again.
Detach the Console
The Console can be detached from the main window and placed in an independent window so that it can be located freely onscreen or on a second computer monitor. All of the features described above and in the Groups and Metering sections of this manual are available when the Console is detached.
To detach the Console, click on the Detach button at the top of the Console Navigation column. The detached Console can be in Small or Large mode, and in Narrow or Normal mode. The window can also be sized and maximized to fit the computer monitor. To reattach the Console to the main interface, click on the Attach button at the top of the Console window.
![]()