Set Up Your MIDI Devices
All MIDI-capable hardware devices are collectively referred to as External Devices in Studio One Pro. There are three types of External Devices: Keyboards, Instruments, and Control Surfaces. While each device type functions in a slightly different way, there is one menu to add and configure any External Device. The menu can be found by navigating to Studio One/Options/External Devices/Add Device (macOS: Preferences/External Devices/Add Device).
Set Up MIDI Keyboards
A MIDI keyboard controller is a hardware MIDI device that is generally used for playing and controlling other MIDI devices, virtual software instruments, and software parameters. In Studio One Pro, these devices are referred to as Keyboards. Before recording a performance with a Keyboard, the MIDI keyboard controller must first be set up in Studio One Pro. Once a Keyboard is set up, it is available at all times for use in Studio One Pro.
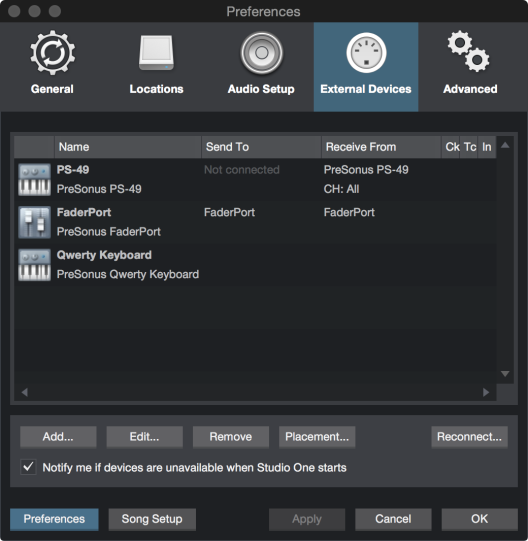
To set up your Keyboard, navigate to Studio One/Options/External Devices (macOS: Preferences/External Devices) and follow these steps:
- In the Studio One/Options/External Devices menu (macOS: Preferences/External Devices), click on the [Add...] button.
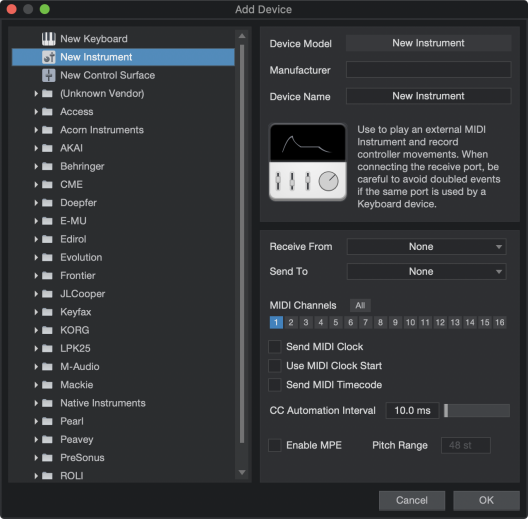
- Choose your device from the predefined device list or set this to New Keyboard if you do not see your device in the list.
- If set to New Keyboard, you may wish to type in a Manufacturer Name and a Device Name in the appropriate fields. This makes identifying your Keyboard easier.
- Specify which MIDI channels to use to communicate with this Keyboard. All MIDI channels are selected by default.
- If you are unsure of the appropriate MIDI channels to use, just leave this at the default setting.
- Engage Split Channels if you would like to create a separate Instrument Track input for each MIDI channel from the Keyboard.
- Specify the device to which the Keyboard is sending and the device from which it is receiving via Studio One Pro. Select your device driver name from the drop-down menu for both Receive From and Send To.
- You can choose to use this Keyboard as your Default Virtual Instrument Input by checking the appropriate box. If you are using only one Keyboard with Studio One Pro, you should check this box.
- Enable MPE if your Keyboard is able to transmit MPE data (MIDI Polyphonic Expression). Use the Pitch Range field to specify the range of the keyboard (the number of keys in chromatic steps). Note that when the Enable MPE box is checked, the MIDI Channels and Split Channels fields are disabled.
Also, Enable MPE must be active for a virtual instrument if you want to take advantage of this feature. This is done in the Instrument Editor window.
Your Keyboard is now ready for use in Studio One Pro.
- Click on the "+" button in the External window of the Console to quickly set up a new Keyboard or other External Device.
MPE Data Reduction
Since Note Data Reduction applies to MIDI Polyphonic Expression (MPE) data, some MIDI recording may sound different with reduced data applied. To avoid issues with MIDI track playback, pull up the Advanced Options dialogue window (Studio One/Options/Advanced Options) and select the Automation tab. From there, make sure the Reduction Level is set to 0%.
Set Up External Hardware Instruments
In Studio One Pro, an External Instrument is an external MIDI hardware synthesizer, workstation, or other device that can generate or manipulate sound. External instruments are set up globally and then are available for use in any Song. The audio output of an external instrument can be routed through one or more Aux Channels in the Studio One Pro Console, where its volume can be controlled with sample-accurate automation, its live signal can be processed by the effects plug-ins, and its performance can be included in a Track bounce, an exported Stem, or the mixdown of a Song.
To set up your Instrument, navigate to Studio One/Options/External Devices (macOS: Preferences/External Devices) and follow these steps:
- In the Studio One/Options/External Devices menu, click on the [Add...] button.
- In the left-hand browser, choose your device from the predefined device list. Set this to New Instrument if you do not see your device in the list. If set to New Instrument, you may wish to type in a Manufacturer Name and a Device Name in the appropriate fields. This makes identifying your New Instrument easier.
- Specify which MIDI channels to use to communicate with this Instrument. MIDI Channel 1 is selected by default. If you are unsure of the appropriate MIDI channels to use, just leave this at the default setting.
- Specify the device to which Studio One Pro is sending MIDI and the device from which the software is receiving MIDI. Select the appropriate MIDI device from the drop-down menu for Send To and (optionally) Receive From. It is likely your external instrument is not connected directly to your computer. In this case, your external instrument must be physically connected to another MIDI device (such as a MIDI interface) that does connect to your computer; you need to select the driver for that device.
- You can choose to send MIDI Clock to this Instrument and/or use MIDI Clock Start by checking the appropriate boxes. You should send MIDI Clock to your Instrument if it has a built-in sequencer or components (such as LFOs) that need to sync to Studio One Pro. Enabling MIDI Clock Start sends MIDI Clock Start signals to your Instrument.
- You can choose to send MIDI Time Code to this Instrument. You can set a Display Offset under Song/Song Setup/General to correct for time-code variances with external devices.
- You can vary the speed at which Automated MIDI CC messages are transmitted, using the CC Automation Interval slider. You can vary the value between 10-100 ms, with the default value being 10 ms.
- Enable MPE if your Instrument has is able to receive MPE data (MIDI Polyphonic Expression). Use the Pitch Range field to specify the range of the instrument (the number of chromatic steps it can reach). Note that when the Enable MPE box is checked, the MIDI Channels field is disabled.
Your external instrument is now available for use in any Song. The easiest way to use an external instrument in a Song is to set up an Aux Channel. This is described in the next section.
Note that if your instrument is also a controller (such as a keyboard workstation), you need to set it up twice. First, set it up as an External Instrument without a Receive From selection, and then set it up as a Keyboard, without a Send To selection. This allows the keyboard-controller section of the workstation to be used as a source for Instrument Tracks, while allowing the synthesizer section to be used as an external instrument.
Linking Aux Channels to Instruments
If you want to sequence and control an external instrument from Studio One Pro, you will need to connect your instrument’s MIDI and Main Outputs to your interface. MIDI allows you to sequence your instrument, while connection through the main outputs allow you to capture the actual recording of your instrument. In previous Studio One Pro versions, you had to handle MIDI sequencing and audio recording in two separate tracks. Fortunately, Studio One Pro now offers a true single track workflow for external instruments.
To actually hear the external instrument as you play, you will need to connect the audio output(s) of your instrument to the available input(s) of your audio interface. You also need to assign this input within Studio One Pro:
-
In Song Settings, click onto the Audio I/O Setup tab.
-
From this window, add Mono or Stereo inputs (depending on the nature of your instrument).
-
Name and assign a color to the input.
-
Then, click onto the input(s) that you used to connect the instrument and click Apply.
An Aux Channel allows an external audio source to be monitored through the Console without the need for an associated track. The incoming audio can be processed by the native plug-in effects, and its volume can be controlled through the sample-accurate automation provided by Studio One Pro.
An Aux Channel is also useful when working with an external MIDI hardware synthesizer, for example, as you can make changes to the MIDI data on an Instrument track without needing to record another take to your hard drive. Audio from the device returns through your audio interface into an Aux Channel, where it becomes a part of the mix like any other track.
Here’s the process:
-
Click onto the External Devices tab in the Console Navigation settings to open the External Devices panel.
-
Click the menu arrow for the external device.
-
Select Edit from the menu to open the control mapping window.
-
Click the Outputs button.
-
Select Add Aux Channel at the bottom of the window. An Aux Channel appears in the Console.
-
If your external instrument has multiple outputs connected to your audio interface, add as many Aux Channels as you need.
-
Important: Click Save Default before closing the window; we’ll explain in the section below.
-
Once linked, simply navigate to the Instrument section within the Browser, open the folder labeled “External Instruments”, and drag your saved External Instrument into the Song Page.
You can now play and sequence your External Instrument just like you would with a Virtual Instrument. Note that since you’re recording with an External Instrument rather than a Virtual Instrument, you will have to do a real-time export when exporting the song. Running external audio signals through the Console means that bouncing, rendering and mixdown automatically switches to real-time.
Also, keep in mind that different versions of the Audio I/O setup can be saved for different use cases.
Make an Instrument Track for the Aux Channel
Here's why it was important to click Save Default after adding the Aux Channel. After following the steps in the previous section, the new Instrument becomes available in the “External Instruments” folder in the Browser / Instruments tab. This enables you to create a new instrument track with AUX inputs in one step: Simply drag-and-drop the instrument from the Browser onto an empty Track. This automatically creates the Instrument Track with the AUX channels already mapped.
Of course, you can always create an audio Track to record the output of the external instrument if you like. The easiest way to do this is to use the Bounce Track command, which creates the Audio Track and bounces the audio in one step.
Set Up Control Surfaces
In Studio One Pro, a Control Surface is a hardware device that includes transport controls, faders, and other specialized controls. The control surface might use MIDI directly or via a special control layer such as Mackie Control.
To set up a Control Surface, do the following:
- In the Studio One/Options/External Devices menu (macOS: Preferences/External Devices, click on the [Add...] button.
- Choose your device from the predefined device list. Set this to New Control Surface if you do not see your device in the list. If set to New Control Surface, you may wish to type in a Manufacturer Name and a Device Name in the appropriate fields. This makes identifying the Control Surface easier.
- Specify the device to which the Control Surface is sending and the device from which it is receiving via Studio One Pro. Select your MIDI device driver name from the drop-down menu for both Receive From and Send To.
- You do not need to specify the MIDI channels your Control Surface should use, as control surfaces use alternative protocols, such as Mackie Control, to communicate with Studio One Pro.
- Your Control Surface is now ready for use in Studio One Pro.
For more information on using Mackie Control devices with Studio One Pro, see Mackie Control.
Custom Placement of Control Surfaces
If you are using multiple surfaces with motorized faders, you can customize the placement of the fader banks so that Channels in the Studio One Pro Console are spread across your surfaces in the desired order.
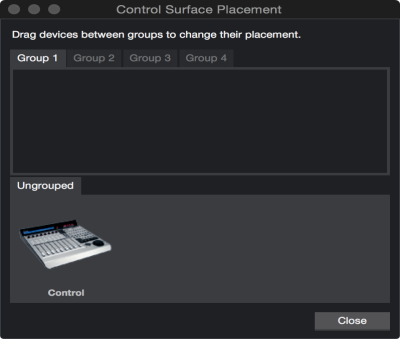
To customize this placement, click on Placement in the Studio One/Options/External Devices menu after adding your surfaces. All ungrouped surfaces appear under the Ungrouped tab. To place a surface in a group, select a Group tab, then click-and-drag the surface from the Ungrouped area to the selected group area. To adjust the order of the grouped surfaces, click-and-drag them left or right. Channels in the Console appear in order across the surfaces from left to right.
Up to four Groups can be created, to allow for mirroring of Channels across multiple surfaces. This is helpful if you have more than one location in the studio where you wish to use control surfaces (e.g., an A room and B room or a control room and live room).
Only supported and predefined Control Surfaces appear in the Placement window. User-defined devices do not appear in this window.
Use Your Computer Keyboard as a MIDI Keyboard
You can use your regular QWERTY computer keyboard as a MIDI Keyboard to play virtual instruments and record note data in Studio One Pro. To do this, add a new device in the Studio One/Options/External Devices/Add Device menu (macOS: Preferences/External Devices/Add Device), choosing the QWERTY Keyboard device from the PreSonus device folder.

With the device added, to use your keyboard as a MIDI Keyboard, open the interface for the QWERTY Keyboard device by double-clicking on it in the External panel of the Console. Any record-enabled Instrument Track then receives input from the QWERTY Keyboard, as shown in the QWERTY Keyboard device interface. Your keyboard only transmits data to Instrument Tracks while the QWERTY Keyboard device interface is open.
Using the PreSonus FaderPort
If you have a PreSonus FaderPort connected to a computer running macOS or Microsoft Windows, Studio One Pro automatically recognizes it and configures it for use. Just open a Song, Project or Show to use the FaderPort immediately.
Reconnect Devices
In most applications, when MIDI devices become disconnected while the application is running, you usually have to restart the application, and the software may crash. In contrast, if an external MIDI device becomes disconnected while Studio One Pro is running with a Song or, Project or Show open, the device can be reconnected without restarting Studio One Pro.
If this occurs, navigate to Studio One/Options/External Devices (macOS: Preferences/External Devices) and click on Reconnect at the bottom of the menu. Then, reconnect your devices and click OK. The devices should now work normally in Studio One Pro.
If an external device is not present when Studio One Pro is started—for instance, if you’re traveling and don’t have some of your gear with you— the application still runs normally. You should see a warning message that makes you aware of the situation. If your setup frequently changes, you may wish to turn off this warning message by disengaging the Notify Me If Devices Are Unavailable When Studio One Pro Starts option.
Later, when you start Studio One Pro with the device connected to your computer, Studio One Pro recognizes the device automatically, and it can be used exactly as before with no further setup required.