Groups
As discussed in the Edit Groups section of the Editing chapter, it is possible to group multiple Tracks together so that any edits done to an Event on one Track in the Group are automatically done to all Events for all Tracks in the Group. These same Edit Groups affect how their related Channel faders behave in the Console.
Create or Dissolve a Group in the Console
To create a Group in the Console, select the desired Channels and then [Right]/[Ctrl]-click and select Group Selected Tracks from the pop-up menu. Or you can use the shortcut: Select the Channels and then use [Ctrl]/[Cmd]+G to create a Group. Groups can be nested: two Channels can be part of a smaller Group and also part of a Group with more Channels.
To dissolve (ungroup) the grouped Channels, [Right]/[Ctrl]-click on any Channel in the Group and select Dissolve Group from the pop-up menu. There's also a shortcut for this: After selecting one the grouped Channels, use [Ctrl]/[Cmd]+Shift+G to dissolve the Group.
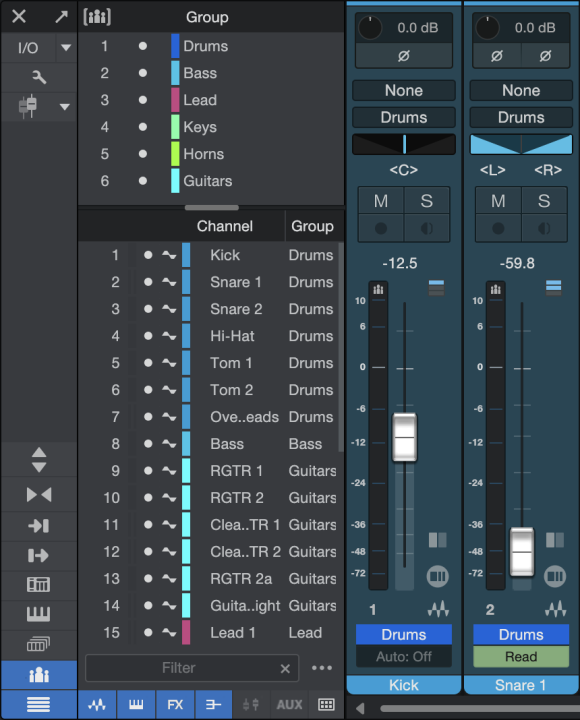
When an Audio Channel is in a Group, the Group icon appears inside the Channel above the level meter. Note that the Group icon is not visible when the Console view is in Narrow mode.
Group Behavior in the Console
When a Channel is placed in a Group its fader is linked to the faders for all other Tracks in the Group, so that if one of them is moved, they all move. Their movements are relative to one another, maintaining the correct dB value relationships among the faders. Grouped Channel parameters can still be edited individually by holding [Alt]/[Option] while manipulating their controls.
Solo, Mute, Record Enable, and Monitor Enable controls are also linked for all Channels in a Group. No other aspect of the Channel in the Console is affected by grouping. Selecting a new Insert effect for one of the Channels will affect the Group, however.
Instrument Tracks in the Arrange view have no direct representation in the Console. The audio outputs of the virtual instruments to which they are routed have corresponding channels in the Console. Grouping Instrument Tracks in the Arrange view only affects editing Events on those Tracks, unless the Tracks are routed to virtual instruments. In this case, grouping behavior is applied to the corresponding Instrument Channels in the Console as well.
Temporarily Suspend Groups
It is possible to suspend a Group temporarily so that, for instance, the fader for a Channel in a Group can be edited without affecting the other Channels in the Group. To suspend the Group, hold [Alt]/[Option] on the keyboard while clicking on the Fader, Mute, Solo, Record Enable, or Monitor Enable controls. Note that [Alt]/[Option]-clicking Solo on a grouped Track clears the Solo status of all Tracks in the Console; if you wish to solo a grouped Track along with other Tracks outside the Group, you must first solo the grouped Track, then enable solo for any additional Tracks. It is not possible to solo single Tracks from two separate Groups simultaneously, though you can solo a single Track from one Group and solo all Tracks in a second Group.
To suspend an entire Group, hold [Shift]+G and type the number of the Group or the first letter of its name into the small window that appears. Use the same command to reactivate the Group. Another way is to hold [Alt]/[Option] and enter a Group number between 1 and 10.
To suspend or reactivate all Groups at once, use [Ctrl/Alt]/[Cmd/Opt]+G. Note that Group suspensions are not saved or remembered when Studio One Pro is restarted.
Show Groups
When the Track / Channel List is open you can view the list of Groups by clicking the Show Groups button. You can temporarily suspend a Group from this list by clicking the dot next to its name. You can also suspend all Groups by clicking the bracketed Groups icon in the upper left corner of the Group list.
Nested Groups
Channels can be part of a smaller Group and also part of a larger Group that includes those Channels. In this case the Groups have been nested. Note that in order to make adjustments to the smaller, nested Group, the larger Group must be temporarily suspended.
Group Attributes
You can specify which controls within a Group will be affected by the other Channels. Features that can be included or excluded from a Group are Editing, Volume, Pan, Mute / Solo, Record / Monitor, Inserts, and Sends. For example, if you want to disable linked panning of all of the grouped Channels at the same time, [Right]/[Ctrl]-click the Group name in the list of Groups and disable Pan. The relative stereo positions of the Channels in the Group are maintained when the Pan control for one of the grouped Channels is moved.
Viewing / Changing Group Assignments
Tracks and Channels can be assigned to more than one Group. Group assignments can be viewed by [Right]/[Ctrl]-clicking anywhere inside the Channel area and selecting Group Assignment. A check mark by a Group name indicates a Group to which that Channel has been assigned. To add or remove a Group assignment, select one of the Group names. The change will be made and the window will close.

Groups and Effects
The first time Channels are grouped they keep the individual effects settings and assignments they had. But changes that are made to the effects of any grouped Channel will cause all of the Channels within the Group to adopt the same changes. Note that this does not add the new effects to the ones already on the Channels; those will be replaced.
For example, if a new Insert preset is selected for one Channel within a Group, that same preset will be selected for the rest of the Group. Any changes made to the Sends of a grouped Channel will affect the entire Group also.
If you want to change the effects settings for one of the grouped Channels without affecting the others you can suspend the Group temporarily. You can also specify that the Inserts and the Sends not be affected by other actions within a Group. To ungroup those actions, disable them in the Group Attributes window.