The Setlist
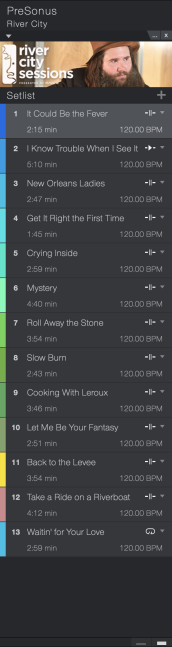
The Setlist is where you decide the order for the songs, musical cues, and/or patch performances that make up a Show. Each entry in the Setlist is called a Setlist Item. They are named automatically as they are added ("Item 1", "Item 2", etc.). You can rename each Setlist Item, assign it a color, and set it to one of three playback modes (Continue, Stop at End, or Loop). Setlist Items can be reordered with simple drag & drop.
The view size can be set to Small or Normal for all Setlist Items, using the buttons between the Items and the Setlist Inspector. When set to Normal, the Item length and BPM are also displayed.
The Setlist Inspector is located at the bottom of the Setlist window. It shows specific information about the selected Item, which can also be edited here.
You can give each Show a unique identity by adding the name of an Artist and Venue at the top of the Setlist window. It's also possible to add a logo or some other image below the Venue name. The maximum image size is 1400 x 1400 pixels, and the image you select is automatically scaled to fit. Alternative versions of a Setlist can be made by saving a new version of a Show (File/Save New Version), just as you would save alternate versions of Songs or Projects.
Add Setlist Items
At the top of the Setlist is the Add Setlist Item button  . Click this to add an Item to the Setlist. Each Item is given a unique color, which you can change by clicking the color field to the left of the Item number. To name an Item, double-click the field to the right of the Item number.
When an Item is placed in the Setlist it also appears in chronological order in the Overview, using the same color as the Setlist Item for easy identification. You can reorder Items in the Setlist or the Overview with a simple drag-and-drop action.
Working with Setlist Items
There are three ways to select Setlist Items: with a click of the cursor, with the up and down arrows on a computer keyboard, or with the ◄ and ► buttons in the Studio One Pro transport.
Set the Playback Mode
The playback mode tells the Setlist what to do when it reaches the end of a Setlist Item. Click the upper-right corner of the Item and choose whether the Setlist should proceed to the next Item (Continue), wait for you to press Play (Stop at End), or repeat that Item indefinitely (Loop).
Change the Item Length
When the view size is set to Normal, the Item length is visible. This is automatically set to the audio file length when a Backing Track Player is used, but a different value can be entered: a shorter value ends the file playback earlier; a longer value leaves a gap between this Item and the next one. If you want a gap, a better way is to enter a Pause value for the next Item in the Setlist Inspector.
Change the BPM
When the view size is set to Normal, a BPM value is visible. If a backing track audio file includes tempo information, this value will be imported. You can enter another value if you like. This affects the Metronome click, but it does not affect the length or playback speed of an Item.
Duplicate, Remove, or Disable an Item
[Right]/[Ctrl]-click on an Item to open a contextual menu with four options:
- Add Setlist Item provides another way to add an Item to the Setlist.
- Duplicate Setlist Item adds a copy of the Item to the Setlist. You can set a different Length for each. All Patch assignments are duplicated as well.
- Remove Setlist Item deletes the Item from the Setlist.
- Disable Setlist Item darkens the Item in the Setlist and hides it in the Overview so it is skipped during the Performance. [Right]/[Ctrl]-click and select Enable Setlist Item to restore the Item to the Show.
Setlist Inspector
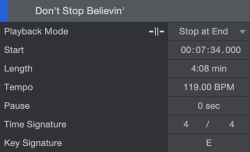
The Setlist Inspector shows specific information about the selected Item. You can also change that information here.
- Color can be changed by clicking the color field to the left of the Item name.
- Name can be changed by double-clicking the field and adding text.
- Playback Mode can be set by clicking on the icon or the current Mode name and selecting the desired option.
- Start shows the start time of the Item in hours, minutes, seconds, and milliseconds. An Item can begin at the precise moment you enter here. When running a Show synced to an External MIDI Device via MTC, the start timecode will be the offset at which a Setlist Item will start playback. The Pause time is adjusted automatically.
- Length can be entered for an Item. Shorter values end file playback earlier; longer values leave a gap until the next Item. We recommend using the Pause parameter to create a gap, though (see below).
- Tempo can be entered here. This affects the Metronome click, but it does not affect the length or playback speed of an Item.
- Pause can be used to place a gap between the selected Item and the previous one. The pause can be as little as 0.001 seconds and as much as 30 minutes. A Pause is recognized instantly in the Overview, since it leaves a gap between Items.
- Time Signature can be entered for informational purposes.
- Key Signature can be set using the familiar pop-up selector; simply click and select the key for the current Item.