Instrument Part Automation
In a feature unique to Studio One Pro, automation envelopes for any given virtual instrument can written and accessed directly within Instrument Parts, just like note data parameters such as velocity and pitch bend. Part automation is integrated into Instrument Parts, so that no matter where an Instrument Part is moved, or how it is edited, the automation stays in place. In this way, virtual instrument automation can be kept where it belongs with the Instrument Parts in your Song.
Thus, Instrument Part automation is functionally similar to the Track automation system but is dedicated to Instrument Parts and the virtual instruments they control, offering additional flexibility.
Recording Part Automation
When an Instrument Part is being recorded, and any of a connected virtual or external instrument’s controls are manipulated with the mouse or with an external hardware controller, those control changes are recorded into the Part as Part automation. At any time, Part automation can be recorded live to a new or existing Part by enabling Record and manipulating the virtual instrument controls.
The related Instrument Track must be connected to a virtual or external instrument in order for Part automation to be recorded.
View Part Automation
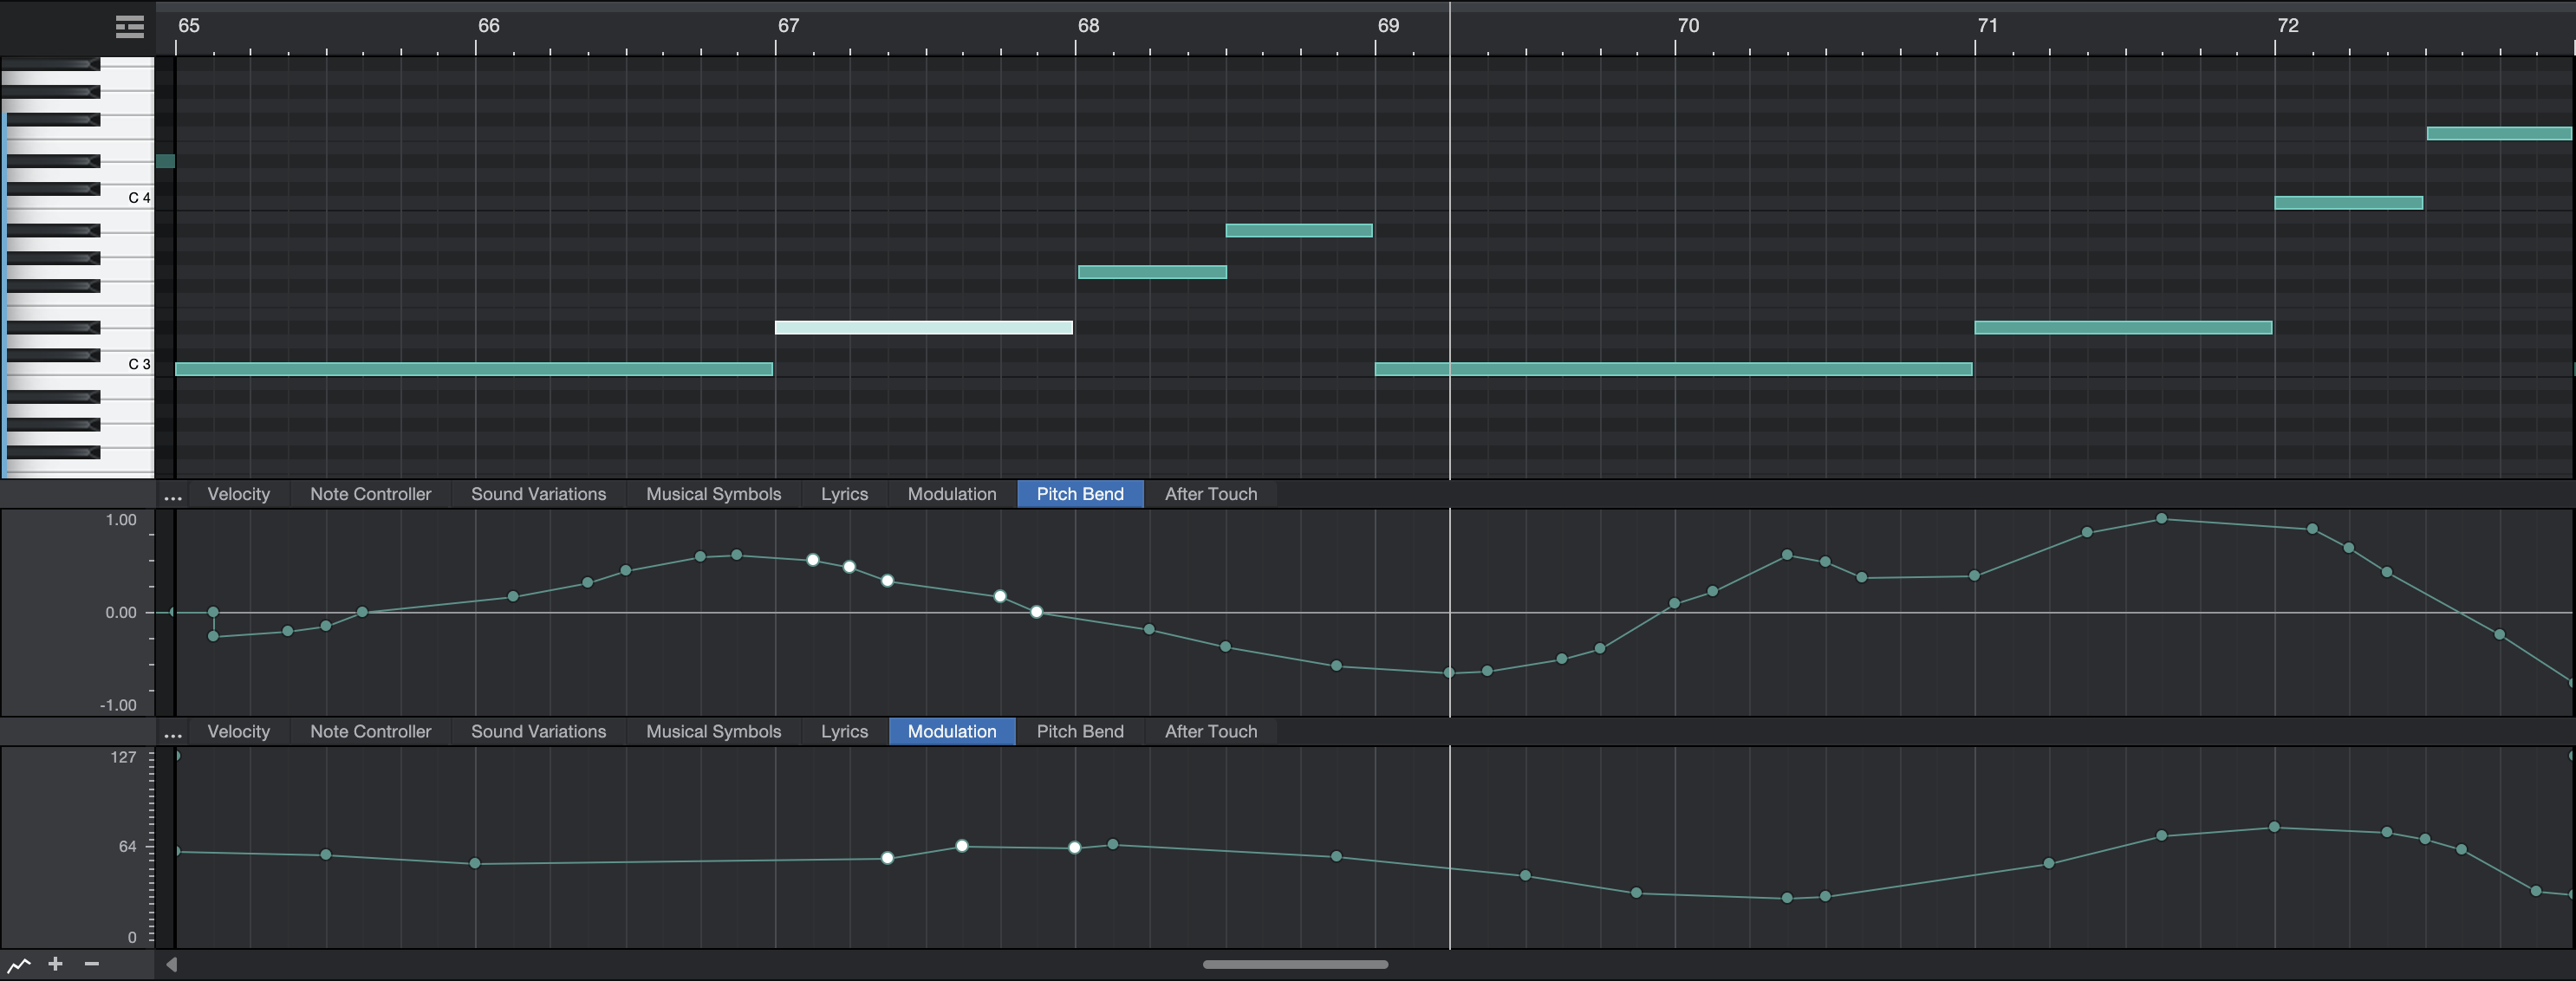
To view and edit Part automation for an Instrument Part, select the desired Instrument Part and open the Edit view by pressing [F2] on the keyboard, double-clicking on the Instrument Part, or clicking on the [Edit] button.

In the bottom-left corner of the Note Editor there's a small button that looks like a couple of jagged mountain peaks ( ). Click that to show / hide the Automation Lanes. The Parameter tab along the top of the lane shows the parameter currently displayed in the lane.
Manually Add and Edit a Part-Automation Envelope
Click one of the Parameter tabs to choose a parameter to view and edit in the Part Automation Lane. By default, Velocity, Modulation, Pitch Bend, and Aftertouch (Pressure) are available.
To group-edit note Velocity, choose the Arrow Tool to draw a rectangle around the desired notes in the Piano View, and then click and vertically drag a highlighted Velocity column in the Velocity Automation Lane to edit the desired velocity up or down. Alternatively, you can group-select with the Arrow Tool in the Velocity Automation Lane itself; be sure to draw the selection rectangle around the tops of the desired velocity columns to choose the desired notes. This allows for nuanced selection of only your loudest or quietest notes.
To assign a new automation envelope to its own Parameter tab, click the Add/Remove button (...) or [Right]/[Ctrl]-click an existing Parameter tab and select Add.... This opens the Automation dialog, which is identical to the window mentioned in the Automation Envelopes on the Track section of this chapter.
Alternatively, you can edit the parameter of the desired instrument, then click on the hand icon in the top left parameter window and drag the parameter to the Note Editor to add a Part Automation envelope for that parameter to the Instrument Part.
The parameters that you can add to the Part Automation lane are based on the virtual instrument to which the Instrument Track that contains the selected Instrument Part is connected. Only those parameters for which an automation envelope does not already exist are available.
Editing Part automation envelopes is nearly identical to editing Track automation envelopes, as described in the Editing Automation Envelopes section of this chapter. The one exception is that if you press [Alt]/[Option] on the keyboard when using the Paint tool to draw an automation envelope, you can draw straight lines of any length, which only use two envelope points.
It is possible to view and edit different parameters in separate Part Automation lanes. You can add and remove lanes using the plus and minus buttons in the bottom-left corner of the Note Editor window. Click the Show/hide Automation Lanes button () to show / hide all of the Part Automation lanes at the same time. Any written Part automation is read, regardless of whether it is currently being viewed in either Part Automation lane.
Select Part Automation with Notes
With this option enabled, selecting notes automatically selects any currently visible Part Automation within the selected note range. As a result, applying any edits to note position will automatically be applied to the selected Part Automation within the same range. This includes changing the note position manually or using Quantize, as well as cut/copy/paste/duplicate/delete operations. Part Automation currently not visible won’t be affected.
In order to select all Part Automation associated with a note, first make sure all Part Automation lanes are visible by adding additional automation lanes and selecting the correct tab to display the automation curves.
This option works with all types of automation, including standard types such as Modulation and Pitch Bend, with the exception of Note Controllers such as Poly Pressure and MPE. Note Controller automation data is always selected with their associated notes, regardless of the current state of the “Select Part Automation with Notes” option.