Presence Editor
By default, Presence is a sample player, which lets you play (and tweak) sounds from existing libraries. The Presence Editor upgrades Presence to full sampler functionality, with powerful scripting and layering features.
This editing function can also be used to deeply change and further optimize programs from imported sound libraries (such as those in EXS or Giga format), or Presence libraries created by other users. Commercial Presence libraries (such as those included with Studio One Pro or bought separately) are protected, and cannot be edited.
Editor Overview
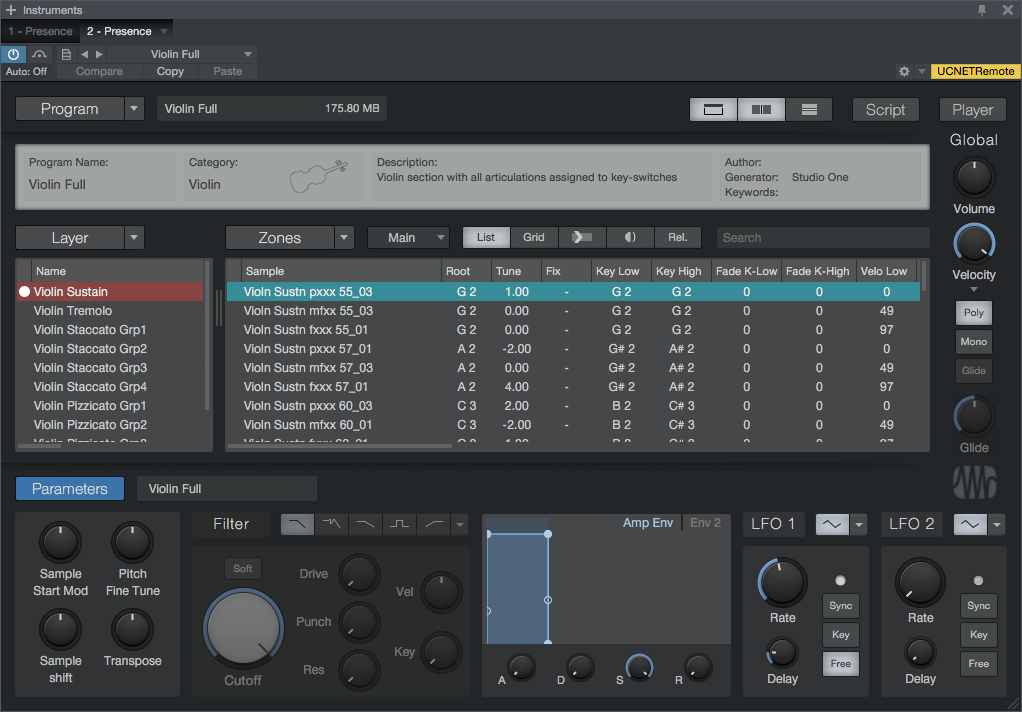
When you open a Presence window, you'll see a new button marked "Editor." This button is located above the global volume knob. Press it to open the editing interface:

To return to the normal view, click the [Player] button. You'll notice there are four main sections in the editing interface:
Program
This area shows you the saved name and disk size of the program you're editing. If you click the menu button next to the [Program] button, a pop-up menu appears. Choose from the following functions:
- New Program: Resets Presence to a default state, with a blank program loaded. If you've begun to create a program and have not yet saved it, you'll receive a warning, telling you that your samples and parameter settings will be lost if you go through with creating a new program.
- Pack Program: Lets you package your program, with all its samples and settings, into a single file, for easy storage and sharing. Packed programs are created with a ".soundx" file extension.
- Set Program Password: Lets you set a password that Presence prompts for if a person attempts to edit this program. This lets you keep a program from being edited, even when sharing it with others.
To the right of the program area, you'll see three buttons that control the editor display. They look like this:
The first button shows or hides an information drawer at the top of the editor window. Here, you can edit the program's name, set its category, and add a description and information about yourself, as author of the program. The information you enter here is shown in the Player view when your program is loaded, so we recommend you always fill in these fields.
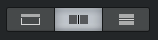
The second and third buttons arrange the Layers and Zones areas either side-by-side, or vertically stacked, according to your preference.
Finally, you'll see the [Script] button, which opens the scripting view, in which you can write scripts in JavaScript, for greater creative control and interface flexibility in your programs. For more information on working with JavaScript in Presence, see Scripting.
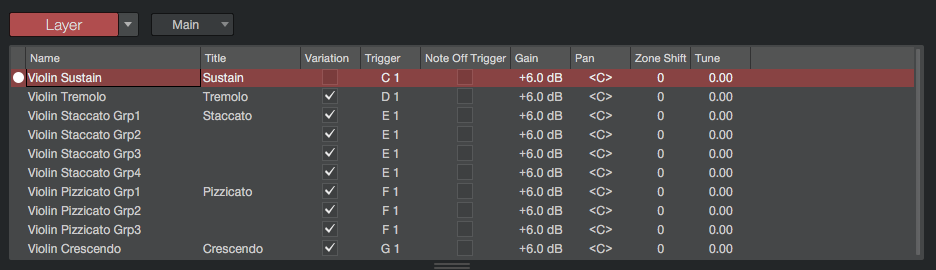
Layer
This area deals with Layers, which are entire sample sets, arranged in Zones (as discussed below) across the range of MIDI key and velocity values. These layers can be combined to create fuller sounds and textures, or to set up one or more MIDI-switchable variations for a given sound.
For example, a layer could be a single variation, such as "Pizzicato," in a string sound (made up of many layers), with multiple sample zones spread across the keyboard, horizontally. Alternatively, a layer could be a single drum instrument, such as a snare drum, containing multiple velocity zones, stacked vertically on a single MIDI note. For more information on working with the layer functions, see Layers.
Zones
This area deals with Zones, which are areas in which a single sample is placed across the range of MIDI key and velocity values. These sample zones are the pieces that make up a layer (as discussed above), letting you decide exactly how your samples are placed, played, and processed.
For example, a high-quality piano sound may have a group of separate samples for every note on the piano, arranged to be played at low, mid, or high velocity. In the Zones area, you can make decisions like this with your own samples, setting up the range of the keyboard and key velocity in which each sample plays, along with many other options. For more information on working with zones, see Zones.
Parameters
This area gives you access to a wide variety of modulation, tonal, and behavioral options for each layer and the zones within them. The parameters available in this area can pertain to the program as a whole, to the currently selected layer, or the currently selected zone.
Clicking the [Program], [Layer], or [Zones] button changes the focus of the Parameters area to address each of those categories, as needed. You can also switch the mode of the parameters area between these three settings by clicking the [Parameters] button. You can easily keep track of which mode you're in, because the Parameters area is color-coded: Program mode is blue, Layers is red, and Zones is turquoise.
For more information, see Parameters.
Creating a New Program
To get started creating a new program, open an instance of Presence and click the [Editor] button to open the editing interface. A blank preset is shown by default. It has a single layer, and no samples yet placed in zones. You can then begin dragging samples from the Browser into the Zones area on the Presence window.
Looking at the Zones area, you can see the samples you add to your new program. By default, they are displayed in a list-style view, showing the sample name and a variety of available parameters for each. If you click the [Grid] button, you'll see the samples displayed along a grid that represents the full range of MIDI notes (horizontally) and velocity values (vertically). You can get back to the list view at any time by clicking the [List] button.
The first sample you add defaults to playing on MIDI note C-1, the second defaults to C#-1, and so on, in ascending order. This can be helpful when creating drum programs or heavily multisampled sounds, where each key may have a sample of its own. If you intend for a sample to cover a larger span of keys, you can specify the desired span using the Key Low and Key High parameters for each sample (if looking at zones in list view) or by dragging the edges of each sample to the beginning and end of the desired range (if looking at zones in grid view).
Once you have the start to a new sound in place, you'll probably want to save the preset to preserve your work. To do this, follow the instructions shown in Creating and Managing Effects Presets.
For more detailed information on the available functions and parameters to help you develop sounds, see the following sections: Layers, Zones, and Parameters.
Layers
The Layers area of the Presence editor window is used to establish sound layering in your program. Layers are entire sound sets, with samples placed in zones, and most of the necessary sample-by-sample decisions already made (such as key and velocity ranges, processing details, and so on). You can add multiple layers to your program, to create hybrid sounds that play together, or provide MIDI-selectable variations on a given sound, such as different bowing and plucking styles in a violin sound.
If you're just getting started creating a new program and you want to import samples and get them placed and configured, you'll be doing most of that work in the Zones area of the Presence window. See Zones for more info to get you started.
Once you've added and configured your first set of samples in the Zones area, you've put together your first layer. If you look at the Layer area in the Presence editor window, you'll see "Layer 1" listed, along with a set of editable parameters for that layer. For more info on parameters available when editing layers, see Layer Parameters.
Managing Layers
To add a new layer, [Right]/[Ctrl]-click in the layers list or click the menu button next to the [Layers] button. Choose "Add Layer" from the pop-up menu. A new layer is created and added to the layers list. This pop-up menu also offers the following options:
- Remove Layer: Removes the currently selected layer from the program. This also removes all samples placed in zones within that layer.
- Duplicate Layer: Creates a duplicate of the currently selected layer, with all sample placements and parameters the same.
- Merge Layers: Combines the sample placements and related parameter settings for all selected layers, into one new layer.
- Copy Page Parameters: Copies the parameter settings shown on the current visible page for the currently selected layer, so that they can be pasted to a different layer.
- Paste Page Parameters: Pastes the copied parameter settings to the currently selected layer.
If you select more than one layer at a time, you'll see all of the zones in all selected layers shown in the Zones area below, whether in list or grid mode.
Layer Parameters
Each layer in your program has several pages of parameters available for editing, to help you shape the sound to your liking. By default, the Main page of parameters is shown. When navigating through a layer's parameters, you can use the cursor keys on your keyboard to move between them, as well as up or down from layer to layer. To edit a selected parameter, press [Enter] on your keyboard, then edit the parameter, and press [Enter] again to lock in the new value.
The Main page contains the following parameters for each layer:
- Title: Lets you set the title for the layer.
- Variation: Lets you designate a layer as a key-switched variation of the sampled sound set (such as different styles of picking or strumming on a guitar sound). If enabled, this layer becomes active when the MIDI note specified in the Trigger parameter (described below) is played. When another variation is activated by its own MIDI key trigger, this layer stops playing. To designate one variation as the default, leave its Variation box unchecked, but still provide a note for the variation in the Trigger column.
- Trigger: Lets you specify the MIDI note that activates this layer, if it has been enabled as a Variation.
- Note Off Trigger: Enable this to trigger sounds within this layer only when a MIDI note ends. This is most useful for adding release sounds to a sample program, such as piano hammers falling back into place after a note is played.
- Gain: Sets overall gain for an entire layer.
- Pan: Shifts overall pan placement for an entire layer, relative to the pan settings for each zone in that layer.
- Zone Shift: Moves all zones contained within a layer up or down the MIDI key range. When you do this, the range of playable notes for each zone is moved up or down, and the base note for each zone shifts with it.
- Tune: Adjusts tuning of all samples contained in a layer.
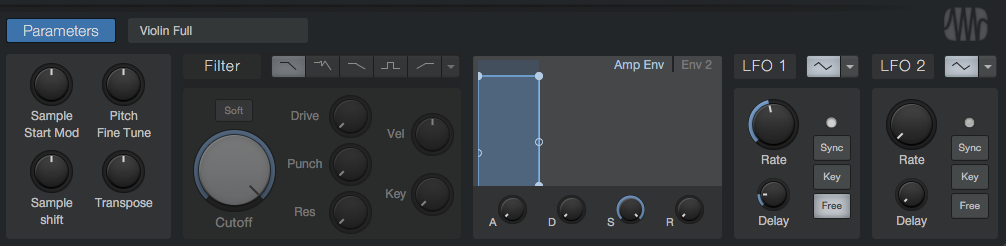
If you click the menu button next to the button currently marked "Main," you can access the following sets of modulation and processing parameters for each layer:
- LFO 1 & 2: These settings mirror the LFO settings in the Player view of Presence, setting LFO parameters for all zones in a layer.
- Amp Env & Env 2: These settings mirror the Envelope settings in the Player view, setting envelope parameters for all zones in a layer.
- Filter: These settings mirror the Filter settings in the Player view, setting filter parameters for all zones in a layer.
- Other: These settings mirror the Glide Time, Velocity Strength, and Velocity Curve controls in the Player view, setting configuration options for all zones in a layer.
When you make changes to parameters in these pages, those changes are applied to all zones in that layer. If any affected zones have differing settings for those parameters, their values are shifted in a relative fashion as you change the corresponding layer parameter.
Zones
The Zones area is where you do most of the work when sound designing with Presence. You drag samples here from the Browser for inclusion in your program, and then, you set the parameters for each sample zone. This lets you place the sample in the desired area of the MIDI key and velocity range and make all the necessary decisions about sample behavior, modulation, and processing.
By default, the sample zones you create by adding samples are shown in a list. This shows the name and parameters for each sample. You can search for a zone by name within the currently selected layer by typing into the Search bar above the Zones display.
Managing Zones
You add zones to a layer by selecting that layer and dragging samples into the Zones area. If you click the menu button next to the [Zones] button, a pop-up menu appears with the following functions:
- Apply Parameters from File: Updates zone parameters to match those found in source file (such as root note, tuning, and loop mode).
- Remove Zone: Removes the currently selected zone from the program.
- Copy Page Parameters: Copies the parameter settings shown on the current visible page for the currently selected zone, so that they can be pasted to a different layer.
- Paste Page Parameters: Pastes the copied parameter settings to the currently selected zone.
- Refresh Selected Zone(s): Lets you re-import samples in the selected zones, if the original samples have been changed or edited since you originally imported them.
- Show in Finder/Explorer: Opens an Explorer (Windows) or Finder (macOS) window, showing you the location of the currently selected sample.
Zones Area Options
There are a set of buttons at the top of the Zones area that change how you see and interact with it.
- List: Shows the zones in the currently selected layer in a list view, along with pages of parameters for fine editing of each zone. For info on the available parameters, see Zone Parameters.
- Grid: Shows the zones in the currently selected layer as regions in a grid that represents the span of MIDI notes (horizontally) and MIDI velocity values (vertically). For more information on placing samples in grid mode, see Zones in Grid View.
- Input Triggers Selection: Enable this option to select zones by playing keys on a MIDI keyboard. When a key is played, all zones that play within its note range are selected in the zones list.
- Audition Focus Zone: Enable this option to audition a sample whenever its zone is selected when looking at zones in grid view.
- Rel.: Enable this option to enter relative editing mode. When this mode is off, if you select multiple zones and change a parameter value in one of the zones, that parameter is set to the chosen value in all selected zones. When this mode is enabled, if more than one zone is selected, and you change a parameter in one zone, that parameter is changed in all selected zones, but in a relative fashion, up or down from the current setting.
Zone Parameters
Looking at zones in list view, you see the list of samples in the currently selected layer, and several columns of parameters with values for each zone. By default, the Main page of parameters is shown.
When navigating through the parameters for a zone, you can use the cursor keys on your keyboard to move between them, as well as up and down, from zone to zone. To edit a selected parameter, press [Enter] on your keyboard, then edit the parameter, and press [Enter] again to lock in the new value.
The following parameters are available in the Main parameter page:
- Root: Sets the root note for the current sample zone. Generally, it's best to set this to the actual note at which the sample plays, ensuring that it plays at the proper pitch when triggered by MIDI notes.
- Tune: Fine-tunes the pitch of the sample, in cents.
- Fix: Lets you set a defined pitch at which the sample plays, regardless of what MIDI note triggers it. This can be helpful for percussion kits or other non-pitched sample sets, where MIDI notes should not transpose a sample from its intended pitch.
- Key Low & Key High: Lets you set the low and high limits of the MIDI note range in which a sample zone should play.
- Fade K-Low & Fade K-High: Lets you specify the degree to which a zone fades down in volume as you play notes closer to the top or bottom of its note range. This can be helpful when you want a smooth transition between two zones, each blending into the other.
- Velo Low & Velo High: Lets you set the low and high limits of the MIDI velocity range in which a sample zone should play.
- Fade V-Low & Fade V-High:Lets you specify the degree to which a zone fades down in volume as you play notes closer to the top or bottom of its velocity range.
- Start & End: Lets you specify the point within a sample that playback begins and ends.
- Loop Mode: Lets you choose the loop mode for a zone. Off disables looping, Sustain enables looping while a MIDI note is held, and Release enables looping when a MIDI note is released, and the release portion of the sound is playing.
- Loop Start & Loop End: Lets you specify the start and end of the looping range of the sample (if applicable).
- Loop XFade: Lets you specify a length of fade to apply at the transition point between the end of a loop and its subsequent beginning. This is often helpful when working with sustained sounds, which may need some smoothing.
- Gain: Lets you set gain for an individual zone.
- Pan: Lets you pan a zone across the stereo field.
- Round Robin: By default, samples that are placed in overlapping zones play concurrently when a note in the proper range and velocity is played. When you select Round Robin values for overlapping zones, they switch places with successive plays of a note, according to the order of the numbers you specify. This can help to introduce natural-sounding variations from note to note, especially in sounds made from samples of live instruments. Type "random" into this field for any set of overlapping key zones, and those samples will play in random order as keys are struck, rather than numerical.
- Play: Lets you specify the play mode for a zone. Normal is the default mode, with zones playing and stopping according to the length of incoming MIDI notes. One-Shot plays the whole specified range of a sample when a note is played. Toggle mode lets long or looped samples play indefinitely, until the same note is played again.
- Follow Tempo: Allows samples with a rhythmic component to be timestretched as needed in order to follow the Song tempo. This feature can be activated per zone and per sample, but it should be used sparingly because real-time timestretching is CPU-intensive.
- Path: Shows the disk path in your file system where the sample for each zone is stored.
If you click the menu button next to the button currently marked "Main," you can access the following sets of modulation and processing parameters for each zone:
- LFO 1 & 2: These settings mirror the LFO settings in the Player view of Presence, setting LFO parameters for a zone.
- Amp Env & Env 2: These settings mirror the Envelope settings in the Player view, setting envelope parameters for a zone.
- Filter: These settings mirror the Filter settings in the Player view, setting filter parameters for a zone.
- Other: These settings mirror the Glide Time, Velocity Strength, and Velocity Curve controls in the Player view, setting configuration options for a zone.
Zones in Grid View
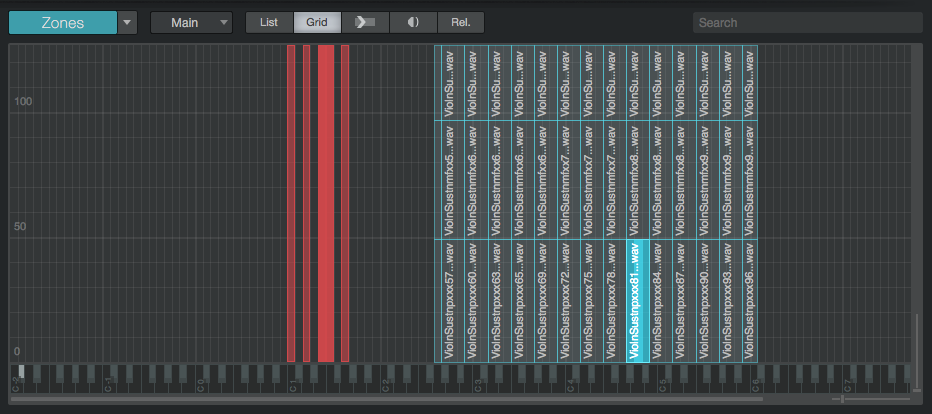
When you look at zones in grid view, you see them as labeled regions, filling a certain space within the range of MIDI notes (horizontally) and velocity values (vertically). You can click and drag the top, bottom, and side edges of each zone to select the desired range in which that zone will play. If you select multiple zones (by holding [Shift] or [Cmd]/[Ctrl] and clicking the desired zones), you can edit their ranges or move them as a group.
If you click one of the "keys" in the keyboard display at the bottom of the grid, all zones triggered by that note are selected.
Parameters
There are a great many available layer and zone parameters that you can access in the Layer and Zones areas of the editor window. While editing in this "spreadsheet" style can be fast and precise, sometimes it can be helpful to use the type of knobs, buttons, and displays you're used to in the Player mode to help set and visualize these parameters. The Parameters area of the editor window lets you set many of the available parameters in this way.
The Parameters area can show controls for the program as a whole (all layers and zones, together), or for one or more selected layers (and the zones they contain), or for one or more selected zones. You can choose to display parameters for each by clicking the [Program], [Layer], or [Zones] button, or cycle through them by clicking the [Parameters] button. You can easily keep track of which mode you're in, because the Parameters area is color-coded: Program mode is blue, Layers is red, and Zones is turquoise.
Whatever mode is selected, parameters pertaining to modulation, filter, and mode-specific settings for that level in the program are shown
Zone Waveform Display
When the Parameters area is in Zones mode, a [Wave] button appears. Clicking this brings up a waveform display for the sample in the selected zone. Click and drag along the top edge to set the loop range for the displayed sample. Click and drag at the beginning or end of the sample to move the play start or end point for the displayed sample.
While loop editing is possible in this fashion, it lacks the control and accuracy of a dedicated wave editor. As a result, clicks and pops may appear when changing loop start and end points in this display. Adding a loop crossfade may solve this problem. This waveform display is mainly meant for monitoring or reference. If in-depth loop editing is required, a dedicated wave editor software should be used.
If you want to replace the sample in a zone with a new sample, simply select the zone, and drag the new sample onto the waveform display. This retains any parameter settings you made for the previous sample.
Scripting
Presence offers powerful scripting functions, based on JavaScript. We chose this language because it is well supported and documented, and known by many. Scripting can be used to affect many functions in a program, most notably to assign macro knobs and buttons to your choice of parameters. Once script controls are assigned here, these controls appear in the central display in the Player mode of the Presence window.
You may have seen these sorts of controls in some of the included Presence programs. Scripting is the way to make this happen.
To access scripting for a program, click the [Script] button in the editor view. This brings up a window in which you can enter your JavaScript code, with some helpful structure added by default. To return to the editor view, press the [Edit] button. There are two buttons at the top of the Script view, that look like this:
The first button shows or hides a drawer that displays the eight scriptable control knobs and buttons for the program. By default, it looks blank. To enable a control, click the dot-shaped button in its lower left corner. To rename a control, click the pencil-shaped button that appears when you hover the mouse cursor over the control. The functions that these controls relate to are set in the script that you create.
The second button opens our documentation for the JavaScript structure you can use to script within Presence. It goes through the various entry points, objects, and parameters that you can use to interface with Presence's engine.
Between this information and the wide range of info resources available on the internet, you can soon dig into scripting for your programs, unlocking many useful functions.
You can click the [Reset] button to return the code window to its default (blank) state, or press [Apply] to apply your script and try out its functions.