Publishing Your Project
When your Project has been mastered, the next step is to publish it. The Project page offers many options, categorized into three main operations, including burning an audio CD, making a disc image file, and making audio files.
Burn an Audio CD
You can burn your mastered Project to a standard Red Book audio CD directly from the Project page. Red Book is the most widely adopted technical standard for audio CDs, and it includes specifications for minimum and maximum track durations, maximum number of tracks, and how audio is encoded to the CD. Since the Project page adheres to this standard, you can be sure your audio CDs are compatible with almost any CD player.
To burn your Project to an audio CD, click on the [Burn] button at the top of the Project page. In the Burn Audio CD dialog, you can select the device you wish to use to burn the CD, as well as the speed of the burning process. In general, using slower speeds in the burning process reduces the chance for errors.
Burn Options
Several options in the Burn Audio CD dialog are intended to prevent common CD-burning errors: Test Write, Use Burnproof, and Use Temporary Imagefile. These options usually increase the time it takes to burn a CD in the Project page but they help to prevent wasting time and blank CDs on failed attempts.
The Test Write option runs tests before attempting to burn the CD in order to be sure the necessary computer resources are available.
Burnproof is a technology capable of preventing buffer under-run errors with some CD burners, in which the CD-writing process is interrupted, and the CD writer is forced to stop burning the CD before it is finished.
The Use Temporary Imagefile option changes the burn process so that an image of the CD to be burned is created before attempting to burn the CD. This helps to eliminate potential problems related to data not being made available fast enough while writing to the CD.
Make a Disc Image
Publishing your Project might require a disc-image file. For instance, sending your Project to a professional CD duplicator might require digital transmission of the content of your CD, rather than sending a potentially imperfect physical copy. Also, you may wish to use a different application to burn your CDs, in which case you need an image file. There are many file formats for disc images, some better suited to audio CD creation than others. Studio One Pro uses a continuous audio Wave file and a cue file to achieve the most universal support.
To create an image of your Project, click on the [Image] button at the top of the Project page. Options are available for file format, resolution, and sample rate, as well as the ability to toggle Realtime Processing and simultaneously upload the Project to a linked SoundCloud account. In making an image, Studio One Pro creates a cue file and a single, continuous audio file of your entire Project and places them in your Project folder. The cue file contains all of the necessary information to create the separate audio tracks for your CD by referencing the continuous Wave file. Many third-party CD-burning applications can create a CD using the Wave and cue files together.
DDP Export
DDP images are quickly becoming the standard method of getting a disc image from mastering to disc manufacturing. The DDP image contains all the contents of your master disc, plus formatting information that ensures your replicas exactly match your master. To create a DDP image of your Project, click on the [DDP] button at the top of the Project page.
All of the DDP image data is exported to a single folder with the name of the Project appended with "DDP." This folder can be delivered to a duplicator.
Digital Release
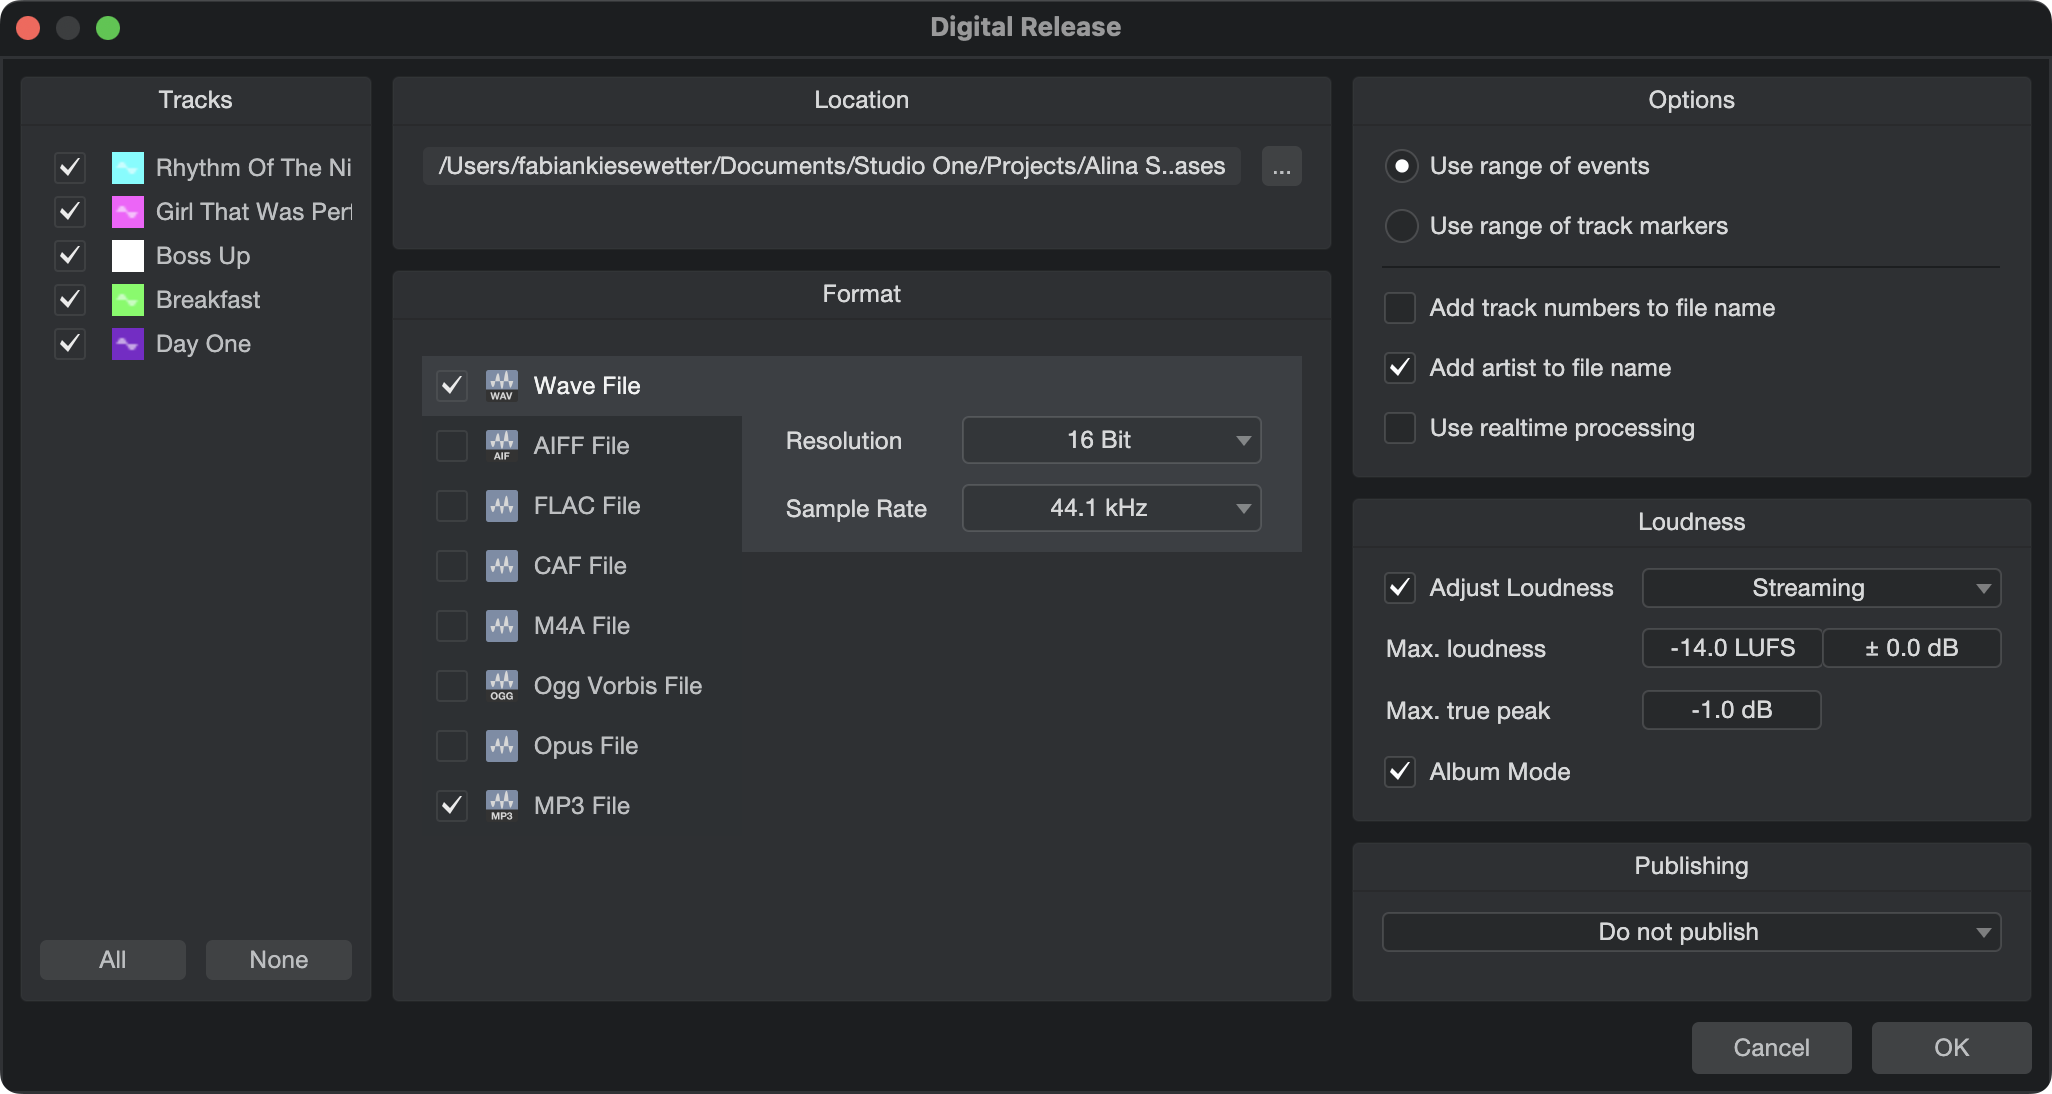
It is possible to publish your Project to a single folder containing all Tracks in your Project, properly tagged with the appropriate meta-information. A common use for this would be to quickly create an MP3 album in one folder and then upload it to a Web site or online retailer for distribution. This process is similar to creating a mix on the Song page, as described in the Create a Mixdown section.
Click on the [Digital Release] button at the top of the Project page to open the Digital Release dialog. In this dialog, you can choose from several formats:
- Wave
- AIFF
- FLAC (16-, 24-, and 32-bit integer)
- CAF
- M4A
- Ogg Vorbis
- Opus
- MP3
Select the formats for your mix file and choose the desired attributes for each. Attribute options will vary by format, but common options include sample rate and resolution. The MP3 and OGG Vorbis formats also offer an option to export at a Constant or Variable bit rate. The encoder will vary the bit rate during export, allocating more bits to complex passages and fewer bits to simple ones. This flexibility allows generating higher quality output files compared to the Constant bit rate mode at the same overall bit rate.
If you want to put your mix on a standard audio CD, create a 16-bit, 44.1 kHz Wave file.
You also have the option to simultaneously upload your Project to a linked SoundCloud account.
The folder to which all new files are written is named according to the Artist and Disc fields in the Project meta-information, at the top of the Track Column. If the Artist field is disabled, the new folder takes its title from the Disc name field. If the Artist field is enabled, the new folder title shows the artist name followed by the disc title. If neither the Artist or Disc fields have been filled in, the folder gets its title from the name of the Project.
The name of each Track in the Track column is used for the name of the new files created. In the Options section of this window, you can include Track numbers and the artist name in the name of each new file to be created in the album. All other meta-information supplied for each Track is used to tag the new files appropriately.
You can also choose Realtime Processing, to mix the Project down in real time.
Publishing
Studio One Pro provides options to directly publish your finished project either by uploading to SoundCloud, TuneCore, or Studio One Pro+ for sharing and collaboration. To publish your project after exporting the Project, select Upload to Studio One Pro+, Upload to TuneCore or Upload to SoundCloud in the Publishing section.
Target Loudness Options
The target loudness and peak level requirements of popular online streaming music services vary significantly. Studio One Pro’s Target Loudness Options can save you a great deal of time by optimizing your Tracks for the variety of requirements of these services—while also ensuring that your mixes won’t be altered by the loudness algorithms employed by these services. Instead, you control how your music will be reproduced. As it should be.
When using Adjust Loudness, your Tracks are analyzed during export, and loudness and true peak are matched to the selected settings. Please note that if the dynamic range of the exported file is too big, it's possible to not hit the Target Loudness, since there may be a conflict between Loudness and Max True Peak. In these cases Max True Peak always wins.
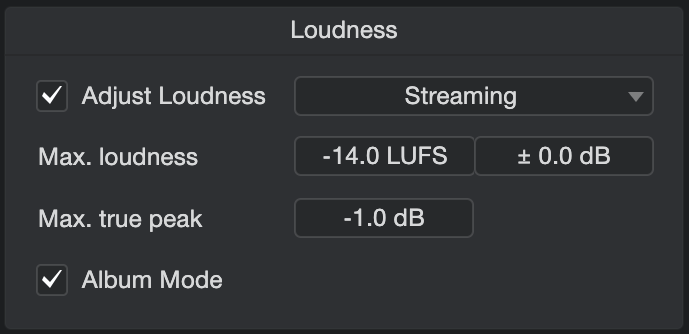
Simply tick the “Adjust Loudness” checkbox and select the preset for the intended platform of release.
Entering your own Max Loudness and Max True Peak settings will cause the Preset to jump to “Custom”, which will save these settings for later use. The streaming service Presets like Apple Music and Spotify cannot be edited or saved.
Adjust Loudness performs the following operations on Export:
- Max Loudness: The loudness of the written file is adjusted accordingly if the analyzed loudness is outside the defined range.
- Max True Peak: If the detected true peak value of the exported file is larger than the value specified, the gain of the final file is reduced accordingly.
- Album Mode: The loudness of the selected Tracks is measured as a whole in order to apply loudness optimization equally. Use this option if you don’t want all the tracks of an album to have the same target loudness; you will maintain full control over the loudness of your album tracks while still meeting the required loudness standard.
Studio One Pro+ Integration
If you’re a Studio One Pro+ member, you have access to additional services such as sharing your work with others and even collaborating on a project with other Studio One Pro+ users. These services are available directly from within Studio One Pro as soon as you're connected to the Internet and your Studio One Pro+ license is activated.
Upload to Studio One Pro+
When you’re running an active Studio One Pro+ subscription license and your computer is connected to the Internet, uploads can be initiated directly from within Studio One Pro. First, make sure to check Upload to Studio One Pro+ in the Publishing section of the Digital Release window on the Project Page, or select Upload to Studio One Pro+ in the Publishing menu of the Export Mixdown or Export Stems window.
For more information on Studio One Pro+, click here.
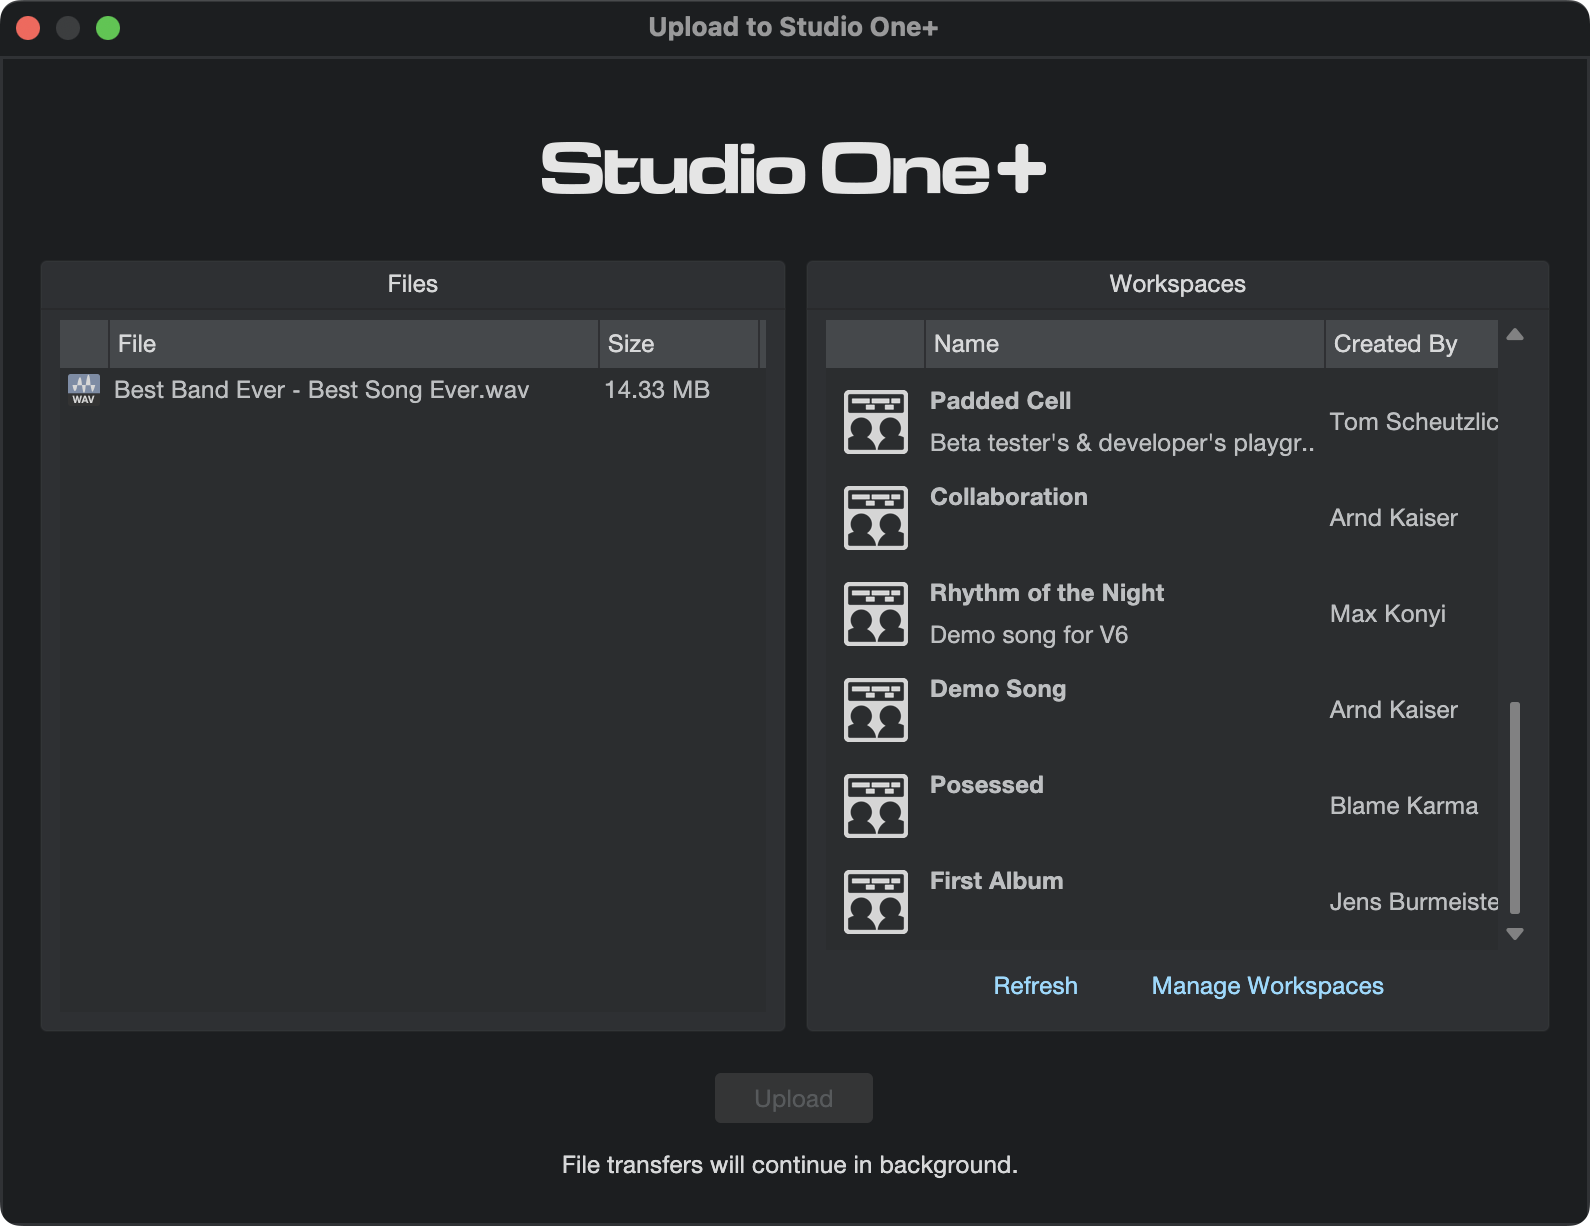
As soon as the mixdown or rendering process is completed, the “Upload to Studio One Pro+ ” window will appear. First make sure the mixed and rendered files in the Files column are complete. Then select a destination Workspace from the Workspaces list. Click the [Upload] button to initiate the upload to Studio One Pro+ .
To add files to a Workspace, at least one Workspace needs to exist in your Studio One Pro+ cloud storage account. You can manage your Workspaces by clicking on Manage Workspaces which takes you directly to the Workspaces area of your Studio One Pro+ account. Here you can manage your storage space, share content with other users, and invite other Studio One Pro+ users to join your workgroup.
SoundCloud Integration
PreSonus has partnered with the popular SoundCloud Web service to make it possible for you to upload your music to SoundCloud from within Studio One Pro. This integration is the first of its kind.
Connect with SoundCloud
To publish your music to SoundCloud, you first need a SoundCloud account. Visit http://www.soundcloud.com to create your free account. Then, open the Studio One/SoundCloud Client dialog and click on Connect with SoundCloud. Your Web browser then opens to a special page to allow Studio One Pro to connect with your SoundCloud account. Log in to your SoundCloud account on this page, click on Connect.
Studio One Pro is now connected to your SoundCloud account.
Upload to SoundCloud

Once Studio One Pro is connected to SoundCloud, you can upload music from your Project to SoundCloud directly from Studio One Pro. To do this, create a digital release from any Project and choose Upload to SoundCloud in the options, or open the Studio One/SoundCloud Client dialog.
If creating a digital release, the Tracks from the digital release are added to the SoundCloud Client window automatically, with the appropriate meta-information already filled in. If accessing the client directly, click on Add Tracks to add any audio file to the list. SoundCloud supports the upload of any audio file from Studio One Pro, at any resolution, and at any file size. Any number of Tracks can be uploaded at once, added from a digital release or manually.
After adding your Tracks, select any Track in the list to edit its information in Track Info and More Info. If you want the Track to be available publicly, meaning any SoundCloud user can see it, select this option under Track Info. If you want the uploaded file for Track to be downloadable or streamable, select the corresponding option under More Info.
When finished editing Track information, click on Upload to upload the Tracks to SoundCloud. The Tracks appear in your SoundCloud account once the upload has completed.
TuneCore Integration
PreSonus has partnered with the popular digital music distribution, publishing and licensing service, TuneCore, making the process of music distribution as seamless as possible within StudioOne.
Create a TuneCore Account
To distribute your music with TuneCore, you first need a TuneCore account. Visit www.tunecore.com to browse their services, compare available monthly plans, and create your account.
You can easily connect to TuneCore via the TuneCore Client window in Studio One Pro, and TuneCore’s signup web page will appear after clicking “Connect to TuneCore” from the Client window. You can open the TuneCore Client window from several locations in Studio One Pro:
-
From the Studio One dropdown menu, click on the “TuneCore Client” option.
-
Click on the TuneCore button in the navigation bar located on the top left of the start page.
-
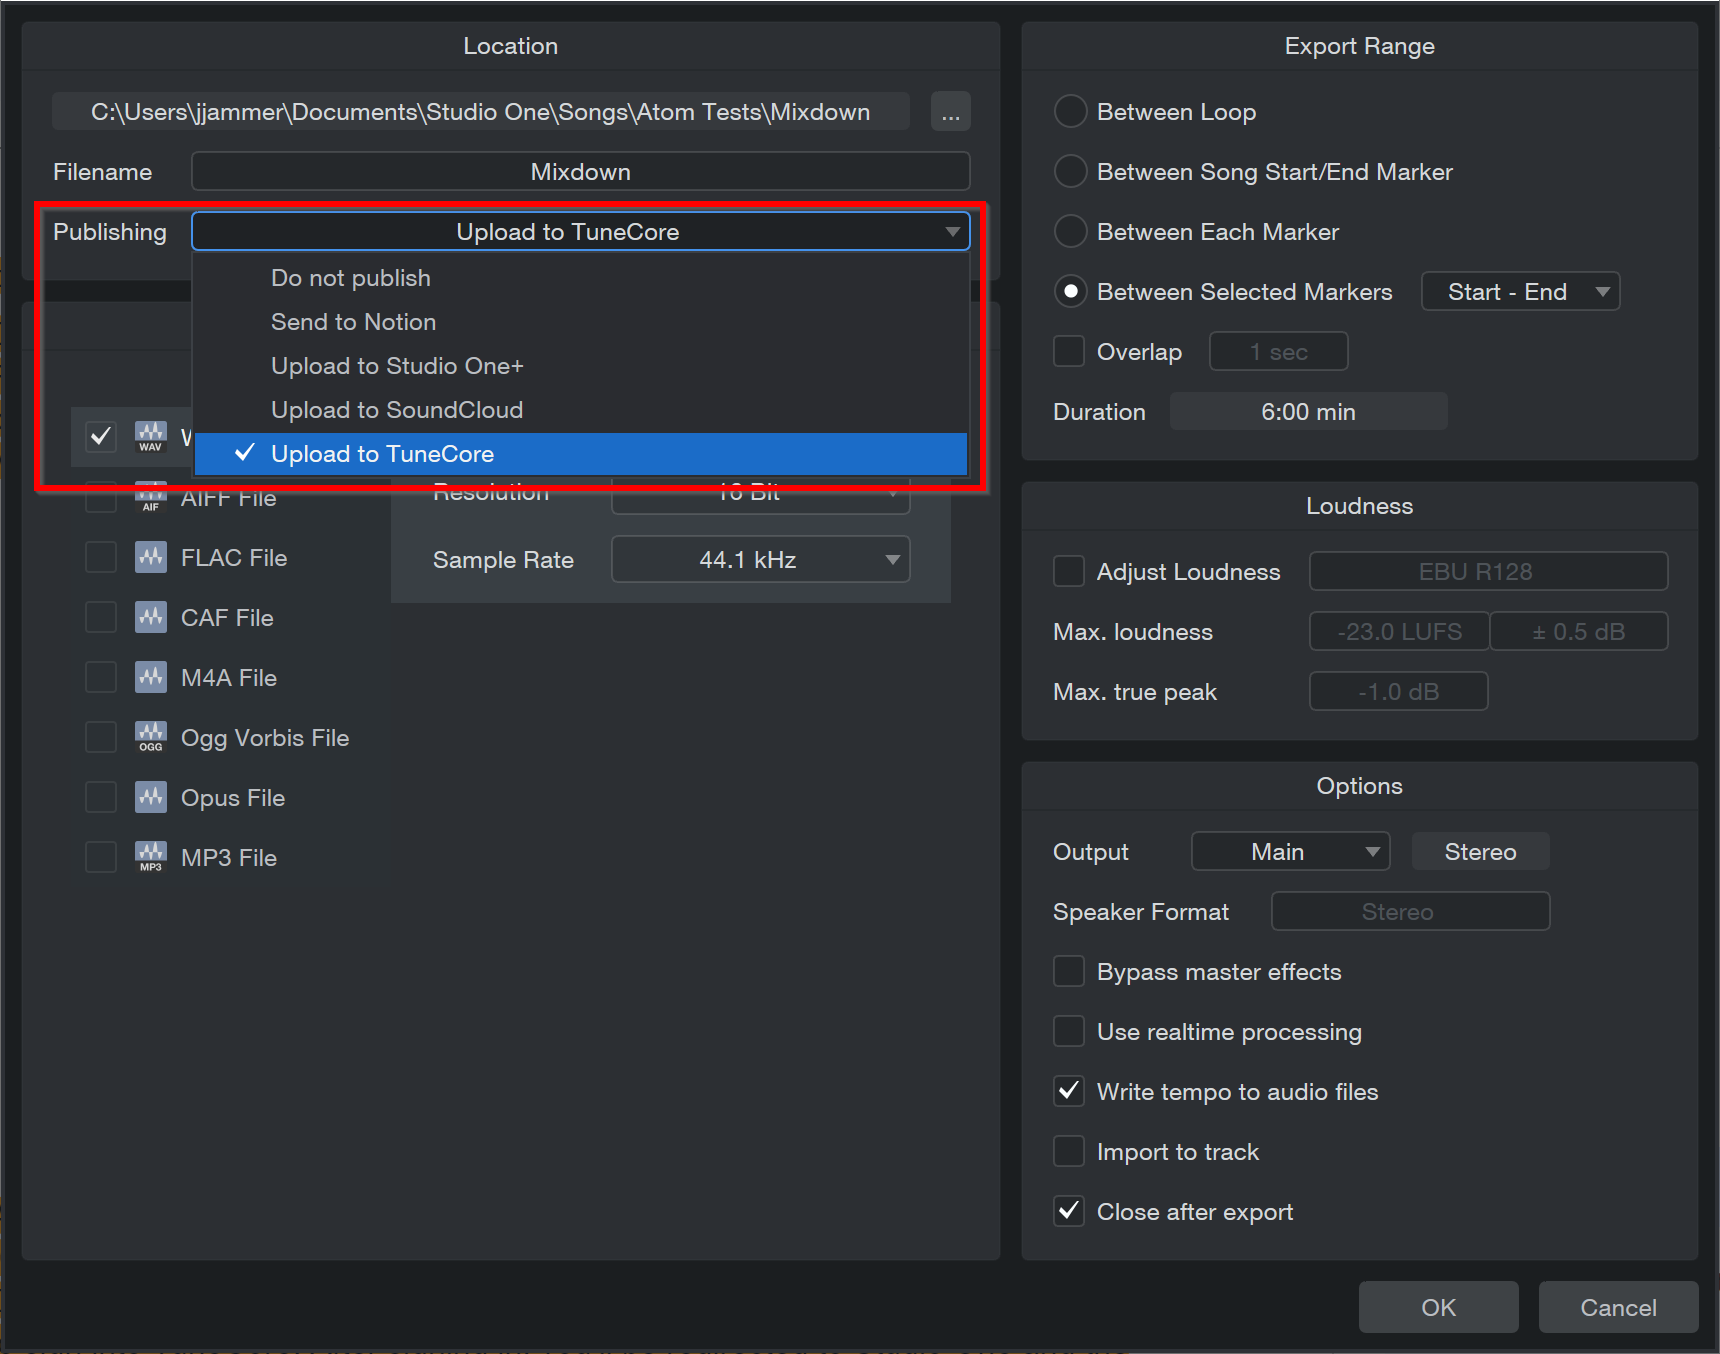
When exporting a mixdown, select “Upload to TuneCore” from the Publishing options. The “Connect to TuneCore” window will appear once you finish refining the export options and press “OK”.
-
When selecting “Digital Release…” from the Project dropdown menu, you can choose “Upload to TuneCore” from the Publishing option here as well.
How to Upload to TuneCore
Once you have an account, you’ll be able to log into your TuneCore account and upload new tracks from Studio One Pro.
Follow these directions to upload to TuneCore:
-
Once your song is ready for export, navigate to Song>Export Mixdown.
-
From the Export Mixdown window, make sure to select the “Upload to TuneCore” option from the Publishing dropdown menu while you specify the export options you would prefer.
-
After the export is processed, the TuneCore Client window will appear. Click “Connect to TuneCore”.
-
Once TuneCore connects, a web browser link will appear where you will be able to sign into TuneCore. After signing in, you’ll be redirected to Studio One Pro and the TuneCore client window, with your new track included, will appear:
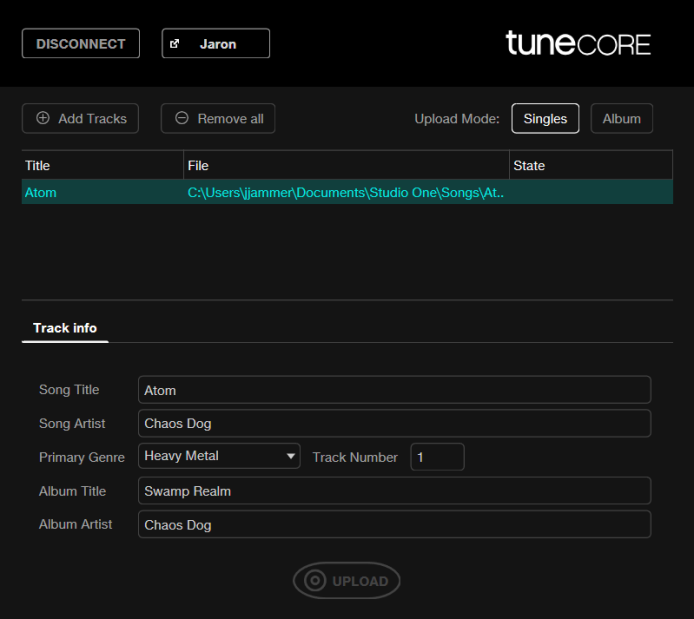
Here, you will be able to Add or Remove Tracks and prepare your upload. Once the Song Info / Album Info are included, click “Upload”.
-
Note, there are two “upload modes” you can choose from: upload singles or upload an album. As you might expect, choosing “upload singles” will set each song apart as separate single releases after uploading; on the other hand, choosing “upload album” will group the songs together into one release.
-
-
Uploaded tracks will be kept in TuneCore file storage and need to be further prepared via www.tunecore.com before release can be initiated. For more information about how to finish the upload via TuneCore, check out this help document: https://support.tunecore.com/hc/en-us/articles/115006689988-How-do-I-create-a-new-release