Mixing Down
In most cases, you’ll record multiple Tracks in a Song, but you'll need to mix these Tracks to a stereo format for distribution online, or on CD or DVD. With Studio One Pro, this simply means saving your mix to a stereo file. For those interested in exporting stems rather than creating a mixdown, see Export Stems from your Song . The following section will cover how to create a mixdown and the various mixdown options available to you.
Create a Mixdown
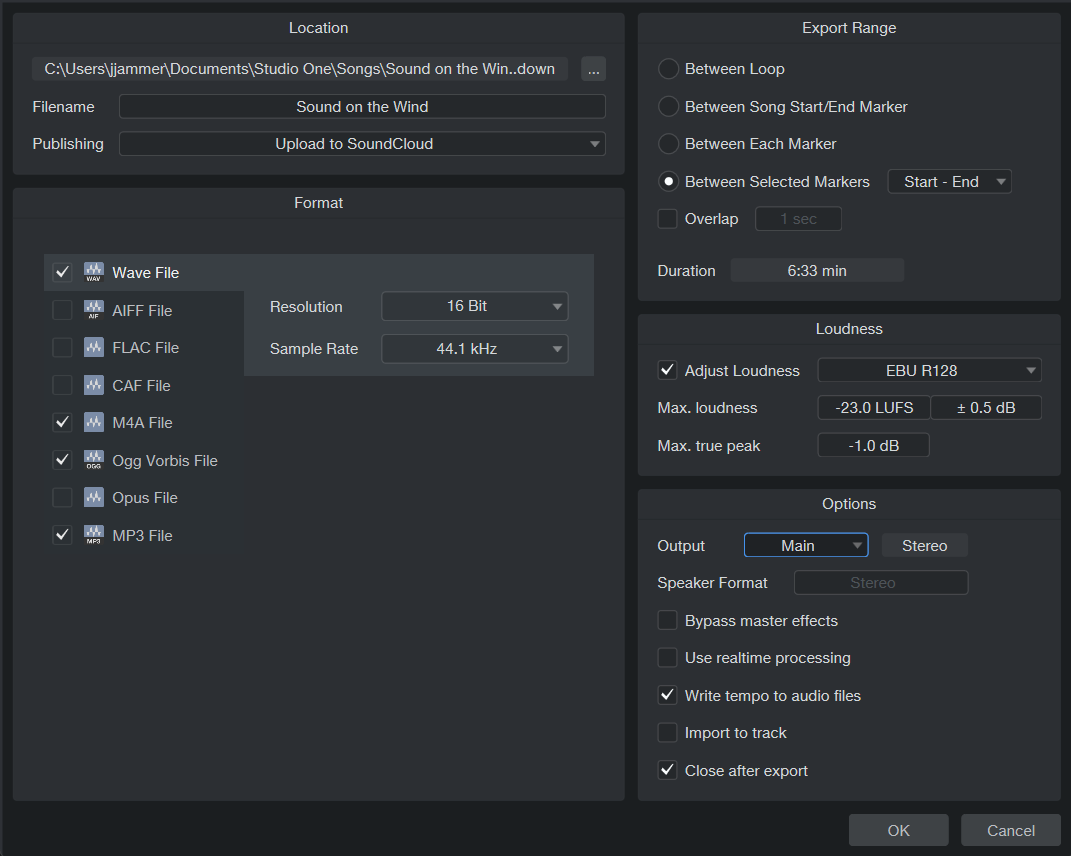
To create a mix of your Song in Studio One Pro, navigate to Song/Export Mixdown or press [Ctrl]/[Cmd]+[E] on the keyboard to open the Export Mixdown menu.
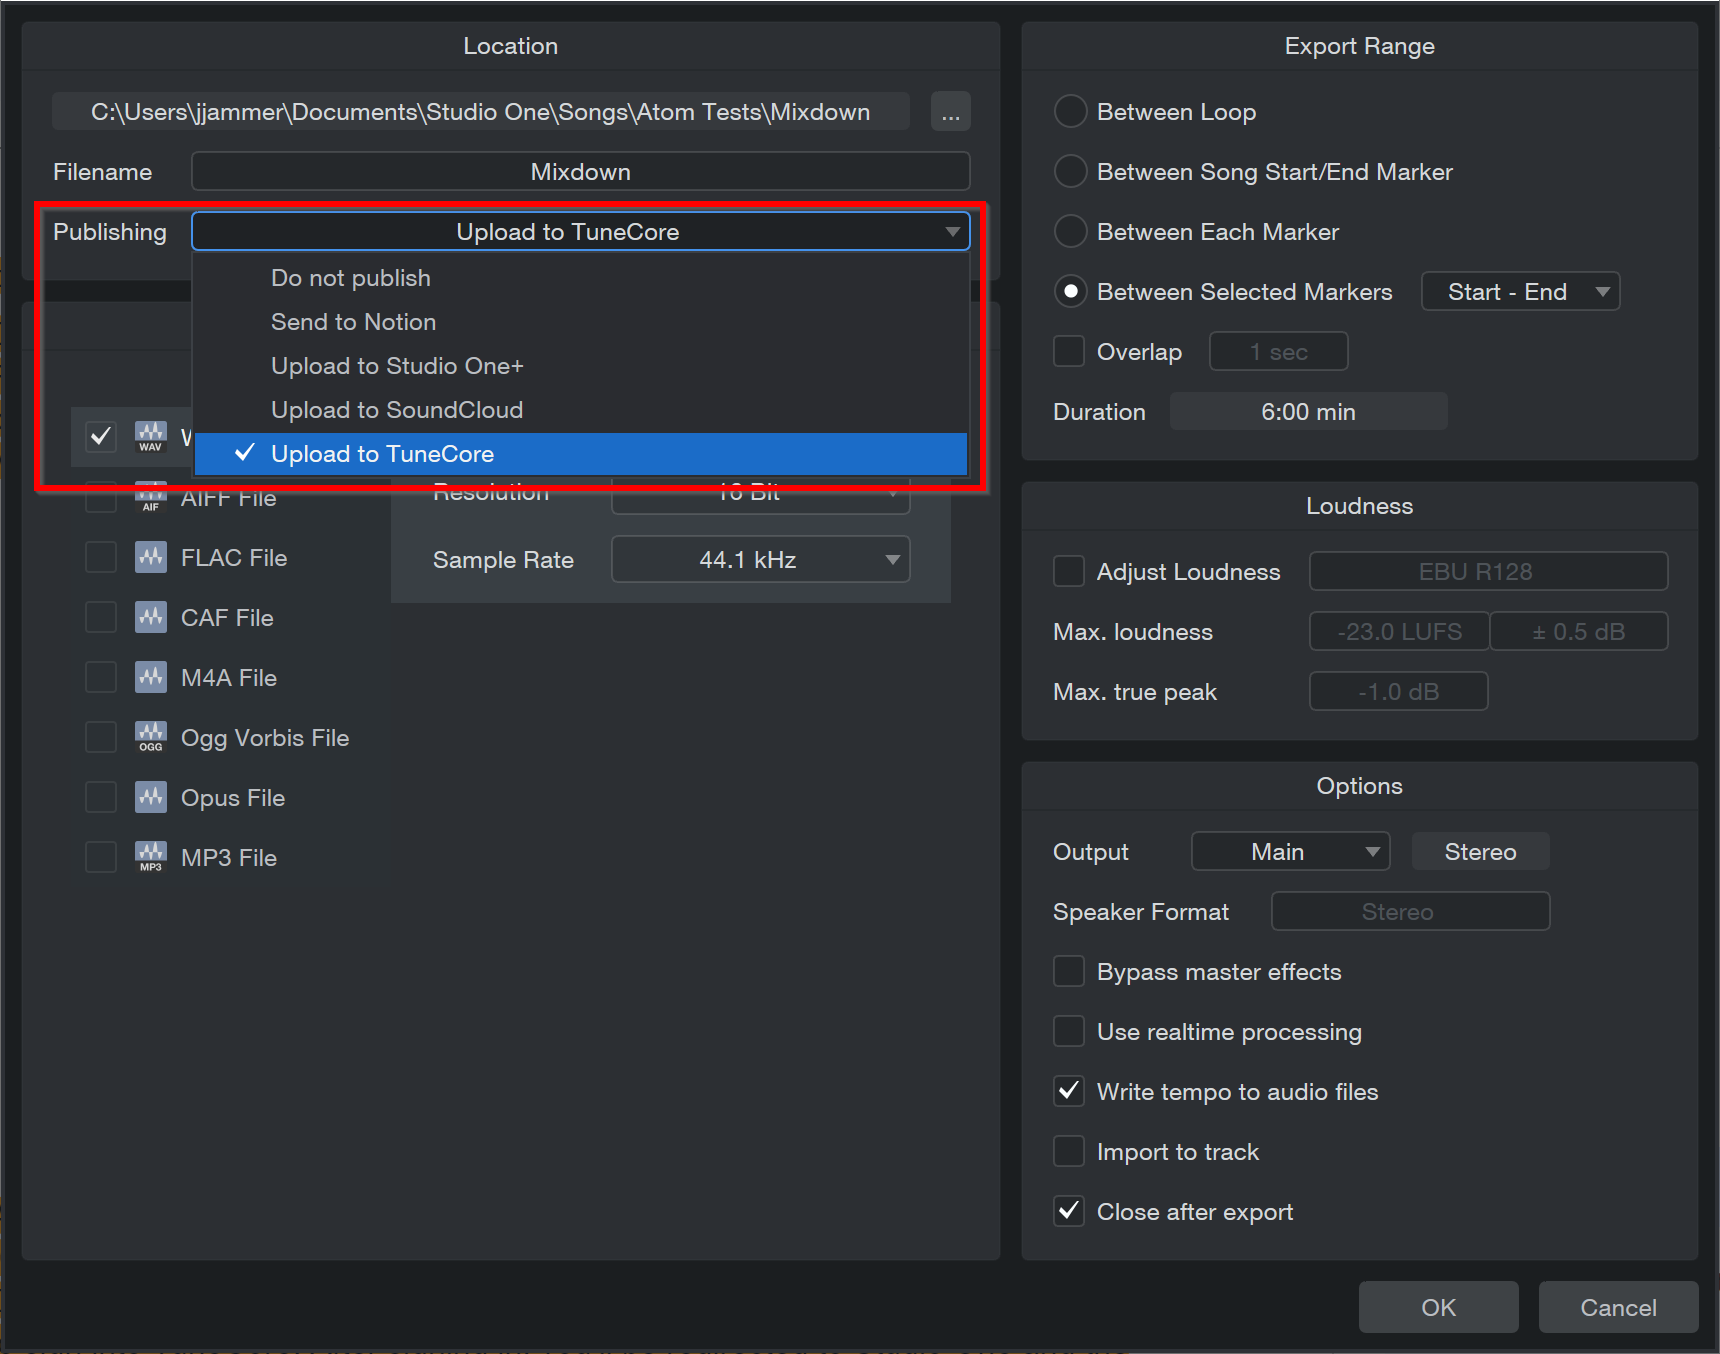
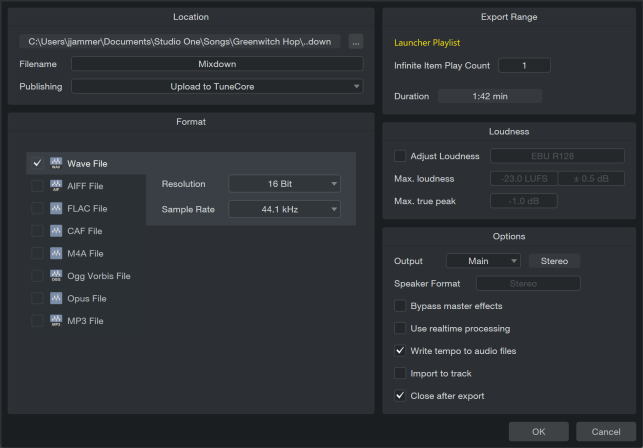
Location
The top section of the Export Mixdown menu is where you can select a location and name for the mix file. Click on the [...] button to choose a file location. Click on the file name, type in a new name, and press [Enter] to choose a name for the file. Location defaults to the Mixdown folder for your Song, but once you set a new mixdown location, Studio One Pro uses that location for further mixdowns until the next time you close the Song. Mixdowns are titled "Mixdown" by default, but once you set a name, that name is used by default for any further mixdowns of the current Song.
The Publishing menu lets you choose to send your mixdown to PreSonus Notion software (choose "Send to Notion"), upload it to PreSonus Studio One Pro+, or upload it to a connected SoundCloud account (choose "Upload to SoundCloud"), once the mixdown is completed. For more information on working with Notion in combination with Studio One Pro, see this section. For more information on working with SoundCloud, see SoundCloud Support. For more detailed information on uploading to Studio One Pro+ see Studio One Pro+ Integration.
Formats
Available export formats include:
- Wave
- AIFF
- FLAC (16-, 24-, and 32-bit integer)
- CAF
- M4A
- Ogg Vorbis
- Opus
- MP3
Select the formats for your mix file in the bottom left section of the Export Mixdown menu, choosing the desired attributes for each. Attribute options will vary by format, but common options include sample rate and resolution. The MP3 and OGG Vorbis formats also offer an option to export at a Constant or Variable bit rate. The encoder will vary the bit rate during export, allocating more bits to complex passages and fewer bits to simple ones. This flexibility allows generating higher quality output files compared to the Constant bit rate mode at the same overall bit rate.
If you want to put your mix on a standard audio CD, create a 16-bit, 44.1 kHz Wave file.
Export Range
-
Choose the Between Loop option to only export the range of your Song between the Left and Right Locators.
-
Choose Between Song Start/End Marker to export the range of your Song between the Song Start and End Markers, as seen in the Marker Track.
-
Choosing Between Each Marker exports separate audio files for the range between each marker in the Song for each Track, placing them in folders named after the markers.
-
Choosing Between Selected Markers lets you choose a pair of Markers to export the range between. The duration of the range to be exported is displayed in the Duration field. Note that when Between Each Marker is selected, the Duration field still shows the full length of the Song, signifying the total length of audio to be exported rather than the length of any one section as dictated by the Markers.
-
Check Overlap and specify a duration if you would like to add an overlap to the exported range so you can create crossfades between them later on.
Target Loudness
The target loudness and peak level requirements of popular online streaming music services vary significantly. Studio One Pro’s Target Loudness Options can save you a great deal of time by optimizing your Tracks for the variety of requirements of these services—while also ensuring that your mixes won’t be altered by the loudness algorithms employed by these services. Instead, you control how your music will be reproduced. As it should be.
When using Adjust Loudness, your Tracks are analyzed during export, and loudness and true peak are matched to the selected settings. Please note that if the dynamic range of the exported file is too big, it's possible to not hit the Target Loudness, since there may be a conflict between Loudness and Max True Peak. In these cases, Max True Peak always wins.
Simply tick the “Adjust Loudness” checkbox and select the preset for the intended platform of release.
Entering your own Max Loudness and Max True Peak settings will cause the Preset to jump to “Custom,” which will save these settings for later use. The streaming service Presets like Apple Music and Spotify cannot be edited or saved.
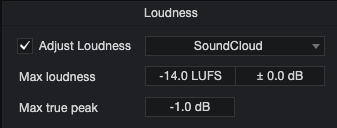
Adjust Loudness performs the following operations on Export:
-
Max Loudness: The loudness of the written file is adjusted accordingly if the analyzed loudness is outside the defined range.
-
Max True Peak: If the detected true peak value of the exported file is larger than the value specified, the gain of the final file is reduced accordingly.
Options
The bottom section of the Export Mixdown menu has several options that affect how the mix file is created:
-
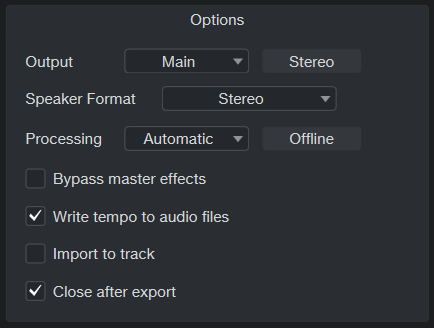
Choose an output from which the mix is to be created in the Output selection box. Only the Main Out appears in the list, by default. If there are any Sub Outs in the Console, they appear in this list as well. Check Import to Track if you would like the mix imported to a new Track in your Song.
-
From the Speaker Format dropdown menu, choose the format you would like to export the mixdown to. You can choose between Original, Mono, Stereo and Split Mono:
-
Original exports mixdown according to the originally set speaker format.
-
Mono generates a monaural mix. This is useful to check for phase cancellation issues between the left and right channels of a stereo mix when the user is listening through a single speaker.
-
Stereo generates a stereo mix.
-
Split Mono exports all multichannel output to separate mono files.
-
-
There are several Processing options. After clicking onto the Processing dropdown, you have the following options:
-
Automatic: With Automatic selected, processing changes according to your signal path. When external instruments or effects are included in your signal path, “Realtime” will become the default setting. When no external instruments or effects are in the signal path, “Offline” will become the default setting. Note that the rendering option automatically chosen will appear next to the Processing dropdown menu.
-
Offline: Choose this option if you would like to export your mix offline. This option allows you to set processing to “Offline” manually, thus overriding the default.
-
Realtime: Choose this option if you wish to export your mix in real time. This option should be used if your Song requires External Instruments or external hardware processing so that note data and audio flow to and through these external sources during mixdown. This option allows you to set processing to “Offline” manually, thus overriding the default.
-
-
Check Bypass Master Effects to bypass the Insert effects on the Main Output Channel of the Console when rendering the mixdown. This is useful if you have inserted effects to simulate the mastering stage, such as a compressor and limiter, but would like to render the mixdown without them in order to address this in a mastering Project, or to preserve flexibility for another mastering engineer.
-
Check Use Realtime Processing if you wish to export your mix in real time. This option should be used if your Song requires External Instruments or external hardware processing so that note data and audio flow to and through these external sources during mixdown.
-
Check Write tempo to Audio Files if you would like to write the tempo information to the mixdown. This is useful if you want to retain the tempo information for use in another project.
-
Check Import to Track if you would like the mix imported to a new Track in your Song.
-
Check Close After Export if you would like to close the Export Mixdown menu after exporting your mix and open the Export path in Finder/Explorer.
Song Meta-Information
Certain file formats, such as MP3, can contain additional information about the audio which is referred to as "meta-information". In the Song/Song Setup/Meta Information menu, there are many fields of data that can be filled in for each Song. These fields are used to tag audio files so that they are labeled correctly for playback in software and various media players. All audio files exported from a Song that can contain meta-information are tagged with the meta-information supplied here.
At the bottom of the Meta Information menu, you can choose to display the Song’s meta-information when the Song is opened. The information can also be viewed at any time by selecting Song Information from the Song menu. The Song Information window also contains a Notes tab, in which you can type in any text information about the Song that may be useful later.
The meta-information displayed represents what listeners see in their media players when playing the Song. Displaying this info could also be helpful in remembering aspects of the Song production later.
Meta-information filled in for any Song is automatically filled in for that Song when it is imported into a mastering Project. For more on this, refer to the Meta-Information section in the Mastering chapter.
Some of the meta-information entered here also appears at the top of the Full Score and Single Track page layouts in Score view: the Title of the Song, the Album name, and the Songwriter/Composer. If those items are edited in Score view, they are also changed in the Song/Song Setup/Meta Information menu. For more information, see The Score Editor chapter.
SoundCloud Support
When you're done mixing down, you can upload your sounds to SoundCloud, a web-based music sharing service, directly from Studio One Pro. You can also download sounds from SoundCloud (when available) directly into Studio One Pro.
To upload a new mixdown to a connected SoundCloud account as soon as it is created, choose "Upload to SoundCloud" from the Publishing menu in the Export Mixdown window. The SoundCloud Client opens when the new mixdown is complete. In this dialog, you are able to upload audio straight to SoundCloud, and set various SoundCloud-specific options as you do so. You can also access the SoundCloud Client directly by navigating to Studio One Pro/SoundCloud Client.
SoundCloud in the Browser
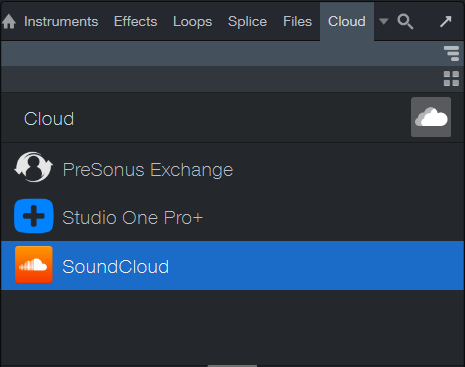
You can find SoundCloud features in the Cloud tab in the Browser.
You can drag and drop audio from the SoundCloud locations listed here just as you would from any other file location, and audio is downloaded (if downloads are allowed for the chosen file) accordingly. You can even preview the audio in the Browser.
For instance, you might have a music partner creating beats for you, and he shares that audio directly with you through SoundCloud. You would browse to that person's SoundCloud folder, listed under the SoundCloud heading in Cloud, and drag the desired audio into the arrangement. A special Event is placed in the arrangement, and the Transfers menu opens to indicate the download’s progress. When the download is complete, the waveform appears for the Event and you can proceed as you normally would with any audio material.
TuneCore Integration
PreSonus has partnered with the popular digital music distribution, publishing and licensing service, TuneCore, making the process of music distribution as seamless as possible within StudioOne.
Create a TuneCore Account
To distribute your music with TuneCore, you first need a TuneCore account. Visit www.tunecore.com to browse their services, compare available monthly plans, and create your account.
You can easily connect to TuneCore via the TuneCore Client window in Studio One Pro, and TuneCore’s signup web page will appear after clicking “Connect to TuneCore” from the Client window. You can open the TuneCore Client window from several locations in Studio One Pro:
-
From the Studio One Pro dropdown menu, click on the “TuneCore Client” option.
-
Click on the TuneCore button in the navigation bar located on the top left of the start page.
-
When exporting a mixdown, select “Upload to TuneCore” from the Publishing options. The “Connect to TuneCore” window will appear once you finish refining the export options and press “OK”.
-
When selecting “Digital Release…” from the Project dropdown menu, you can choose “Upload to TuneCore” from the Publishing option here as well.
How to Upload to TuneCore
Once you have an account, you’ll be able to log into your TuneCore account and upload new tracks from the Studio One Pro.
Follow these directions to upload to TuneCore:
-
Once your song is ready for export, navigate to Song>Export Mixdown.
-
From the Export Mixdown window, make sure to select the “Upload to TuneCore” option from the Publishing dropdown menu while you specify the export options you would prefer.
-
After the export is processed, the TuneCore Client window will appear. Click “Connect to TuneCore”.
-
Once TuneCore connects, a web browser link will appear where you will be able to sign into TuneCore. After signing in, you’ll be redirected to Studio One Pro and the TuneCore client window, with your new track included, will appear:
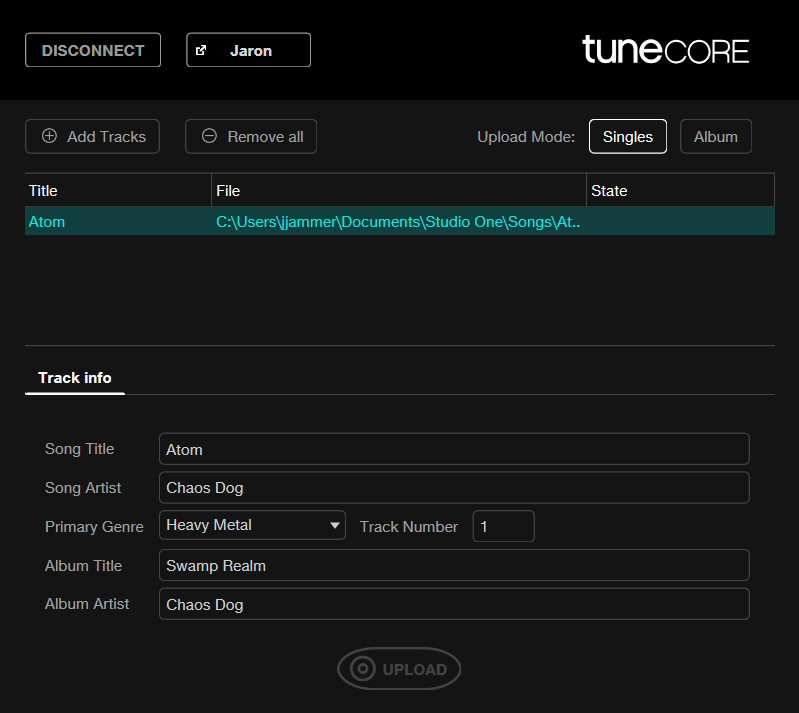
Here, you will be able to Add or Remove Tracks and prepare your upload. Once the Song Info / Album Info are included, click “Upload”.
-
Note, there are two “upload modes” you can choose from: upload singles or upload an album. As you might expect, choosing “upload singles” will set each song apart as separate single releases after uploading; on the other hand, choosing “upload album” will group the songs together into one release.
-
-
Uploaded tracks will be kept in TuneCore file storage and need to be further prepared via www.tunecore.com before release can be initiated. For more information about how to finish the upload via TuneCore, check out this help document: https://support.tunecore.com/hc/en-us/articles/115006689988-How-do-I-create-a-new-release
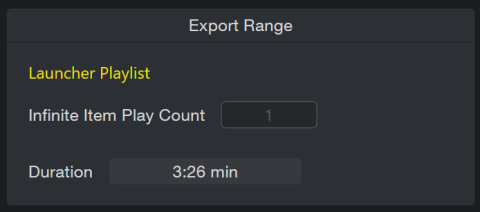
Export Launcher Playlist
Assuming you created a complete song inside the Launcher using Playlists, these can be exported directly without having to move them to the Timeline first. With a Playlist active, you have the following export and mixdown options from the Song context menu:
-
Select Export Mixdown… you will find a new Launcher Playlist option inside “Export Range”:
-
Select Add to Project to send a mixdown of your Playlist directly to the Project Page
-
Select Add to Show to do the same for the Show Page. Keep in mind this is a mixdown of the entire Playlist, not the Playlist itself with its Cells and Scenes. The Show Page doesn’t have a Launcher. (Although you can use the existing Performance View to “launch” Arranger Sections. If this is your aim, use “Insert Playlist into Song…”, then send the Song to the Show Page.
To export a Launcher Playlist, you must first enable the playlist from the Launcher playlist panel:
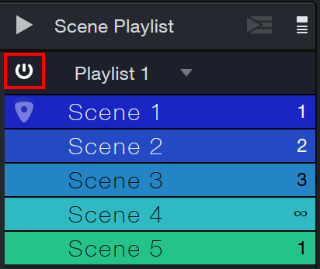
Once the playlist is enabled, the Launcher Playlist option will appear within the Export Range section of the Export window:
For more information about the Launcher, check out The Launcher page.