The Pool
When you import an audio file or record on an Audio Track, an Audio Event is created in the Arrange view of the Song, and a representation of the original audio file associated with the Event, called a Clip, is placed in the Pool. The Pool contains all audio files that are, at any point, associated with an Audio Event in your Song.
To open the Pool, first open the Browser by clicking the [Browse] button, then click on the [Pool] button. You also can press [F10] on the keyboard to open the Pool directly.
Navigate the Pool
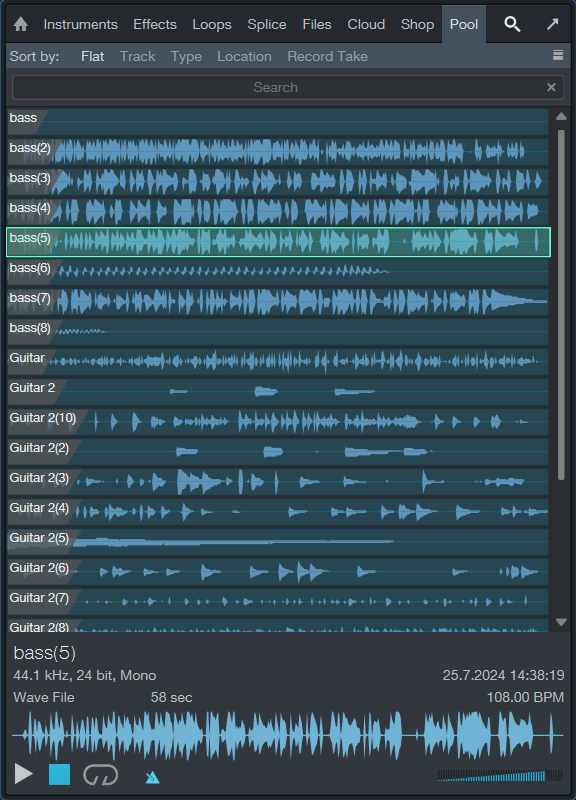
The Pool displays audio Clips as waveforms. You can zoom in or out on these waveforms by manipulating the Pool's Data Zoom control. Clips can be sorted using the Sort by... options at the top of Pool. The following sorting options are available:
- Flat: View all Clips with no order.
- Track: View Clips by the Track on which they are currently used or were previously used.
- Type: View Clips by Clip Type (Audio or instrument-oriented Sound).
- Location: View Clips by the storage location in which they exist on your computer.
- Record Take: View Clips by the order of record takes within your Song.
File Management in the Pool Tab
[Right]/[Ctrl]-click in the Pool Browser window to select from the following commands:
- Rename File: Rename the file associated with the currently selected Clip.
- Locate File: Locate a file for the currently selected Clip (e.g., to find a missing file).
- Show in Explorer/Finder: Open the file location for the currently selected Clip in Windows Explorer/Mac Finder.
- Select on Track: Select any Events associated with the currently selected Clip in the Arrange view.
- Remove from Pool: Remove the currently selected Clip from the Pool. This does not delete the file.
- Delete File Permanently: Permanently delete the file associated with the currently selected Clip.
- Delete Attachments: Permanently delete any attachments associated with the currently selected Clip.
- Convert Files: Convert selected files in the Pool to the current Song’s sample rate and bit depth. The Convert Files menu appears, with file options. A new file is created for each selected file, replacing the original file in the Pool. The original file is retained in the current Song’s Media folder.
- Refresh: Refresh the contents list of the Pool to reflect the current state of your Song and computer.
- Locate Missing Files: If any files are missing in your Song—usually this occurs because the files were moved—use this command to locate the missing files.
- Remove Unused Files: Remove any Clips from the Pool that are not currently used in the Song. This does not delete the files.
- Show Media Folder in Explorer/Finder: Open the Media Folder for the current Song in Windows Explorer or the Mac Finder.
Using Audio Files from the Pool
The audio Clip associated with any Event in your Song is always available in the Pool, regardless of whether the Events associated with that Clip remain in the Arrange view of the Song. This means that the original state of a Clip with which an Event is associated can be quickly restored by loading it directly from the Pool.
Click-and-drag any Clip or video from the Pool into the Arrange view, as you would when importing any file from the Browser.
Some audio clips in the Pool show an attachment icon:
- Music Loops imported to Tracks show the musical performance as an attachment.
- Audio clips with transformed Event FX show the original Event as an attachment.
- Audio clips edited with Melodyne show the detected notes as an attachment.
Files with attachments are marked with a paper clip icon. Click the triangle button to the left of a file to display all attachments. Attachments can be dragged separately into the Arrangement, or deleted using the Delete command in the [Right]/[Ctrl]-click contextual menu. Note that no undo is possible after deleting an Attachment, so before doing so, please ensure that the files you delete are no longer needed elsewhere.
Importing Audio Files to the Pool
If you know a certain set of files will be used in a Song but do not want to import them into the Song directly, you can simply import the files into the Pool. Later, you can quickly find and make use of these files from the Pool.
To import a file into the Pool, drag it to the Pool from the Files tab of the Browser, or from Windows Explorer or the Mac Finder.
To quickly copy all external files used in your Song to the Song’s Media folder, [Right]/[Ctrl]-click in the Pool and select Copy External Files from the pop-up menu. Only those files that did not previously exist in the Song folder are copied and placed into the Media folder.
Enable the "Ask to copy external files when saving Song" option in Preferences/Locations/User Data if you'd like to be given the option to copy any new external media files to the Song's media folder when saving a Song.
Backing Up and Sharing Your Songs
Once all of the external files have been copied to your Song folder, you can back up your Song and all of its contents simply by copying the Song folder to an external hard drive or DVD. To share your Song with another Studio One Pro user, you can simply compress the Song folder in a .zip archive and email or transfer the archive.