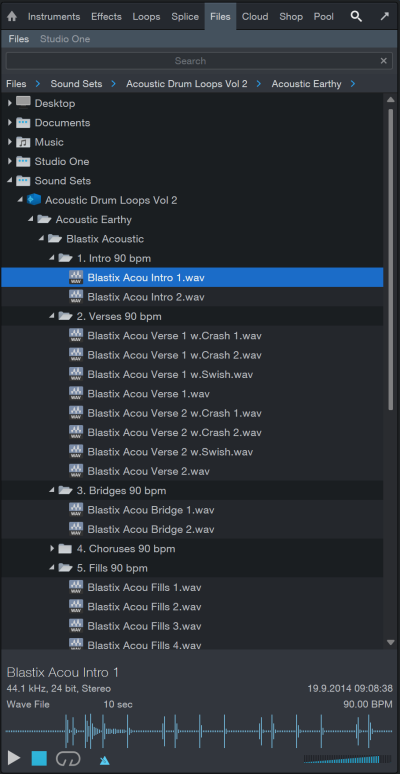
Files Tab
The Files tab gives you access to files and folders throughout your computer's file system, as well as Studio One Pro-specific content locations.
It is possible to import several file types from the Files tab into your Song, Project or Show, including WAV (BWF and RF64), AIFF, REX, Apple Loops (CAF only in macOS), Ogg Vorbis, FLAC (16-, 24-, and 32-bit integer), and MP3 audio files, as well as Standard MIDI Files, and of course Studio One Pro's Audio Loops and Music Loops.
Finding Audio Files in the Files Tab
Open the Browser by clicking on the [Browse] button, or press [F5] on the keyboard, and click on the [Files] button at the top of the Browser to view files and locations on your computer. You also can press [F9] on the keyboard to open the Files tab directly.
By default, the Files tab displays the following sub-tabs:
- Desktop: Displays any folders on your desktop and allows access to their files. Note that this will not display shortcuts or aliases.
- Documents: Displays the contents of the documents folder for the logged-in User.
- Studio One: Content sub-tab, as specified in Studio One/Options/Locations/User Data setup menu (macOS: Preferences/Locations/User Data), which contains all Songs, Projects, Shows, Presets, and other Studio One Pro files.
- Sound Sets:Contains all sound sets installed from your PreSonusAccount, including loops, instruments, and samples.
- Volumes: Contains all folders and files within your computer's file system, and also provides access to the contents of any attached storage devices.
Click on any folder to view its contents, as you would with Windows Explorer or macOS Finder.
When browsing Audio Loop files and REX audio files, note the drop-down arrow that expands to reveal the slices of the REX file. If you drag in either of these types of files, the slices are contained in an Audio Part.
When moving files onto or within your computer while Studio One Pro is open, you may need to refresh the Browser to see the subsequent changes. If you encounter this, [Right]/[Ctrl]-click in the Browser and select Refresh.
File Management in the Files Tab
[Right]/[Ctrl]-click on a file or folder in the Files Tab to access the following commands. Note that the context menu may change depending on the selected file:
- Show Package Contents: Select to allow Browser access to files within a bundled file, such as a .song file.
- Set as Root: Select to set the folder to the root of the current Tab.
- Up: Once a folder has been set as the root of the current tab, select this command to set its enclosing folder as root.
- Reset Root: Resets the root of the current tab to its default top-level directory.
- Upload To: Select to upload the chosen file to a connected cloud service, such as SoundCloud.
- New Folder: Select to create a new folder within another folder.
- Show in Explorer/Finder: Select to show the file or folder in the Windows Explorer or macOS Finder.
- Rename File/Folder: Select to rename any file or folder.
- Delete File/Folder: Delete any file or folder permanently. This places the file or folder in the Recycling Bin or Trash.
- Send To new SampleOne: Sample, loop, or .wav/mp3. Opens the file as a new SampleOne instrument.
- Send To new Impact: Sample, loop, or .wav/mp3. Opens the file as a new Impact instrument, sliced across multiple pads.
- Import to Pool: Sample, loop, .wav/mp3, or video. Places the file into the Pool of resources associated with the current Song.
- Import Song Data...: when right-clicking .song file. Specify which parts of the Song to import: tracks, tempo, markers, Instruments, etc.
You can also move or copy any file or folder to another location within the File Browser. To move a file or folder, click-and-drag on top of another folder. To copy a file or folder, hold [Ctrl]/[Cmd] while dragging.
Use [Alt]/[Option]+[Up Arrow] to collapse all of the directories when navigating the Files Browser. Use [Alt]/[Option]+[Left Arrow] to collapse the currently selected top-level directory (and any of its sub-directories).
Previewing Audio Files
When an audio file is selected in the Browser, the bottom window of the Browser becomes the Preview Player, displaying transport controls and information about the selected file. When the Preview Player appears, you can listen to the selected file directly within the Browser. To start file playback, double-click on the file in the Browser or click on the Play button in the Preview Player with the desired file selected.
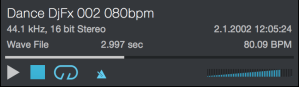
Preview Player playback is independent of the main Song playback; notice the playback-position cursor does not move across the Arrange view while previewing a file. The Preview Player has its own playback-position indicator that moves left to right to indicate the current playback position in the selected file. The position indicator can be clicked-and-dragged to navigate through the selected file during playback. A volume fader controls the playback level of the Preview Player.
Preview Player playback can be synced to Song playback to allow auditioning of files along with Song playback. Click on the Play at Song Tempo button, which is engaged by default, to allow the Preview Player to sync to the current Song tempo.
If the currently selected file’s tempo is known, and Play at Song Tempo is engaged while previewing, the file is timestretched on the fly to match the current Song tempo. To preview while hearing your Song, start Song playback first, and then select a file to preview.
To loop the selected file during preview playback, click on the Preview Player’s Loop button, which is engaged by default. Looping during preview playback makes it easy to listen to the selected file in the context of your Song.
An easy way to audition many audio loops from a single folder, such as a loop library, is to set the left and right locators around the range of the Song into which you plan to import the loop, then loop playback in the Transport within that range. Next, preview the first loop in the folder and then use the up and down arrow keys on your keyboard to cycle through the loops in that folder.
Importing Audio Files into Your Song
Importing an audio file from the Browser into your Song is as easy as clicking on the file and dragging it into the Arrange view of the Song. When the file is dragged to empty space, a mono or stereo Audio Track is created with the file placed on it as a new Audio Event, located at the position to which it was dragged. When the file is dragged to an existing Audio Track, it is placed as a new Audio Event on that Track, at the position to which it was dragged.
If you import a stereo file to a mono Track, the Event created is stereo, but the output is mono, since the Track is mono. If you import a mono file to a stereo Track, the output is dual mono, that is, the same signal sent equally to both sides.
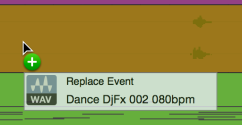
If you wish to replace the audio clip associated with an Event with another audio clip from the Browser, you can hold [Alt]/[Opt] while you drag-and-drop the new audio onto the Event to be replaced. This effectively swaps out the existing audio with the new audio, and the edits to the Event stay intact.
It is possible to select multiple files in the Browser and drag all of them in at once, making the transfer of recordings done in another DAW a one-click process. If you would like to insert multiple audio clips, selected in the browser, to the same Track, with one placed after the other across the timeline, hold [Ctrl]/[Cmd] while dragging the audio clips to empty space on a Track. This can be helpful if you want to quickly drag in multiple variations of similar audio, or for laying out an entire song structure in one move.
For virtual instruments that support audio-file importing using drag-and-drop (such as many drum samplers), you can drag-and-drop audio files from the Browser directly onto the instruments to load audio files.
You can also [Right]/[Ctrl]-click on any audio file and select Send to New SampleOne to instantly load the file as a sample in the built-in SampleOne™ virtual instrument. If you do this with an Audio Loop or REX audio file, its slices are automatically mapped across the keyboard (up to 96 slices).
Audio Loops and Tempo
Many audio loops have a rhythmic component such as a drum beat or a time-based effect. If tempo information is available for the audio loop, as described in the section Audio File Tempo Information, Studio One Pro stretches the loop to match the tempo of the song. The process is normally effortless, but if a file doesn't conform to tempo, try one or more of these steps:
- Select an audio file that is less than 60 seconds long.
- Audition the file in Previewer with "Play at song tempo" enabled.
- Drag the file to an Audio Track with timestretching enabled in the Track Inspector.
- Add the track tempo to the file name (e.g., "110", "89bpm", etc.), if it isn't there already. Most loop providers embed tempo information in the names of the files and the file metadata, so this may only be necessary for audio loops you've made yourself.
-
When a file is imported or dragged in the song from the browser, a tempo mapping analysis is also triggered in case all other methods of tempo detection fail.
File Tempo Approval on Import
If you don’t know the tempo of the audio file associated with the current Event, Studio One Pro will attempt to deduce it, and it will do so based upon BPM data in the filename of the imported Event. In this example, “SynthBass_120BPM.wav” was imported with a probationary BPM of 120—listed in red in the inspector. If this tempo is correct, it can be approved by the user from the drop-down menu to the right of the file’s tempo. From this drop-down menu, you can also double or halve the event’s tempo.
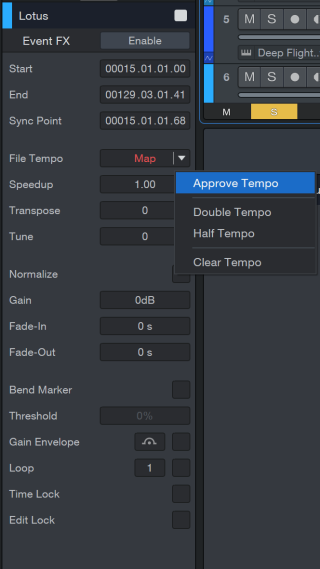
If the BPM is not contained in the Event’s header or filename, Studio One Pro will instead attempt to deduce the tempo of the Event based on both the file’s length and an assumption of an evenly-subdividable number of bars. Tempo Approval on Import is not available on Events that contain more than one tempo.
Automatic MP3 to WAV Conversion
When you import an MP3 file into a Song, or any other file type, it is automatically converted to a WAV file. The WAV file created during conversion is stored in the Media folder of the Song in which the file was imported and has the same name as the original file, with the .wav file extension. The newly created WAV file inherits the Song’s sample rate and resolution (bit depth), as set in Song/Song Setup.
Audio File Operations
Audio files can be processed directly from the Browser using the [Right]/[Ctrl]-click contextual menu as follows. Note that in every case, the original audio file is left unmodified. It is possible to select multiple audio files of the same format and apply processing to all of them at once.
- Split to Mono Files: Split a multi-channel audio file into separate mono files, one for each channel. This operation will append the speaker short name for all known speaker setups as L, R, C, LFE, etc. If the speaker setup of the file is not known, the new files will be numbered.
- Merge to Multichannel File: Merge a set of mono audio files to a single multichannel file. Select several mono audio files, then [Right]/[Ctrl]-click and select Merge to Multichannel File.
Studio One Pro will attempt to identify the appropriate Channels by reading the filenames. When merging mono files that are not marked with channel-indicating suffixes (.L, .R, .LFE, etc.) suffixes in the Browser, the first selected file becomes the L channel, and the second becomes the R channel, and so on.
- Convert to Wave File: Convert a non-Wave format audio file to a Wave file. This can also be used to flatten sliced files such as Audio Loop and REX, wherein the slices are rendered at their original tempo.
- Convert to Audio Loop: Convert any audio file to an Audio Loop.
Importing Audio and Instrument Tracks into your Song
To import an Audio Track or Instrument Track from an existing Song into your currently-open Song, navigate to the desired Track file in the Browser’s File tab, and drag it to its desired location in the Arrange Window. Tracks are stored in the “Tracks” subfolder of each Song.
Tracks imported in this way retain their associated Instruments, Presets, Insert Effects, Colors, Automation, Console attributes like Volume and Pan, and Inspector attributes like Timestretch Mode and Chord Follow.
When Importing from the Browser, you can [SHIFT-Click] to select a range of Tracks, or [CTRL/ALT-Click] to individually group-select multiple Tracks.
For more selective control over the attributes included with a multiple-Track import, you may want to consider the Import Song Data command.
Importing MIDI Files into Your Song
To import a MIDI file using the Browser, navigate to the desired file, as you would for an audio file, and click-and-drag it into your Song. If the MIDI file is dragged to an empty space in the Arrange view, a new Instrument Track is created with that file placed on the Track at the position to which it was dragged. If the file is dragged to an existing Instrument Track, the file is placed as a new Instrument Part on the Track, at the position to which it was dragged.
Some MIDI files contain more than one MIDI Part in the sequence. If this is the case, a drop-down arrow is shown next to the file in the Browser. You can click the drop-down arrow to reveal the independent Parts. If you drag in a file with multiple Parts, they are shown when dragging the file into your Song.
As with all Instrument Tracks, you need to ensure that the new Instrument Track is routed to a virtual or external instrument in order to hear the new Instrument Part. Refer to the Monitoring an Instrument Track section of the Recording chapter for more information.
You can also drag a MIDI file directly onto virtual instruments that support drag-and-drop MIDI importing.
Previewing MIDI Files
When any MIDI file is selected in the Browser, you can preview the MIDI file through any virtual instrument loaded in the Song. To do this, select a MIDI file, then select an Instrument Track in the arrangement and it appears in the Preview Player, sending to the selected channel.
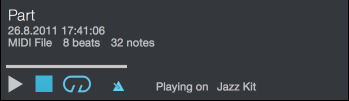
Now, when you start playback with the Preview Player, the MIDI file plays through the virtual instrument to which that Instrument Track is routed. You can switch Instrument Tracks on the fly to audition a part quickly through many different instruments.
Exporting Audio Files
You can drag-and-drop any Audio Event to a location in the File Browser to export it as an audio file to that location. As you hover over the Browser, you can press [Alt] to choose between rendering the Audio Event with or without its associated Insert FX.
Exporting MIDI Files and MIDI Musicloops
You can drag-and-drop any Instrument Part to a location in the File Browser to export a Musicloop or MIDI file to that location. As you hover over the Browser, you can press [Alt] to choose between Musicloop and MIDI file formats. If you drag-and-drop multiple parts at once, they are written to one file with multiple Parts.
Standard MIDI Files exported from Studio One Pro can be used by virtually any application that supports MIDI.
Make Finding Your Favorite Files Easy
It is common that groups of files, such as drum loops, are stored in one folder on the computer. If you know you want constant access to such folders in the Browser, you can create Tabs for these locations. By default, there are two Tabs at the top of the File Browser, called “Files" and "Studio One Pro". The Files tab gives you access to the entire file structure of your computer, and the Studio One Pro tab shows you the User Data location as set in the Studio One/Options/Locations/User Data menu (macOS: Preferences/Locations/User Data).
To create a Tab for any file location, navigate to that location and drag it onto the top bar, or simply drag the chosen folder from the Browser onto the bar where the Tabs reside. This adds a new Tab at the top of the File Browser with the name of the folder, allowing instant access. You can also [Right]/[Ctrl]-click on any location, or any file within that location, and select New Tab From Here in the pop-up menu.
You can create an additional Root Tab (analogous to the standard "Files" tab, showing the root of your file system) by [Right]/[Ctrl]-clicking in any location and choosing New Root Tab. You can also set any current tab to point the root of your file system by [Right]/[Ctrl]-clicking the tab of your choice and selecting Reset Root.
To rename a Tab, [Right]/[Ctrl]-click on the tab and select Rename Tab. Type a new name in the pop-up menu and click OK.
To close or remove Tabs, [Right]/[Ctrl]-click on the desired Tab and select Close Tab from the pop-up menu.
To move up one level in the File Browser, [Right]/[Ctrl]-click and select Up.
Tabs you create in the File Browser appear for all Songs, Projects and Shows, and you can create as many Tabs as you need. When the Browser runs out of space for Tabs to be displayed, a drop-down list is created to the far right of the Tab bar. Click on the Tab drop-down button to choose a Tab from the list.
If changes you make in your file system (such as moving a file or folder in the Windows Explorer or Mac Finder) have yet to show up in your File Browser, [Right]/[Ctrl]-click in the Browser and choose Refresh to renew the Browser's view.