Track and Event Inspectors
The Track Inspector and Event Inspector views offer you fast access to a variety of important per-Track and per-Event parameters and functions. To show or hide the Inspectors, press [F4] on the keyboard, or the "i" button, located above the Arrange view. Once the Inspectors are visible, clicking on a Track or Event brings that element into focus in the appropriate Inspector. You'll see differing sets of controls, depending on if the Track or Event is audio-based or instrument-oriented.
There's also an Inspector for the Marker Track, which is described here.
Track Inspector
Click on your Audio Track of choice to give access to the following parameters in the Track Inspector:
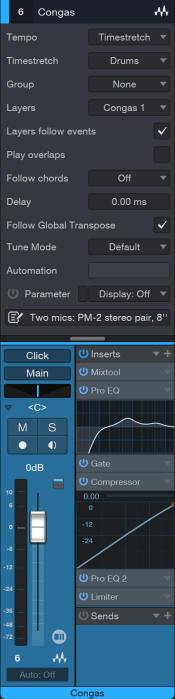
- Tempo (Mode): Lets you choose how playback of the current Track relates to Song tempo. For more details, see the Automatic Timestretching section.
- Timestretch (Mode): Lets you choose the optimal timestretching algorithm for the Track. For more details, see the Timestretching Material Modes section.
- Group: Lets you assign the current Track to an existing Track Group. For more information, see the Groups section.
- Layers: Lets you Add, Duplicate, Rename, or Remove a layer from the Track, as well as set which layer is currently chosen for playback. For more information, see the Track Layers section.
- Layers Follow Events: Enable this parameter to make audio on underlying layers follow the related Event above when you move it along the timeline. When this parameter is disabled, moving an Event with one or more Layers beneath it detaches that Event from the layers below, making it a permanent part of the primary Layer.
- Play Overlaps: Enable this option to allow any overlapping audio on the current Track to play back simultaneously, rather than cutting off at the beginning of the next Event.
- Follow Chords: Use this menu to specify the Follow Chords mode for the Track. This defines how the Track interacts with the Chord Track.
- Delay: Lets you apply a positive or negative time delay to the current Track, to help align it with other elements. Range of -1000 to 1000 ms.
-
Follow Global Transpose: Enable this option if you would like your track to transpose according to the current Global Transpose value. For more information about Global Transpose, see the Common Editing Actions section.
- Tune Mode: This setting applies to audio tracks only. With it you can choose the algorithm that best suits the audio material. It is described in the Tune Modes section.
- Automation: Lets you choose the Automation mode for each of the automated parameters associated with the Track, as well as quickly view and enable or disable the automation for a given parameter. For more information, see the Automation Modes section.
- Parameter (Routing and Mix Controls): This area is a duplicate of the parameters you see when viewing a Channel in the Console. Input and Output routing, Track Volume, Pan, status, effects Inserts and Sends are all available. For more information, see The Console.
- Edit Note: Click the pencil-and-paper icon to open the Track Notes window.
Click on the Instrument Track of your choice to access the following parameters in the Track Inspector:
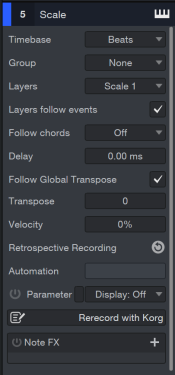
- Timebase: Lets you set the Timebase format for the current Track, in Beats or Seconds. Set to Beats, the Events on the Track change their position in time and speed to follow tempo changes in the Song. Set to Seconds, Events stay in place and maintain their playback speed until you change them intentionally. This can be useful, for example, in film audio, in which certain sounds must remain at certain absolute positions in time, to maintain synchronization with the visuals.
- Group: Lets you assign the current Track to an existing Track Group. For more information, see the Groups section.
- Layers: Lets you Add, Duplicate, Rename, or Remove a layer from the Track, as well as set which layer is currently chosen for playback. For more information, see the Track Layers section.
- Layers Follow Events: Enable this parameter to make instrument data on underlying layers follow the related Event above when you move it along the timeline. When this parameter is disabled, moving an Event with one or more Layers beneath it detaches that Event from the layers below, making it a permanent part of the primary Layer.
- Follow Chords: Use this menu to specify the Follow Chords mode for the Track. This defines how the Track interacts with the Chord Track.
- Delay: Lets you apply a positive or negative time delay to the current Track to help align it in time. Range of -1000 to 1000 ms.
Follow Global Transpose: Enable this option if you would like your track to transpose according to the current Global Transpose value. For more information about Global Transpose, see the Common Editing Actions section.
- Transpose: Lets you change the pitch of all notes on the current Track, in a range between -64 and +64 semitones.
- Velocity: Lets you boost or attenuate incoming note Velocity, before it arrives at the current instrument or external MIDI device. Settings between -100% and -1% attenuate velocity. Settings between 1% and 100% boost velocity. At 0%, velocity is unchanged.
- Retrospective Recording: When this button is lit, that means MIDI data was captured on the current Track while you weren't recording (i.e., during playback or with the Transport stopped). Click the button to place that data onto the Track. For more information, see the Retrospective Recording section.
- Automation: Lets you choose the Automation mode for each of the automated parameters associated with the Track, as well as quickly view and enable or disable the automation for a given parameter. For more information, see the Automation Modes section.
- Program: Lets you select a MIDI program number (and in some cases, a bank number) to associate with the current Instrument Track. This program change value is transmitted to the instrument, ensuring that the correct preset is loaded when you open a Song.
- Parameter (Routing and Mix Controls): This area is a miniature duplicate of the parameters you see when viewing a Track in the Mix view. All Instrument Tracks display input and output routing options and Mute/Solo/Record/Monitor status toggles. If the Track is hosting a virtual instrument, Track Volume, Pan, effects Inserts and Sends are displayed. For more information, see The Console.
- Edit Note: Click the pencil-and-paper icon to open the Track Notes window.
- Note FX: Lets you choose and apply real-time Note FX processing to the note data of the current Track. For more information, see Note FX.
Event Inspector
Click on the Audio Event of your choice to access the following parameters in the Event Inspector.
- Event FX: This lets you assign effects to individual Audio Events, rather than to a Track as a whole. For more information, see the Event Effects section.
- Start and End: Lets you specify the start and end times for the current Event.
- File Tempo: If you know the tempo of the audio file associated with the current Event, you can specify it here. This gives Studio One Pro a tempo reference to work from when timestretching an Event to match Song Tempo. Studio One Pro can also try to deduce the tempo of a file if the BPM is not known—more info on that below.
- Speedup: Lets you speed up or slow down the tempo of the current Event, independent of other tempo settings. For more information, see the Manual Timestretching section.
- Transpose: Lets you shift the pitch of the current Event up or down, in a range of -24 to +24 semitones.
- Tune: Lets you fine-tune the pitch of the current Event up or down, in a range of -100 to +100 cents.
- Normalize: Lets you boost the volume of the current Event, so that the highest peak in the audio reaches 0 dBFS. You can also Normalize an Event by selecting the Event and pressing [Alt-N] / [Cmd-N].
- Gain: Lets you adjust the overall level of the current Event, in a range of -40 to +24 dB.
- Fade-In: Lets you specify the length of the fade at the beginning of the current Event. At a setting of 0 ms, no fade is applied.
- Fade-Out: Lets you specify the length of the fade at the end of the current Event. At a setting of 0 ms, no fade is applied.
- Bend Marker: Engage this to view the Bend Markers for the selected Audio Event.
- Threshold: This field is only active when Bend Markers are visible. Use it to adjust the threshold for placing Bend Markers in the Audio Event. The range is 0-100%, with a default value of 80%.
- Gain Envelope: Two options are provided: the Bypass button disables the Gain Envelope without resetting it, and the check box lets you show or hide the Gain Envelope.
- Time Lock: Select this option to keep the Event from being moved to a different time position within the Track. See Lock Tracks or Events for more information.
- Edit Lock: Select this option to prevent the contents of the Event from being altered in any way. See Lock Tracks or Events for more information.
Click on the Instrument Part of your choice to access the following parameters in the Event Inspector:
- Start and End: Lets you specify the start and end times for the current Event.
- Transpose: Lets you shift the note pitch of the current Event up or down, in a range of -24 to +24 semitones
- Velocity: Lets you scale the effect of note Velocity, before it arrives at the current instrument or External MIDI device. At 0%, all notes play at full velocity. At 100%, the full range of note velocity is sent.
-
Loop: Enabling Loop state loops Event until next Event or the Song End Marker. You can manually adjust the number of loops within the box next to the Loop enable checkbox. For more about the loop function, see Quickly Duplicating Events.
- Time Lock: Select this option to keep the Event from being moved to a different time position within the Track. See Lock Tracks or Events for more information.
- Edit Lock: Select this option to prevent the contents of the Event from being altered in any way. See Lock Tracks or Events for more information.
File Tempo Approval on Import
If you don’t know the tempo of the audio file associated with the current Event, Studio One Pro will attempt to deduce it, and it will do so based upon BPM data in the filename of the imported Event. In this example, “SynthBass_120BPM.wav” was imported with a probationary BPM of 120—listed in red in the inspector. If this tempo is correct, it can be approved by the user from the drop-down menu to the right of the file’s tempo. From this drop-down menu, you can also double or halve the event’s tempo.

If the BPM is not contained in the Event’s header or filename, Studio One Pro will instead attempt to deduce the tempo of the Event based on both the file’s length and an assumption of an evenly-subdividable number of bars. Tempo Approval on Import is not available on Events that contain more than one tempo.
Event Effects
It is possible to insert effects directly on an Audio Event in the arrangement, as opposed to inserting effects on the entire Audio Channel for the related Track, thereby affecting all Events on the Track. Event Effects are commonly used to add variety to the arrangement or to insert utility effects, such as pitch correction, into specific Events.
Insert Event Effects
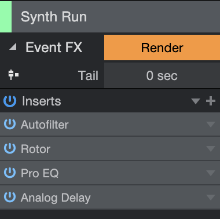
To insert an effect on an Event, select the Event and open the Inspector by pressing [F4] on the keyboard. In the Event Inspector area of the Inspector, you can see an Event FX tab with an [Enable] button. Click on Enable, and an Insert Device Rack opens.
Insert effects or FX Chains here, as you normally would, and the Event is processed accordingly, in real time, during playback. The resulting sound is exactly as if you had inserted the effect on the Track: You can hear all other Tracks play and can make effects parameter changes while hearing the results in context with the rest of the mix.
You can also add Event Effects by right-clicking an Event and choosing Event FX >> Add Effect… from the contextual menu, where you will also find a list of the Effects currently applied to the selected Event.
As Event Effects may alter the relative volume of an Event, thereby skewing existing volume fade envelopes, an option has been provided to process volume envelopes after Event Effects. Click on the Tail check box, in the area above the Insert Device Rack, to enable this option.
Add Effects to Multiple Events
You can add Effects by dragging them from the Browser onto all selected Events, or by group-selecting several Events and assigning Event FX via the right-click contextual menu described above.
Render Event Effects
Once the intended sound is achieved via an Event Effect, it is likely a good idea to render the audio in order to conserve CPU resources. Studio One Pro provides a very flexible way to do this that allows you to revert to real-time processing at any time in order to make changes.
To render any Audio Event with inserted Event Effects, click on Render above the Event FX Insert Device Rack. The Insert Device Rack collapses, a new Audio Event with the rendered audio replaces the original Event in the arrangement, and the [Render] button is labeled [Restore]. At any time, click on Restore to replace the rendered Event with the original and restore any inserted effects to their pre-rendered states.
When rendering Event FX, note that the Tail setting above the Insert Device Rack allows you to specify a length to render beyond the end of the Audio Event. This is critical to properly capturing reverb tails, delay lines, and other similar audio tails caused by inserted effects. When a Tail value is given, a volume fade is applied across the entire length of that tail on the rendered Event after rendering to ensure smooth-sounding results. This fade envelope can then be modified, as usual.
Rendering Event FX creates bounced audio files that are placed into the Pool for the current Song.
Using ARA Effects
Drag and Drop an ARA Effect from the Event Editor folder onto an Event to apply it as an Event FX. Hold [Alt/Opt] while dragging and dropping to instead apply it as an Insert Effect to the whole Channel. Note that adding a second ARA (Audio Random Access) Effect (like Melodyne or VocAlign) to an Event will replace the previous Effect with the second. ARA Effects are highlighted in blue in theEvent FX section of the inspector.