Note FX
Note FX are real-time effects processors that change and reinterpret incoming note data before it reaches your choice of plug-in instrument or external MIDI device. Arpeggiator, Chorder, and Repeater are most useful for creative expansion and adaptation of note data. Input Filter is a utility processor that limits note output to a selected range of note and velocity values. You assign Note FX to Instrument Tracks in the Note FX section of the Track Inspector. For more information, see Track Inspector.
Once you've loaded one or more Note FX processors onto an Instrument Track, you can quickly access the related settings by clicking the Note FX Editor button  on the control area for that Track in Arrange view. You can also access these settings by double-clicking one of the processors in the Note FX section of the Track Inspector.
You can save and load Note FX settings as presets, just as you can with other instruments and effects. For more information on saving and loading presets, see the Signal Routing chapter.
Rendering Note FX
If you wish to make the effects of Note FX processing permanent (part of the note data, rather than a real-time process), select the Track and navigate to Event/Render Instrument Tracks, or [Right]/[Ctrl]-click the desired Part in Arrange view and choose Instrument Parts/Render Instrument Tracks from the pop-up menu.
This also makes permanent any transposition or velocity changes you've made within the Inspector view for the track.
Arpeggiator
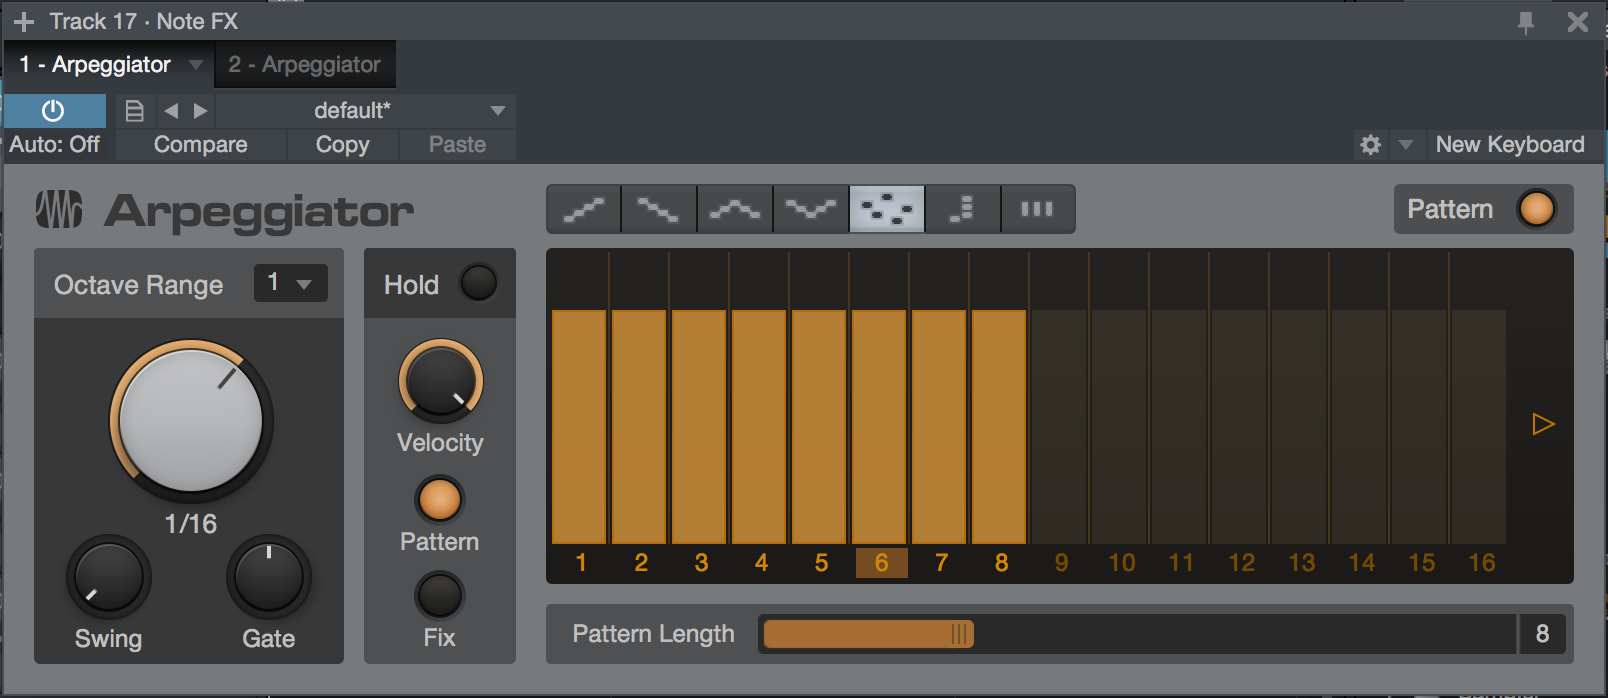
Arpeggiator turns chords (as well as single notes) into arpeggios—rhythmic cycles of single notes, derived from the notes currently held. Like the arpeggiator functions found in many synthesizers, Arpeggiator creates repeating patterns of notes that can travel upwards in pitch, downwards, up-and-down, down-and-up, or in a randomized pattern. You can also use Arpeggiator to play repeated patterns of whole chords, or note patterns that follow the order in which notes are played.
Going beyond the basics, you can use the Pattern function to create rhythmic patterns of velocity and note length that the arpeggio follows as it plays, opening many creative options for repeating musical articulations.
The following parameters and functions are available in Arpeggiator:
- Arpeggio Direction: Choose the note direction that creates the pattern you want, from the following options:
- Up: The arpeggio starts at the lowest held note and travels upward through the held notes, then returns to the lowest note as the arpeggio begins again.
- Down: The arpeggio starts at the highest held note and travels downward through the held notes, then returns to the highest note as the arpeggio begins again.
- Up/Down: The arpeggio starts at the lowest held note, travels upward to the highest, then travels back down to the lowest note, and the arpeggio begins again.
- Down/Up: The arpeggio starts at the highest held note, travels downward to the lowest, then travels back up to the highest note, and the arpeggio begins again.
- Random: The arpeggio plays the currently held notes in a random pattern.
- Chord Mode: The currently held chord (or single note) is repeated as long as it is held.
- From Input: The arpeggio pattern is derived from the order in which notes are played and held.
- Octave Range: Lets you extend the range of the arpeggio by mirroring the currently held notes an octave above (at a setting of 2), the two octaves above (at 3), or the three octaves above (at 4). At 1, no mirroring occurs and the arpeggio plays according to the held notes. Setting Octave Range above 1 when in Chord Mode causes an upward-rising cycle of repeated chords, an octave apart, its length determined by the Octave Range setting.
- Rate: Lets you select a rhythmic value, determining the length of each arpeggio step. Range is from a bar to a 64th-note, in all triplet and dotted varieties.
- Swing: Lets you add swing to the timing of the arpeggio, creating a range of rhythmic feels. For more information on swing timing, see Swing.
- Gate: Acts as an overall note-length control. Lower settings create shorter notes, and higher settings create longer notes. When a Pattern is active, Gate works relative to the gate settings in the Pattern.
- Hold: Enable this to hold all currently played notes. Each new chord or single note that you play replaces the previous memory and holds until the next note input is received.
- Velocity: Acts as an overall note-velocity control. When a Pattern is active, Velocity works relative to the velocity settings in the Pattern.
- Pattern/Fix Switches: Choose Pattern to allow Velocity data from the Pattern to control note velocity (in tandem with the Velocity control). Choose Fix to set a fixed velocity for all notes, with the Velocity control.
- Pattern: This is a 32-step pattern sequencer you can use to create repeating patterns of note velocity and gate (length) that are applied to the control output of the Arpeggiator. The Pattern area contains the following controls:
- Activate Pattern: Toggle this on or off to enable or disable the Pattern sequencer.
- Pattern Sequencer: This series of sliders is where you'll create your velocity/gate pattern. You can click and drag each step in the sequence vertically (to set velocity) and horizontally (to set gate length). 16 steps are shown at any one time. To reach the second set of 16 steps, click the right-arrow to the right of the pattern. To return to steps 1-16, click the left-arrow to the right of the pattern.
- Pattern Length: Lets you choose the length of the pattern.
Chorder
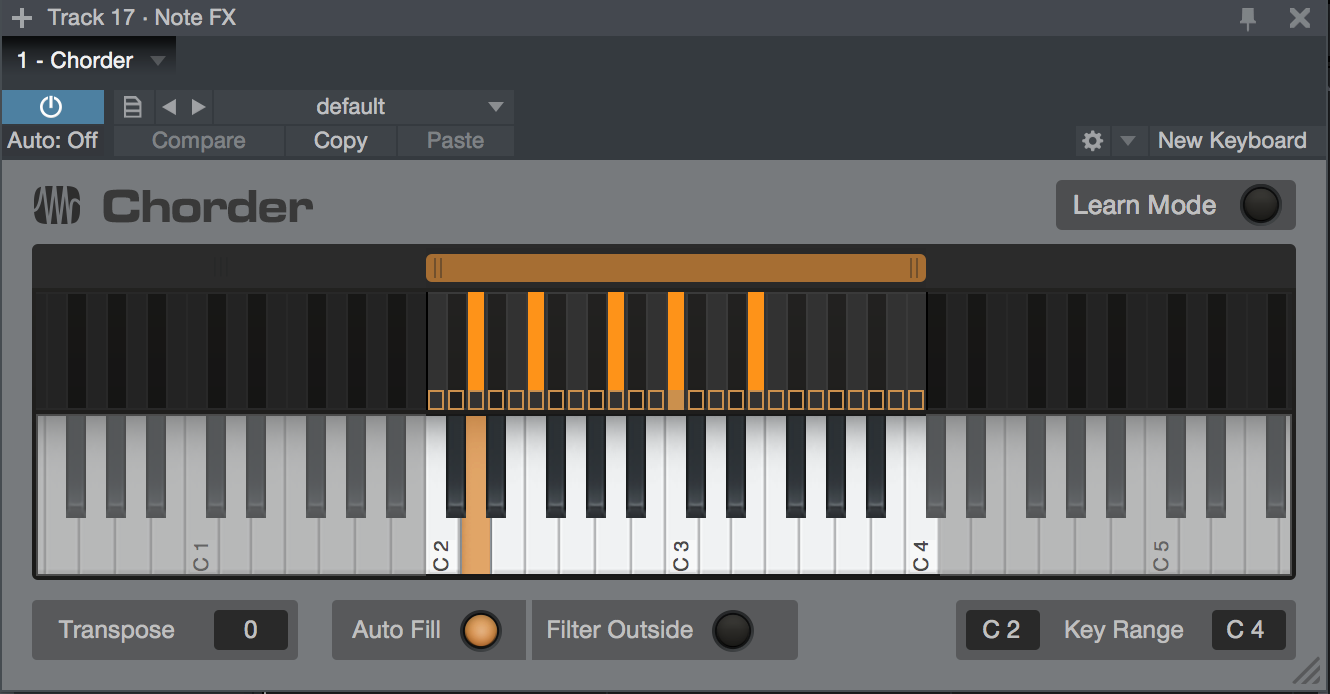
Chorder is an intelligent chord generator that lets you trigger chords by playing single notes. You can specify intervals in the chord manually, or capture chord shapes played on the keyboard. Each key can trigger a different chord of your choice, or you can choose a single chord shape, to play across multiple keys. You also have control over the area of the keyboard that triggers these chords, letting you, for example, trigger chords in the upper part of the keyboard, while playing single-note bass parts in the lower half.
The central interface shows two rows of piano-style keys. The lower row is used to audition chord shapes; click and hold a key to play. In Learn Mode, the lower row lets you select a keyboard key for chord assignment (selected key turns orange). The upper row displays the notes being played (both by MIDI input and the chord generator), and which keyboard keys have been assigned chord shapes (small square at the bottom of each key turns orange). In Learn Mode, the upper row displays the currently assigned chord shape for the selected key (chosen notes turn orange).
Assigning Chord Shapes
Chorder defaults to an example chord setting that you can play with. The next thing you'll want to do is assign your own chord shape to one or more keyboard keys. You can do so by following this procedure:
- Press the [Learn Mode] button to put Chorder into Learn Mode.
- Select a keyboard key for chord assignment by clicking it in the lower row of keys. The selected key turns orange. C3 is selected by default.
- Build the chord shape of your choice by selecting notes in the upper row of keys with the mouse, or by playing notes on a connected MIDI controller. Selected notes turn orange. Click or play a note a second time to deselect it.
- If you want to assign custom chord shapes to other keyboard keys, select each chosen key in the lower keyboard, and assign chord shapes to each, as described in step 3.
- Press [Learn Mode] again to disengage, and begin playing.
The following parameters and functions are available in Chorder:
- Learn Mode: Enables Learn Mode. When Learn Mode is active, the following controls appear:
- Clear All: Clears all chord assignments for all keyboard keys.
- Clear: Clears chord assignments for the currently selected keyboard key.
- Copy: Copies the currently shown note pattern, for pasting into other keys.
- Paste: Applies copied note pattern data to the currently selected key.
- Selected Keyboard Key: Shows the pitch of the currently selected keyboard key. To specify a particular note value, click this field to select it and type in the note name and octave number (such as C3). You can also click-and-drag in the note field, or click on the note field and select with your mouse's scroll wheel.
- Chord Range: Drag the ends of this slider to select the portion of the MIDI keyboard that triggers chords.
- Transpose: Lets you transpose the chord output, in a range of -12 to +12 semitones. Notes outside the Chord Range are unaffected.
- Auto Fill: Enable this to automatically assign any unassigned keyboard keys in the Chord Range to the chord shape mapped to the lowest keyboard key. Disable to ensure that only assigned keyboard keys trigger chords.
- Filter Outside: Enable this to stop all notes that fall outside of the Chord Range. Disable to allow playing notes outside the range.
Repeater
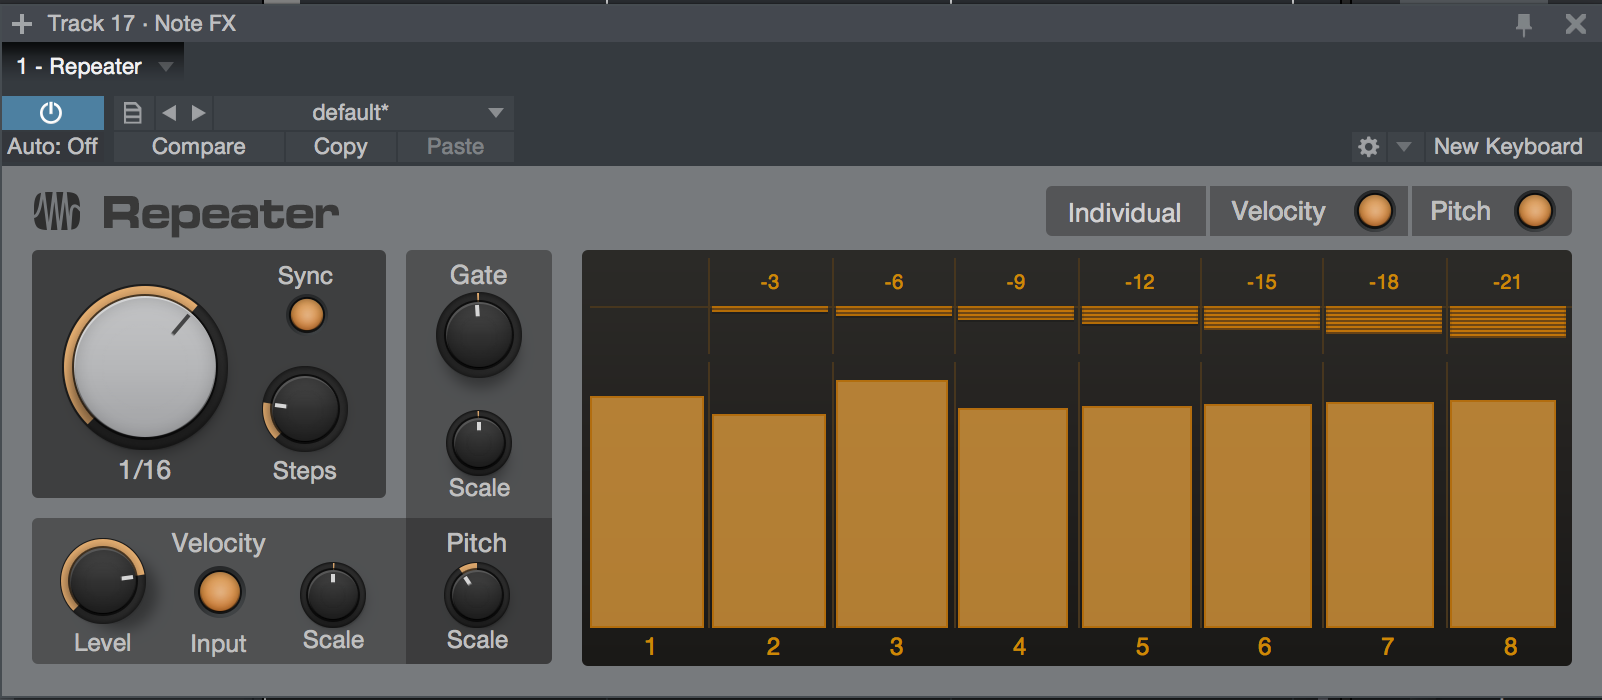
Repeater works just like it sounds—it creates rhythmic repetitions of the notes you play. These repetitions can be simple copies of incoming notes, or can change in velocity, gate length, and pitch as the pattern plays.
The following parameters and features are available in Repeater:
- Individual Velocity & Gate: Engage to enable individual setting of note velocity and gate length for each step.
- Individual Pitch: Engage to enable individual setting of note pitch for each step.
- Sequencer: This lets you specify velocity, gate, and pitch values for each step in the sequence of repetitions. The following controls are available for each step:
- Level/Gate Slider: With Individual Velocity and Gate enabled, you can click and drag the upper edge of this slider up or down to set note velocity for the current step. You can also click and drag the right edge of the slider left or right to set note gate length for the current step. With Individual Velocity and Gate disabled, moving velocity or gate sliders manipulates that setting for all steps (equivalent to turning the Velocity Level and Gate knobs).
- Pitch: With Individual Pitch enabled, you can click and drag this slider up or down to apply a positive or negative pitch transposition to the current step. With Individual Pitch disabled, moving a pitch slider changes pitch transposition for all steps simultaneously. At 0, no transposition occurs.
- Rate: Lets you set the rate of repetition. When Sync is enabled, you can choose a tempo-synced rhythmic value between one bar and one 64th-note, in all triplet and dotted varieties. When Sync is disabled, you can choose a repetition frequency between 2 and 25 Hz (repetitions per second).
- Sync: Enable Sync to snap the Rate control to rhythmic values, in sync with Song tempo. Disable to set repetition speed in Hz.
- Steps: Select your desired number of repetitions (and sequencer steps), from just two steps, to 32.
- Velocity Level: Acts as an overall velocity level control, scaling every step's velocity, relative to its custom setting.
- (Velocity Relative to) Input: Enable this to derive overall repetition velocity from note input, attenuated or boosted by the setting of the Velocity Level control.
- Velocity Scale: Turn this to introduce a sloping change in velocity in the sequence over time, relative to each step's setting. At center, no slope is added. Turned left of center, a downward slope is introduced. Turn to the right for an upward slope.
- Gate: Acts as an overall gate length control, scaling every step's gate length, relative to its custom setting.
- Gate Scale: Turn this to introduce a sloping change in gate length in the sequence over time, relative to each step's setting. At center, no slope is added. Turned left of center, each step in the sequence is shortened more than the last. Turn to the right, and each step is lengthened more than the last.
- Pitch Scale: Turn this to introduce a sloping change in pitch in the sequence over time, relative to each step's setting. At center, no slope is added. Turned left of center, you get a range of downward pitch shift slopes. Turn to the right for upward slopes.
Input Filter
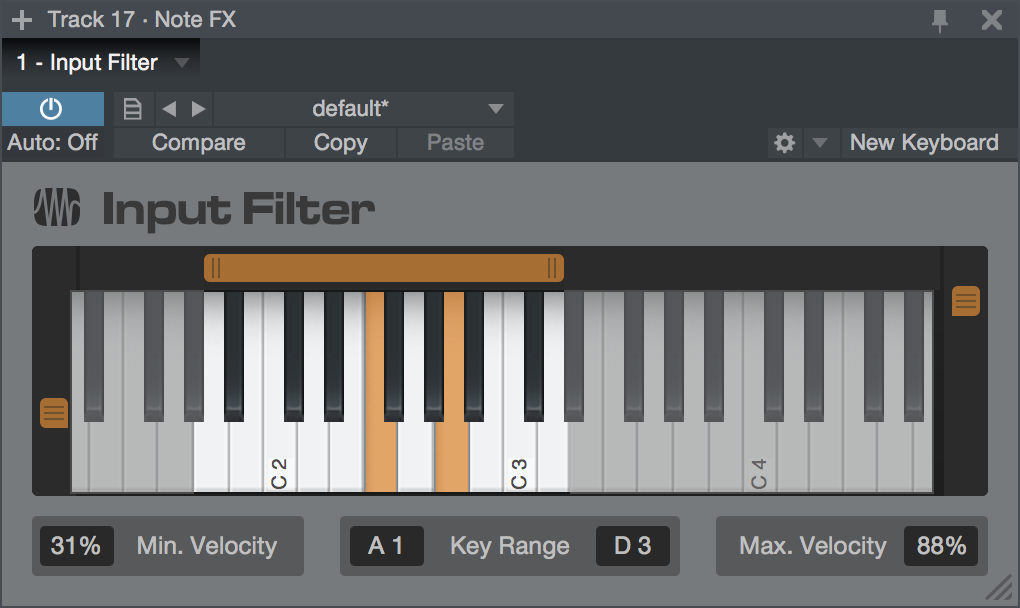
Input Filter lets you filter out unwanted notes before they reach your instrument or MIDI device. You can specify a range of note pitches to allow, and a range of note velocities to allow, and all notes that fall outside of either of those ranges are stopped. The following parameters are available in Input Filter:
- Key Range (Low and High): Set the low and high limits for note pitches. This can be done by moving the ends of the slider above the keyboard graphic, or by manipulating the Key Range displays by typing in values or scrolling through values with your pointing device's scroll function. Any incoming notes that fall outside of the chosen Key Range are stopped.
- Minimum and Maximum Velocity: Set the low and high limits for note velocity. This can be done by moving the sliders to the left and right of the keyboard graphic, or by manipulating the Min Velocity and Max Velocity displays by typing in values or scrolling through values with your pointing device's scroll function. Any incoming notes that fall below the Min Velocity percentage or above the Max Velocity percentage are stopped.
Note FX Input Mode
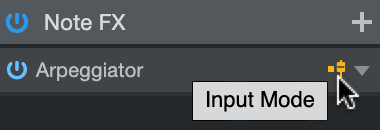
Found in the Inspector (F4), Note FX Input Mode controls whether Note Events are recorded before or after they are passed through the Note FX plug-ins on a given Instrument Track. This allows for rendering of processed Note Events to an Instrument Track while recording through Note FX. The default setting is off.
On: incoming note events are recorded to the Instrument Track before they pass through the Note FX plug-in
Off: incoming note events are processed first, and then the output of the Note FX plug-in is recorded to the Instrument Track.
An example: turning Note FX Input Mode On would allow you to record Note Events as processed by the Arpeggiator — and allow you to edit each individual note by hand after recording.