Score Editor Toolbar
The Score Editor toolbar makes the creation of a Score fast and intuitive. Using the number keys to select tools and note values, and a mouse to place notes and symbols, a full Score can be produced very quickly. A keyboard controller is not required, although the process is even faster with one.

Using the Arrow Tool
Use the Arrow tool to select locations and items inside the Score, including notes, rests, dynamic markings, and articulations. Click an item inside a staff to select it, and it turns orange. To select multiple items, click a blank spot in any measure and drag across the items you want to select. Hold [Shift] and then click or drag to select items from multiple staves.
The cursor can be placed in front of any note or rest in a measure. Clicking inside an empty measure places the cursor at the beginning of the bar.
Selected notes can be edited using various commands, or you can cut/copy/paste/delete them using standard computer key combinations. Many options are available in the [Right]/[Ctrl]-click contextual menus.
Shifting Notes
To change the pitch of a note using the Arrow tool, click the note and drag it up or down. To change the pitch of a chord or a series of notes after selecting them, use the following keys:
- Up/Down arrow shifts the notes within the key signature if one has been selected, or diatonically within the key of C if a key has not been defined for the Song.
- [Ctrl]/[Cmd] + Up/Down arrow shifts the notes chromatically.
- [Shift] + Up/Down arrow shifts the notes by octaves.
Using the Note Tools
Select the desired note value from the toolbar. You are now able to add notes to the score with the cursor. We'll walk through the basics in this section; follow this link to learn the quick entry method.
When hovering the cursor over the score, the will become a pencil, with a gray note of the selected value linked to it. The gray note changes its pitch as it is moved up and down the staff.
Click the staff at the desired location to place a note there. The note turns black to indicate that it has been added to the staff. You can make a chord by placing more notes on different pitches at that location, or move the cursor to another location in the Score and place some notes there.
If you want to place a rest in the Score instead, select the note value first and the equivalent rest value appears in the toolbar to the right of the 64th note.
Remember, there's a faster way to do all of this. But here are two things you might want to know now.
- A red note or rest means you've put too many items in that bar. Try a shorter note value or place the extra item in the next bar.
- It isn't necessary to fill a measure with notes or rests right away. Just put the notes in the right bars first, if you like. Rests can be added easily using the Fill with Rests feature, which is described next in the Action menu section.
For more details on using the Note tools, see the Editing the Score section.
The Action Menu
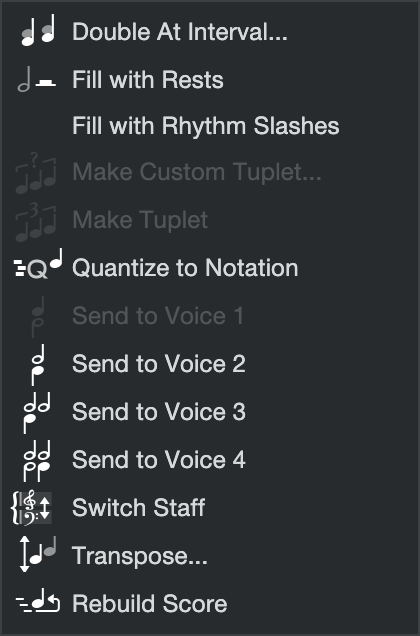
Note: Many of the following items are also available in one or more of the contextual menus. [Right]/[Ctrl]-click a selected note for one menu; [Right]/[Ctrl]-click a group of selected notes for a different menu. Still another menu appears when you [Right]/[Ctrl]-click inside the Score without any notes selected. See Contextual Menus in the Editing the Score in Notation section for full details.
- Fill with Rests: This option places the appropriate rests in any empty sections of the selected measures, including whole-measure rests, up to the limit set by the time signature. To use it, click-and-drag across the desired areas of the Score and then select this option from the Action menu. You can also use [Ctrl]/[Cmd]+[A] to select all measures in the current staff, or use the contextual menu option Select All on Tracks: to select the entire Score, and then select Fill with Rests from the Action menu. If no selection is made, then all measures are filled with rests from the beginning up to the current caret position.
- Fill with Rhythm Slashes: This option places a stemless rhythm slash on each beat in the selected measure as long as the measure is empty of notes and rests. It is also possible to change existing notes to slashes—just select them, right click, and select Toggle Rhythm Slash from the contextual pop-up menu.
- Tuplets: are notes whose division differs from the normally permitted subdivisions of the current time signature (for example, a triplet in 2/4 time). They can be made from groups of notes inside a single measure of a single staff. They are not available across bar lines, or if notes from different staves are selected.
- Make Custom Tuplet...: This option allows you to make more unusual tuplets in addition to the standard tuplets such as triplets, etc. You also have greater control over the notation used to represent the tuplet.
- Fit X Into Y: Group the number of selected notes (X) into the space of the specified denominator (Y).
- Show as ratio If you want to display a tuplet as a ratio instead of a single number, engage this option. The tuplet will be displayed as 4:3, 6:4, 5:8, etc.
- Brackets: A bracket is often placed around tuplet as a visual aid. If deactivated, the brackets are hidden and only the number is shown above the grouped notes. The rhythm of the notes is the same, with or without the brackets.
- Make Tuplet: Use this option when the grouping of notes is fairly standard (triplets, quintuplets, etc.). If you want to specify the notation as a ratio, etc., use the Make Custom Tuplet option.
- Make Custom Tuplet...: This option allows you to make more unusual tuplets in addition to the standard tuplets such as triplets, etc. You also have greater control over the notation used to represent the tuplet.
- Switch Staff: This action is only available when the Grand staff is used. It allows you to switch a note from the upper staff to the lower staff, or vice versa.
- Transpose: Use this to transpose the selected notes up or down after you specify the Interval, Interval quality, and Octave range of the transposition. These options are similar to those described in the Transposing Notes section. They can force notes or chords to conform to the key (Diatonic), allow them to maintain the same interval relationships, or follow a number of other permutations, all while transposing up or down in specified intervals by as much as three octaves.
Note / Rest Values
Note value: Seven options from whole note through 64th note. These also can be selected with the number keys on the keyboard, as described here. For triplets, etc., use the Tuplet options in the Action menu or the contextual menus.
Rest: The note value for rest symbol is always the counterpart of the selected note value. These also can also be selected with the number keys on the keyboard; they follow the same keys as the note values. Simply toggle between the note or rest by pressing the key repeatedly.
Augmentation Dots: A single dot lengthens the note value by half (i.e., a dotted eighth note equals three sixteenth notes). A double dot lengthens the note by three-quarters of its original value (i.e, a double-dotted quarter note equals three eighth notes plus a sixteenth note).
Voices 1-4
Up to four voices can be notated in a single staff. Multi-voice input enables simultaneously- sounding notes with different durations—for example, a quarter note can be notated in Voice 1 and two eighth notes in Voice 2.
-
Voice 1 (Upper Voice)
By default, all notes you enter are considered to be part of Voice 1.Until you add Voice 2, note stems of Voice 1 will point either up or down, depending on the degree on a staff. -
Voice 2 (Lower Voice)
Switching to Voice 2 triggers two events: all succeeding notation you enter appears as Voice 2 (stems down). At the same time, every time you add a Voice 2 note, any Voice 1 note(s) in the same beat that happen to have stems down now have their stems pointing up. -
Voices 3 and 4
With three- and four-voice parts, the number of voices determine the stem directions.-
If you use four voices, then voice 4 note stems point down and all other voices point up.
-
If you use three voices, then voice 3 note stems point down, and voices 1 and 2 point up.
-
Notehead Symbols
This opens a menu of notehead symbols that you can use with the Note tool:
- Normal is the one most commonly used for instruments and voices.
- X-Symbol notes indicate an indeterminate pitch (e.g., a spoken word, a noise, etc.).
- Triangle represents a note to be played by the eponymous percussion instrument.
- Slashed notes often indicate a rim-shot played on a percussion instrument.
- Circle-X can represent an unpitched percussion part or a muted note (triangle, guitar, etc.).
- Diamond noteheads are often used to indicate a harmonic played on a string.
Step Record / Undo
Step Record: Activate this button to enter notes from an external controller in step time.
Move backwards/undo: This can be used while step-recording to undo multiple entries without having to move your hand to the computer keyboard and type [Ctrl]/[Cmd]+[Z].
Autoscroll
When this is button is engaged the Score view window follows the timeline position during playback. Disengage this button to freeze the Score view window at its current location.
Layout Style
The Layout Style buttons determine how the Score is displayed and printed.
- Continuous Layout displays the Score horizontally with no page breaks, similar to the Arrange view. The Score can't be printed when this Layout Style is selected. Note also that the Song meta-information is not displayed at the top of the Score (Title, Composer, etc.).
- Full Score Page Layout can display and print multiple Tracks.
- Single Track Page Layout shows the Score for the most recently selected Track.
These three buttons are linked to the Layout Style options in the Layout panel of the Note Editor Inspector. When a Layout Style is selected in either location, the change is made in both.
Note that the Full Score and Single Track page layouts are not available within a Scratch Pad; only the Continuous mode is available. Note also that a Scratch Pad cannot be printed.
If Song Meta-Information has been entered at Song/Song Setup/Meta Information, the Title, Album, and Songwriter/Composer for the Song are shown at the top of the Score (Full Score and Single Track page layouts only). This information can be accessed from Score view; simply click one of those fields inside the Score to open the Song Setup window. Enter the desired information and click OK to close the window. The new information now appears at the top of the Score.
Print the Score
When you're ready to print the Score, click the Printer icon or navigate to Song/Print Score.... Most recent computer operating systems also offer an option to save the Score as a PDF file from the print dialog box.
Note that the Continuous Layout can't be printed, so the Score view switches automatically to one of the other Layout Styles when the Printer icon is selected.
Remember that Score view only prints the region between the Start and End markers. Anything beyond those markers is not included.
Detach and Pin
-
Detach: This button allows you to detach the Score view window and place it in another area of the screen, or even move it to a different monitor. You can then select a different Editor view in the main display window if you like.
-
Pin: When the Score window has been detached and placed at the desired location, click the Pin icon to lock its status and position. This will keep it from closing when [F2] is used to toggle the Editor window status.
-
Close: Click the X to close the Score Editor window. This can also be done with the [F2] key.