Editing the Score Using Standard Staff Types
The basics of using the Paint tool to enter notes are covered in the Score Editor Toolbar section. Here we'll describe the advanced features of the Score Editor and also provide some helpful shortcuts. Note that the below applies to the following Staff Types as chosen by the Note Editor Inspector: Standard, Grand Staff, Drumset, or Single Line. See Editing Scores in Tablature for information on editing your score using the Tablature or Standard + TAB Staff Types for fretted instruments.
Quick Entry Methods
Without a Controller
A combination of keyboard shortcuts and mouse actions can be used for the rapid entry and editing of notes in Score view.
- Press the [2] key to activate the Paint tool.
- Select the desired note value with keys [3]-[9].
- Press the same key a second time to select a rest of the same value. (Steps 3 and 4 can be swapped.)
- To select a dotted value for the note or rest, press the [0] key repeatedly to reach the dotted and double-dotted symbols. Press [0] a third time to remove the dot.
- Click the left mouse button to enter the note or rest.
- Use the mouse to place the cursor anywhere on the Score, or use the left and right arrow keys to move within the current staff. The next event can be added between two existing events.
- To add notes to a chord, select the matching note value in the tool bar, then click on the staff to add the note.
Controller and Mouse
The process is slightly different when you are using a keyboard controller.
- Click the Step Record button. You can play the keys on the controller at any time during the following steps to add an event and advance the cursor.
- Select the desired note values with numbers [3]-[9] on your computer keyboard.
- Press the same computer key a second time to enter a rest of the same value.
- To select a dotted value for the note or rest, press the number [0] on your computer keyboard repeatedly to reach the dotted and double-dotted symbols. Press [0] a third time to remove the dot.
- Play a key on your controller to enter the note or chord and move the cursor to the next location. You can also place the cursor anywhere on the Score, even between two existing notes. Keep in mind that one or more events to the right of the cursor could be replaced by the next key you play, depending on the selected note value.
- Repeat steps 2-5 while playing the keyboard until you have entered all of the desired events. You can also add ties whilst in step time, by clicking the tie icon with the mouse in between entering two notes of the same pitch.
- Press the [2] key to exit Step Record mode.
You can also enter notes from your controller while recording in real time; just use the recording capabilities of your DAW as you normally would to capture a live recording.
Change a Rhythmic Value
To change the rhythmic value of an existing note or rest:
- Click the desired note value in the tool bar, or use the appropriate number key. This automatically selects the Paint tool.
- If the desired event is a rest, select the rest symbol on the right, or press the same number key a second time.
- Click over the existing notehead and its value will change to the new value.
To change the rhythmic value of an entire chord:
- Click the desired note value in the tool bar, or use the appropriate number key. This automatically selects the Paint tool.
- Click over the existing notehead in the chord. All notes in the chord will change to the new duration.
When Events Are Red
If you see notes or rests that are red, that means you've exceeded the limits of the time signature for that bar. Studio One Pro will add as many events as possible within the bar, but the current time signature is always maintained. During playback the excess events are skipped and the next bar plays normally.
There are several ways to eliminate red events:
- Select a shorter note value and replace the events
- Place the extra events in a different bar, or
- Add a time signature change to the Signature Track at that location if those events belong in the same bar.
Staff configuration
Choosing the Initial Clef

Left-click the clef in the Continuous Layout, or the initial clef in the Pages Layout, to view all available starting clefs. You can make clef changes later on in your Track using the clef tool. There are ten options, including Treble, Bass, C clefs, Octave clefs, and two neutral percussion clefs. Make a choice and the menu will close.
Key and Time Signatures
Key and time signatures can be set in the Transport or in the Signature Track (above the Arrange view). You can change them throughout the Track, too. Just add a new key or time signature to the Signature track, and it appears immediately in the Score view. Key signatures can be detected automatically, too; see Detecting Key Signatures.
Contextual Menus
Score view has three contextual menus that are accessed inside the Score. Each menu has unique options and ones it shares with the other menus.
The Staff Menu

[Right]/[Ctrl]-click in an empty area of the staff to view the options of its contextual menu.
- Arrow Tool: Use this option to select the Arrow tool.
- Paint Tool: Use this option to select the Paint tool.
- Select All: Use this option to select all events in a single staff, or to select all events in both staves when the Grand staff is being used for the selected Track.
- Select All in Staff: Use this option to select all events in a single staff when the Grand staff is shown. Click inside the desired staff first, then select this option from the contextual menu.
- Select All on Tracks: This option selects all events in all staves that are visible in the Score.
- Deselect All: Use this option to deselect every item that is currently selected.
- Cut/Copy/Paste/Delete: These perform the same function as the computer keyboard actions.
- Recent items: Choose from a short list of recently-performed commands, good for quickening repetitive tasks.
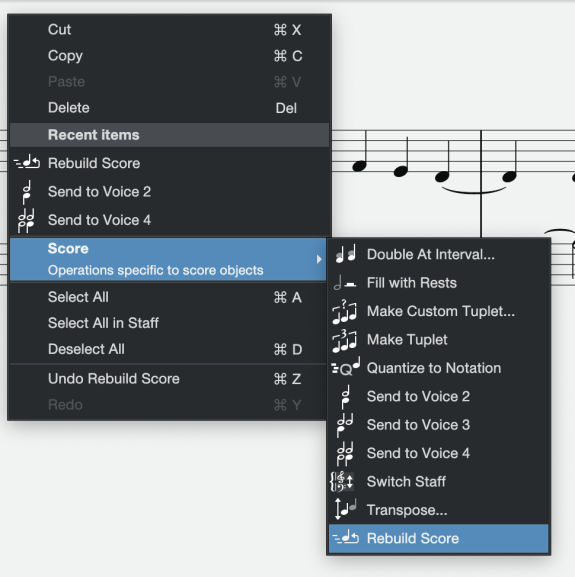
- Score: A submenu of context-senstive score-specific commands:
- Fill with Rests: This option places the appropriate rests in any empty sections of the selected measures, including whole-measure rests, up to the limit set by the time signature. To use it, click-and-drag across the desired areas of the Score and select this option from the Action menu.
To fill the entire Track with any rests that are needed, click anywhere within the staff and use [Ctrl]/[Cmd]+[A] to select the entire Track, then open the contextual menu and select Fill with Rests. If no events are selected, rests of the proper duration are placed in every available location to the left of the cursor, including the measure where the cursor is placed. - Rebuild Score: This option re-creates the complete representation of the track in focus from the note events of the parts on the track. This is particularly useful for drum tracks, in order to automatically assign instrument voices.
- Fill with Rests: This option places the appropriate rests in any empty sections of the selected measures, including whole-measure rests, up to the limit set by the time signature. To use it, click-and-drag across the desired areas of the Score and select this option from the Action menu.
- Undo/Redo: This option will undo and re-do the most recent action.
The Note Menus
After selecting one or more notes, [Right]/[Ctrl]-click to open the contextual menu. The full menu includes the Tuplet options, when appropriate; otherwise a smaller menu is shown.
- Cut/Copy/Paste/Delete: These perform the same function as the computer keyboard actions.
- Recent items: Choose from a short list of recently-performed commands, good for quickening repetitive tasks
Score: A submenu of context-sensitive score-specific commands:
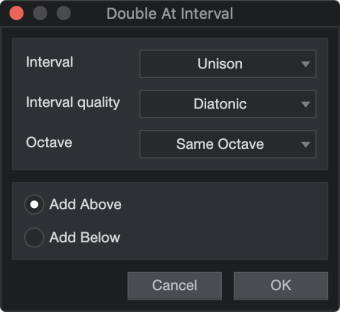
Double at Interval: Doubles the current selection of notes at a specific interval either above or below the existing notes using the following modifiers:
Interval: Use this option to select unison, second, third, fourth, fifth, sixth, seventh, or octave.
Interval quality: Use this option to select Diatonic, Minor, Major, Perfect, Diminished, or Augmented.
Octave: Use this option to select the Same Octave or one to three octaves above.
Add Above or Below: Use this option to add intervals above or below the existing notes.
- Fill with Rests: This option places the appropriate rests in any empty sections of the selected measures, including whole-measure rests, up to the limit set by the time signature. See the description in the Staff Menu section above for more details.
- Make Tuplet/Custom Tuplet...: These options appear when notes or chords from different positions within the same measure and staff are selected. See their descriptions in the Action Menu section.
- Quantize to Notation: This action quantizes Note Events to precisely match the note values and rests displayed in the score view.
- Send to Voice 2/3/4: This action will assign selected Notes to the Voices of your choice.
- Switch Staff: This action is only available when the Grand staff is used. It allows you to switch a note from the upper staff to the lower staff, or vice versa.
- Transpose: Use this to transpose the selected notes up or down after you specify the Interval, Interval quality, and Octave range of the transposition. These options are similar to those described in the Transposing Notes section. They can force notes or chords to conform to the key (Diatonic), allow them to maintain the same interval relationships, or follow a number of other permutations, all while transposing up or down in specified intervals by as much as three octaves.
- Rebuild Score: This option re-creates the complete representation of the track in focus from the note events of the parts on the track. This is particularly useful for drum tracks, in order to automatically assign instrument voices.
- Select All/All in Staff/All on Tracks: See descriptions in the Staff Menu section above for more details.
- Deselect All: Use this option to deselect every item that is currently selected.
- Undo/Redo: This option will undo and re-do the most recent action.
Multitrack Score Editing
It is possible to view and edit the staves for many Instrument Tracks simultaneously. The quickest way to do this is to open the Track List by clicking its icon in the upper left corner of the Note Editor's Inspector panel. In this list you can show or hide the staves of each Track in the Score using the Show/Hide buttons to the left of the Track name. It is possible to click-and-drag through many buttons and add their Tracks to the Score view very quickly.
When the staves for multiple instruments are displayed you can duplicate or move notes from one staff to another using standard key commands for Cut, Copy, and Paste. These options are also available in the [Right]/[Ctrl]-click contextual menu.
When a Select All action is performed with [Ctrl]/[Cmd]+[A], only the notes in the current staff are selected (both staves when the Grand staff is used). To select all of the staves that are visible in the Score, use [Right]/[Ctrl]-click inside the Score and choose Select All on Tracks from the contextual menu.
To select a specific staff within the Score when multiple staves are visible, click on a note or an empty space within the staff you want to edit. The vertical blue cursor will appear at that location.
To view only one staff and close the others, double-click on an arrangement event inside that staff.
Song / Album / Composer Information
If you would like the Score to display and print the Title, Album, and Songwriter/Composer for the Song, press [Ctrl]/[Cmd]+[.] or navigate to Song/Song Setup/Meta Information to open the Song Setup window, and then enter this information in the appropriate fields. Note that it can only be seen and printed from the Full Score and Single Track page layouts, not the Continuous layout.
If this information is already present at the top of the Score and you would like to change it, simply click one of those fields to open the Song Setup window. Enter the desired information and click OK to close the window. The new information now appears at the top of the Score.
For more on this topic, see the Song Meta-Information section.