Arrange View Mouse Tools
The mouse tools allow direct interaction with Events, using the mouse. It is helpful to remember that the mouse tool actions can be undone at any time, so feel free to explore them. [Right]/[Ctrl]-click in any open space in the Arrange or Edit views to open a list of mouse tools and editing commands. Use the left mouse button to make a selection. You can also click the middle mouse button or the scroll wheel in the open space to display an expanded list of tools, including all of the Paint tool shapes.

In the Arrange view, the following mouse tools and related functions are available from left to right in the toolbar.
Link Button
The bracket-shaped button on the left side of the toolbar is the Link button. Click it to combine the Arrow and Range tools. When it is engaged, the mouse operates as Range tool in the area above the horizontal center line of the Event, whereas the Arrow tool is available in the area below the center line. This combination of tools is available at track heights of Normal or higher.
Arrow Tool
This tool is selected by default. Click on the Arrow tool button or press [1] on the keyboard to select the Arrow tool. The Arrow tool can be used for the following purposes:
Move an Event
To move an Event using the Arrow tool, click anywhere on the Event and drag left, right, up, or down. Dragging the Event left or right moves the Event backward and forward in time, relative to the current Timebase and Timeline zoom. When dragging an Event left or right beyond the viewable arrangement, hold [Space Bar] on the keyboard to speed up the scrolling.
Dragging the Event up or down moves the Event to another existing Track of the same type. If the Event is dragged to a position where no Track currently exists, Studio One Pro creates a new Track of the same type.
When dragging an Event from one Track to another (up or down), the position of the Event is constrained within an automatic snapping range to make it easy to keep the Event at the same time position. To defeat this snapping, hold Shift while dragging the Event up or down.
Size an Event
Events can be thought of as windows into audio files and musical performances, where what you see is what you hear. Sizing is a fundamental technique wherein Events are made shorter or longer, so that only a portion of the audio or note data they contain is seen and heard. To size any Event using the Arrow tool, float the mouse to the left or right edge of the Event to reveal the Sizing tool. When this tool appears, click-and-drag left or right to size the Event. Events can be sized and resized nondestructively any number of times.
Two adjacent Events can be sized simultaneously so that no gap is created between them. To do this, float the Arrow tool to the bottom of where the two Events meet in the Timeline, where you can see the sizing icon with both left and right arrows illuminated, and then click-and-drag left or right.
Holding [Alt]/[Option] on the keyboard and then sizing an Event from the right edge results in the Event being freely timestretched. Refer to the Timestretching section of this chapter for more information.
Adjust Audio Event Volume Envelopes
All Audio Events feature a basic volume envelope that allows the volume of the audio to be shaped in several ways. Using the volume envelope, you can create a fade-in and fade-out, as well as set a constant volume level between the fades. The volume envelope applies gain changes to the audio clip in the Event and is therefore at the front end of the audio signal path.

To create a fade-in or fade-out, click-and-drag left or right on the Fade Flag in the upper left or right corner of an Audio Event. By default, a linear fade is created over the length you have moved the Fade Flag. Fade times, as well as Event gain, can also be edited in the Inspector for any selected Event.
To change the curve of the fade, click on the Fade Curve box in the middle of the fade curve and drag up or down. The fade curve determines how quickly or slowly the fade occurs and changes over time. If you press and hold [Shift] while editing the fade length or the curve, you can edit both at once. Dragging up or down edits the curve, and dragging left or right changes the length.
It is also possible to drag a complete crossfade left or right, or up or down, in order to change the location and characteristics of the fade. Float the mouse to the center of the crossfade until the Hand icon appears, then click and drag to adjust. Dragging left or right adjusts the location of the fade, extending or shortening the crossfaded Events. Dragging up or down alters the shape of the crossfade.
To adjust the overall volume level of an Audio Event, click on the volume box in the center of the volume envelope and drag up or down. As you adjust the volume envelope, the audio waveform is redrawn to approximate the effect of the adjustment.
You can also create complex envelopes anywhere inside an Audio Event using Clip Gain Envelopes.
Select Multiple Events
Multiple Events can be selected in order to edit them all at once, with a single action. To select multiple Events with the Arrow tool, do one of the following:
- Click outside of the range of an Event, and then drag over any other Events; a gray box is drawn while you drag over the target-selection area. Release the mouse button once the box is drawn over all of the Events you wish to edit, and these Events are selected for editing.
- Click on any Event, then while holding [Shift] on the keyboard, click on any other Events to select them. This allows you to select multiple Events that are not in close proximity to each other. All selected Events can then be edited at once.
- Click on any Event, then press [Alt]/[Option]+[Shift]+[Home] or navigate to Edit/Select/Select from Start to Event, to select all Events on all Tracks that lie between the start of the Song and the current Event.
- To select all Events on the currently selected Track that lie between the start of the Song and the current Event, press [Shift]+[Home].
- Click on any Event, then press [Alt]/[Option]+[Shift]+[End] or navigate to Edit/Select/Select from Event to End, to select all Events on all Tracks that lie between the current Event and the end of the Song.
- To select all Events on the currently selected Track that lie between the current Event and the end of the Song, press [Shift]+[End].
- Double-click on the timeline of a Track in the Arrange or Edit view while holding [Shift], to select all Events present on that Track.
Normally, when you select multiple Events and adjust volume or fade in/out shape on one of them, all selected Events change to match the new setting. If you want to adjust an individual Event without losing your selection, hold [Alt] while making your changes.
Select a Range
Like the Range tool, you can use the Arrow tool to select a range, or area, within Tracks and their contents, without switching tools. Do this by hovering the Arrow tool in the upper half of a track. The cursor changes to a crosshair shape. Click-and-drag to select your chosen range.

You can enable or disable this feature by clicking the Link button to the left of the Arrow tool in the toolbar.
Alternate Arrow Tool Uses
For speed and efficiency when editing, a selection of modifier keys can be applied while the Arrow tool is selected, giving temporary access to the following alternate tools and editing modes:
- Alternative Tool: Hold [Ctrl]/[Cmd].
- Slip Editing: Hold [Ctrl]/[Cmd]+[Alt] while floating the Arrow tool over an Event.
- Define Tempo: Hold [Ctrl]/[Cmd]+[Alt]/[Option] while floating the Arrow tool over the edge of an Event.
Alternative Tool
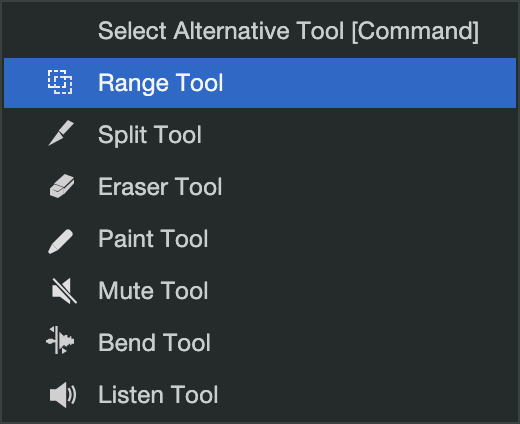
The Alternative Tool feature allows you to quickly access an alternate tool of your choice when using the Arrow tool by holding [Ctrl]/[Cmd]. The Range, Split, Eraser, Paint, Mute, Bend, and Listen tools can all be used in this way.
You can choose your Alternative Tool from the drop-down menu beneath the Arrow Tool, or by repeatedly pressing the [1] key on your keyboard to cycle through the options. The currently-active Alternative Tool is highlighted with a blue underline in the Tools list.
Range Tool
The Range tool is used to select a range, or area, within Events. Click on the Range tool button or press [number 2] on the keyboard to select the Range tool.
To select a range within an Event, using the Range tool, click-and-drag over the area to be selected; a gray box is drawn over the target selection area. Release the mouse button when the box is drawn over the range of the Events you wish to select. The range you have selected is now treated as a single, consolidated Event. Clicking once with the Range tool on a Track moves the play cursor to that location.
For instance, you can use the Range tool to select the content of several Audio Events across multiple Tracks in bar 12, and then use the Arrow tool to move that section of audio to bar 14. Another common use of the Range tool is to quickly select and delete a range of audio within an Event, rather than using the Split tool to make two splits, then select and delete the section with the Arrow tool.
When you float the mouse cursor over a selected range, the Arrow tool temporarily appears. This makes it easy to quickly select and edit a range of Events.
To select multiple, non-contiguous ranges across any Event, on any Track, hold the [Shift] key while using the Range tool. Continue to hold [Shift] and use the Arrow tool to select whole Events. For instance, when using the Arrow tool, if you press and hold [Ctrl], you get the Range tool. Press and hold [Ctrl] and [Shift] to select multiple ranges, then continue to hold [Shift] but release [Ctrl]; now you have the Arrow tool and can select whole Events. All of your selections remain selected.
To split an event in half without reaching for the Split tool, double-click at your chosen split point. Double-click a selected range to split the Events in that range at the left and right borders of the range.
If Snap to Grid is enabled, your selections using the Range tool snap to the value set by the Snap Timebase parameter. To temporarily reverse the Snap to Grid option while editing, hold the [Shift] key.
Selected ranges can be sized by floating the Range tool at the left/right edge of the selection. You also can split a selected range at the left and right edges of the selection by choosing Split Range from the Edit menu or by pressing [Ctrl]/[Cmd]+[Alt]+X after selecting a Range.
To temporarily switch to the Arrow tool while the Range tool is selected, hold [Alt].
Split Tool
Using the Split tool, single Events can be split into multiple Events. Click on the Split Tool button, or press [number 3] on the keyboard to select the Split tool.
With the Split tool selected, a vertical and horizontal line is drawn near the current mouse-cursor position. The vertical line indicates the exact time position of the Split tool, while the horizontal line underscores the Track on which the Event to be split resides. The Split tool is directly affected by the current Snap settings.
Click on any Event with the Split tool to split the Event at that position. By splitting a single Event, you create two Events that can be edited independently. If multiple Events are selected across multiple Tracks, the Split tool affects all of the selected Events in the same way.
It is also possible to split selected Events at the timeline cursor, without using the Split tool, by pressing [Alt]+[X] on the keyboard. If you have a range of time selected, pressing [Alt]+[X] will split the selected content into a new Event.
To temporarily switch to the Arrow tool while the Split tool is selected, hold [Alt].
Splitting Instrument Parts
Normally, if you split an Instrument Part at a point that falls within one or more notes, those notes are truncated at the split point, and no longer play in the newly created Part to the right of the split point. This can be an issue, especially when splitting up Parts in which some notes are held for long periods, such as pad and string passages.
For example, if you have a four-bar Part in which a chord is played and held throughout, splitting the Part in the middle leaves the Part to the left of the split point mostly untouched. However, the held notes are now missing from the newly created Part to the right of the split point.
To split an Instrument Part and split (rather than truncate) any notes that cross the split point, hold [Alt]/[Opt] while you make the split.
Eraser Tool
The Eraser tool is used to delete Events. Click on the Eraser Tool button or press [number 4] on the keyboard to select the Eraser tool. To delete any Event using the Eraser tool, simply click on the Event. If multiple Events are currently selected, clicking one of the Events with the Erase tool erases all selected Events.
You can click and drag across multiple Events with the Eraser tool, erasing each Event you touch.
To temporarily switch to the Arrow tool while the Eraser tool is selected, hold [Alt].
Paint Tool
In the Arrange view, the Paint tool can be used in two ways: to create an empty Instrument Part on an Instrument Track, or to create a complex Gain Envelope for an Audio Event. Click the Paint Tool button or press [number 5] on the keyboard to select the Paint tool.
Create an Instrument Part
To create a new, empty Instrument Part on an Instrument Track with the Paint tool, click-and-drag over any empty area in the Track lane of the Instrument Track. Clicking once with the Paint tool creates an empty Instrument Part that varies in length according to the current timebase setting.
Create a Gain Envelope
To view, create, or edit a Gain Envelope, [Right]/[Ctrl]-click an Audio Event and enable the Gain Envelope box. The white line that appears inside the Audio Event represents the current Gain Envelope. If a Gain Envelope does not already exist, you'll see a white horizontal line running through the zero point of the waveform.
When using the Arrow tool you must click somewhere on that white line to add a Gain Envelope point. Note that the gain of the entire Audio Event can be raised or lowered after adding the first point: simply click-and-drag that point up or down to adjust the gain of the Audio Event. When more points exist, the click-and-drag method affects only part of the Audio Event, not the whole thing.
The Paint tool lets you click-and-drag anywhere inside the Audio Event to add new points. The menu arrow under the Paint tool icon reveals the list of Paint tool shapes: Freehand, Line, Parabola, Square, Triangle, Saw, Sine, and Transform. Select one of the shapes and experiment with it by click-dragging across the Audio Event. You can always undo those actions.
To bypass a Gain Envelope (i.e., disable it without deleting it), [Right]/[Ctrl]-click the Audio Event and activate the Bypass button. For more details, see the Clip Gain Envelopes section.
Mute Tool
In the Arrange view, the Mute tool is used to mute Audio Events, Audio Parts, and Instrument Parts. Click on the Mute Tool button or press [number 6] on the keyboard to select the Mute tool. To mute or unmute any Audio Event or Instrument Part, simply click on it with the Mute tool. When an Event or Part is muted, it appears grayed out, and an “m” icon appears in the lower left corner of the Event or Part.
Click and drag the Mute tool to select multiple Events to mute. If multiple Events are already selected, clicking one of them with the Mute tool mutes all selected Events.
To temporarily switch to the Arrow tool while the Mute tool is selected, hold [Alt].
Select Muted Events
Sometimes, you may use Event muting to silence superfluous Audio or Instrument content that you don't intend to use. If you decide you want to get rid of these unused Events, you can quickly select all muted Events by navigating to Edit/Select/Select Muted Events, then simply press [Backspace] or [Delete] to delete (and clear away) the unwanted Events.
Bend Tool
In the Arrange view, the Bend tool is used to manipulate, add, and remove Bend Markers. For more information on Bend Markers, refer to the Transient Detection and Editing section of this chapter.
Listen Tool
In the Arrange view, click and hold on any Track to instantly solo the Track and start playback from the position you clicked. Playback continues as long as the mouse click is held. When the mouse click is released, playback is stopped, and the related Track is un-soloed.
For more information about the paint tool, see the Editing Automation Envelopes page.